Anyone replace the bath vent fan?

davebennington

Senior Member
The NAPA part number I used is HC6050, but I believe that Eric's mod would be better because you have a range of speeds vs just 3.

dave
 
Last edited:

lduguay

Past North Carolina Chapter Leader
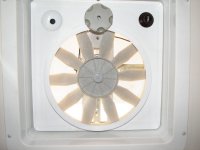
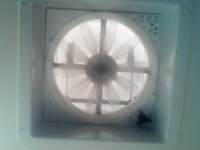
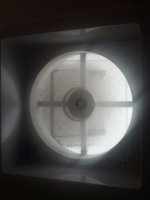
I also replaced the OEM bathroom fan with the Heng Vortex fan. I also added a rheostat switch I bought from an auto parts store for about $12. Now have variable speed. Did it slightly different than davebennington, I kept the original push button switch, and added the rheostat switch on the opposite side. Just drilled a hole, inserted switch but added some plastic support (epoxied) on the mounting side so the rheostat could be fastened (see picture) and therefor not turn when adjusting the fan speed. This way I still have one switch to turn fan On/Off, and can then adjust speed with rheostat according to conditions and needs:eek:. Sorry you have to look at picture sideways, just glad I could upload it;).

Hey Eric, can you post a pic of the installed mod?

Thanks to both you & Dave!!
 

ChopperBill

Well-known member
I think the Landmark guys have wall switches for their fan which make changing out the switch a simple job. Ours is still the push button deal in the fan.
 

pegmikef

Well-known member
Yeah on mine, there's a pushbutton on the vortex fan and a wall switch, It never occurred to me to change the wall switch. Thanks for the tip. Mike
 

cookie

Administrator
Staff member
Sometime this year we are going with a 2nd A/C for the BR. At that point I am going to install the Fantastic Vent from the BR to the Stool room. I just hope I can pull the wires through the roof to rehook up the thermostat.
Yes I did change the fan in the bath in our last rig. I did just what Bob is proposing, only I didn't use the t-stat. I just installed an on/off switch.
The hard part was removing all the old caulk.

Peace
Dave
 

2psnapod2

Texas-South Chapter Leaders-Retired
I replaced mine with a Maxx Air Fan. It has a remote and a rain hood too. I am very glad I spent the money on it. It was kinda expensive but I feel its worth it.
 

Flying Dutchman

Virginia Chapter Leaders - Retired
Here is a photo of my installed Heng Vortex fan where I added a rheostat to be able to adjust the fan speed. I still use the OEM push button On/Off switch, and adjust the fan speed higher if needed (I keep it normally on the lowest speed). Looking at the image, the OEM On/Off switch is on the left, and the added rheostat on the right.
The fan is very efficient even at the low speed, and it does reduce the sound level somewhat.
I have seen that there is now a Vortex II Vent Fan upgrade available from Camping world that has 3 forward speeds and 2 reverse speeds. It is on sale now for $116.99 (regularly $156.99). I was able to get the original Vortex fan on sale, and with the added rheostat switch ($12) my total cost was less than $63. Since I only want exhaust mode in the bathroom I wont miss the reverse speed:p.
 

Attachments

  • IMG_0005.jpg
    IMG_0005.jpg
    105.7 KB · Views: 60

hepcat

Member
I just installed a fantastic fan in the main vent in my 184. I actually bought it five or six years ago to put into a different trailer and I just never got 'round to doing it. The mpg seemed to be the perfect place for it. Properly installed and caulked, you won't have any leaks. Although the instructions call for silicone caulk, and all of the manufacturers use silicone caulk, I'd recommend a butyl caulk instead. Fantastic includes a gasket that seals really well. I've installed several of these over the years and never had a leak. With the 184, the only mod was that I had to drill a 1/4" hole for the width of the frame through the plywood roof sheathing to get the power wires run above the aluminum frame member to get to the nearest ceiling light for power.

I used the trailer for the first time this week in 90* temps and I was REALLY pleased with the install. BTW, the entire install only took about an hour. I am really puzzled about why this wasn't a factory standard feature.
 

JohnDar

Prolifically Gabby Member
Here is a photo of my installed Heng Vortex fan where I added a rheostat to be able to adjust the fan speed. I still use the OEM push button On/Off switch, and adjust the fan speed higher if needed (I keep it normally on the lowest speed). Looking at the image, the OEM On/Off switch is on the left, and the added rheostat on the right.
The fan is very efficient even at the low speed, and it does reduce the sound level somewhat.
I have seen that there is now a Vortex II Vent Fan upgrade available from Camping world that has 3 forward speeds and 2 reverse speeds. It is on sale now for $116.99 (regularly $156.99). I was able to get the original Vortex fan on sale, and with the added rheostat switch ($12) my total cost was less than $63. Since I only want exhaust mode in the bathroom I wont miss the reverse speed:p.

Hmmm. I've been putting off replacing the OEM fan in the bathroom, but I can envision pulling it out, moving the single speed Heng Vortex I put in the bedroom into the bath and installing a Vortex II in the bedroom. While in the bathroom, I could drop a switch down next to the toilet so I can turn it on...after getting comfy. That, or put a long stick next to the toilet.
 

GOTTOYS

Well-known member
Here is a photo of my installed Heng Vortex fan where I added a rheostat to be able to adjust the fan speed. I still use the OEM push button On/Off switch, and adjust the fan speed higher if needed (I keep it normally on the lowest speed). Looking at the image, the OEM On/Off switch is on the left, and the added rheostat on the right.
The fan is very efficient even at the low speed, and it does reduce the sound level somewhat.
I have seen that there is now a Vortex II Vent Fan upgrade available from Camping world that has 3 forward speeds and 2 reverse speeds. It is on sale now for $116.99 (regularly $156.99). I was able to get the original Vortex fan on sale, and with the added rheostat switch ($12) my total cost was less than $63. Since I only want exhaust mode in the bathroom I wont miss the reverse speed:p.
Easy enough to add a reversing switch also. Add a DPDT toggle switch which is available for around 5-6 bucks and you can have it all..I found instructions online showing how to wire it up..Don
 

2psnapod2

Texas-South Chapter Leaders-Retired
My Max Air has reverse and a wireless remote!

Sent from my DROID BIONIC using Tapatalk 2
 

Attachments

  • uploadfromtaptalk1342368978700.jpg
    uploadfromtaptalk1342368978700.jpg
    14.3 KB · Views: 32
  • uploadfromtaptalk1342369010661.jpg
    uploadfromtaptalk1342369010661.jpg
    14.6 KB · Views: 29
  • uploadfromtaptalk1342369044482.jpg
    uploadfromtaptalk1342369044482.jpg
    20.9 KB · Views: 27

DW_Gray

Well-known member
I replaced my bathroom fan last May with the Fan-Tastic Vent Create-A-Breeze 3-Speed Manual Crank (model 8000). Fantastic provides a how-to video online. It wasn't difficult at all. The only delay was the fan garnish was not deep enough. After a call to Fan-Tastic and they sent a replacement, free.

I also installed a Camco 40431 White RV Roof Vent Cover as well. I decided to remove the fan unit's cover, eliminating the need to open and close it.

Fan-Tastic Vent 8000 ABS LID Vent Create-A-Breeze 3-Speed Manual Crank ABS White Lid

Camco 40431 White RV Roof Vent Cover
 

rick_debbie_gallant

Well-known member
Yes I did change the fan in the bath in our last rig. I did just what Bob is proposing, only I didn't use the t-stat. I just installed an on/off switch.
The hard part was removing all the old caulk.

Peace
Dave

I cant remember the name of it but there is a caulk remover out there. It will even remove 5200. When I find my can I WILL POSST. (dang puter, where is my white out) I will post.
 

RollingHome

Well-known member
July 15, 2012
How I removed my front bedroom vent fan to install an AC unit.
DO NOT attempt this yourself. Only allow certified, master certified RV service technicians or Heartland “Craftspeople” to work on your recreational vehicle. This post is NOT intended for others to do their own RV work. Its intention is solely informational and educational. Please consult a RV professional as described above.
01). I first removed 4 screws that held the trim in place inside the BR. This exposed the DICOR roof membrane flaps. The DICOR roof membrane is about the gauge of a pool liner. It is tough and rubbery. This membrane is very easy seen once the 4 screws are removed. I had done this prior to buying the AC unit to make sure the wires were installed by the HL electricians. The roof membrane was X cut to install the (14 ½” x 14 ½” approximately) vent fan by HL “Craftspeople”. When I purchased my 5[SUP]th[/SUP] Wheel I opted (and paid extra$$$) to have HL electricians install the wires for a front AC unit. HL electricians installed a 12/2 Romex power cable, a white 4 conductor T-Stat wire and a brown 7 conductor accessory wire. These are seen in photo # 1 below. My AC install will be easy because I paid the extra $$$ for this wire option ;
# 1 Remove 4 screws.JPG
02). I then went onto the roof and removed the fan & housing. I first scraped the DICOR sealant off the screw heads (they were easy to spot) and removed the screws, see photo’s # 2 & # 3. I took an empty paper bag to the roof so I had a place to dump the still sticky DICOR sealant, otherwise it would have stuck to any place it landed. ;
# 3 Scraping 1 screw.JPG

# 2 Tools needed.JPG

03). After pushing a putty knife and floor chisel under the fan flange I carefully pried it up & off. I had to be careful not to drive the tools through the DICOR membrane roof, it was not a problem for me. Next I disconnected the 2 wire nuts (these were still energized with 12 VDC (positive & negative) so I was careful not to short them). I recapped the wire ends and left them hang down into the BR. I then sat the fan aside.
# 4 Fan Off.JPG
04). Next I had to scrape the DICOR sealant off the DICOR membrane so I had a smooth mating surface for the AC foam gasket. With Patti’s help this took about an hour – we were thorough and careful not to damage the DICOR membrane.
# 5 Scrape the goop.JPG# 6 Clean opening.JPG

05). When we were done we had a nice clean and prepared hole just the size we needed. Now we could put an AC unit or Fan Tastic, Vortex or, or… our choice was the AC unit. This took us about 2+ hours to complete… In a future post I will show our progress on the AC install. Remember, don’t try this yourself, and leave it to the pros to give you their very best…
Happy RVing.
 

porthole

Retired
I also installed a Camco 40431 White RV Roof Vent Cover as well. I decided to remove the fan unit's cover, eliminating the need to open and close it.

Dave, when my trailer was brand new sitting on the delaers lot in Elkhart I installed one of those covers on the bathroom vent.

Rock and roll T-storm came through while I was out and about and I had a wet floor when I came back.
I think removing the vent's cover could cause you some grief.
Besides, how are you going to keep the heat in later in the year?
 

porthole

Retired
I cant remember the name of it but there is a caulk remover out there. It will even remove 5200. When I find my can I WILL POSST. (dang puter, where is my white out) I will post.

The 5200 remover is made for 5200. I haven't tied it yet, but anything strong enough to remove 5200 i would be careful with.
 

DW_Gray

Well-known member
Rock and roll T-storm came through while I was out and about and I had a wet floor when I came back.
I think removing the vent's cover could cause you some grief.
Besides, how are you going to keep the heat in later in the year?

Duane, as for the T-strom, I'll keep that in mind. All the reviews I read stated rain never came in. Time will tell.
As for winter, very simple, I'll stuff a Thermal Reversible Vent Insulator in there. I use those in all the vents during winter.
 

porthole

Retired
Dave I only had water in twice, once with the t-storm and once after I had put the FF in. After the T-storm I left it closed when we were not in the trialer.

When I did the FF I removed the rear screen from the cover, so that left it open. One night I had turned off the power to the FF instead of raising the thermostat to stop the fan. Without power the automatic rain sensor feature wasn't so automatic.
 
Top