Basement wall question

ORV1980

Sherman
I want to make the walls in my basement quick and easy to remove and reinstall. I plan on cutting the panels into smaller sections but have not figured out a good method for fastening the panels without using screws.
Any suggestions?

If this is not the right category for this question, let me know. It was the only one that mentioned walls.
Thanks,
Sherman
 

LBR

Well-known member
I didn't do anything to our 3 CY back basement walls except leave all the screws out. I have "stuff" stacked against them to hold them in place. When access is needed, the "stuff" needs to be unloaded/shifted out of the way anyway, then the panels are easily removed.
 

mlpeloquin

Well-known member
Some have cut one section of wall shorter in height and added a channel, formed out of wood or aluminum angle, on top and bottom. The upper channel must have taller sides. The wall lifts up onto the top slot so the bottom clears the bottom channel and slides in. The height of the wall is such that the top will not clear the top channel when the bottom is inserted. Then add door handles to the wall for easy lifting.
 

jmarnell

Well-known member
I just took my basement wall out to check the TV cable lines. Thinking of using velcro strips where the screws were. Not sure if they will hold but going to give it a try.
 

JohnDar

Prolifically Gabby Member
I made removable panels cut into the wall sections so I could access the back of the UDC, the water pump, and where I remounted the converter and surge suppressor. Really not a lot of storage behind the walls with all the wiring and plumbing back there. If I really needed to get in there, I can still remove the entire wall.
By removing the one by the UDC, I can periodically inspect for any plumbing leaks.


Sent from my iPhone using Tapatalk
 

Flick

Well-known member
I made removable panels cut into the wall sections so I could access the back of the UDC, the water pump, and where I remounted the converter and surge suppressor. Really not a lot of storage behind the walls with all the wiring and plumbing back there. If I really needed to get in there, I can still remove the entire wall.
By removing the one by the UDC, I can periodically inspect for any plumbing leaks.


Sent from my iPhone using Tapatalk

A while back on 5-3-20, I had posted that I had modified my basement wall by making it a sliding door. Works great and allows me a sturdy, very accessible access to the mechanical equipment. Has rails and has a catch when lifted up, allows you to slide out and remove if want.
Someone moved that post to Exterior Accessed or whatever that is and it was well hid. No one visited so I guessed no one thought it was a good idea. Win a few and lose more. Lol.
One of my comments in that post was that I thought rv manufacturers should consider making that area easy to access from the factory. You should be able to get into that area in a heartbeat if necessary.
 

Garypowell

Well-known member
I removed all but the section of wall that has plug, etc. in it immediately to the left of the basement door on the doorside. But I moved it back since I had better organized what was behind it. I screwed 2 by 2’s on the floor and ceiling to form the new wall since I had moved stuff back the wall was placed to give me more basement room.

I then cut pieces of while cloroplast to fit and used Velcro to attach it. Bought some while corner molding and attached that where needed.

it has held up for 8 years and removes easily.
 
Last edited by a moderator:

jbeletti

Well-known member
I want to make the walls in my basement quick and easy to remove and reinstall. I plan on cutting the panels into smaller sections but have not figured out a good method for fastening the panels without using screws.
Any suggestions?

If this is not the right category for this question, let me know. It was the only one that mentioned walls.
Thanks,
Sherman

Hi Sherman - great to hear from you.

On my Newport, for the wall in front of the UDC/Water Heater etc., I removed the walls, then I cut 2x2 lumber and screwed it to the ceiling and floor. I then stapled pieces if Velcro to the 2x2s and pushed the walls onto it. The carpeting on the walls wraps to the back side and he Velcro sticks to that carpet.

I also made custom wall sections as I had reconfigured the space behind the walls to open more storage space up. Have fun with it.
 

Gaffer

Well-known member
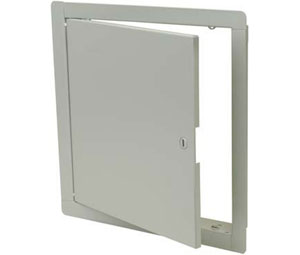
I think this is an easy way to accomplish what you need to do.
https://absupply.net/wb-basic-300-24x24-series-access-door-24x24.aspx

wb-300-lg.jpg
 

ORV1980

Sherman
Wow, before I went to bed last night I posted my question. I expected a couple answers in a week or so. I was very happy to see several responses this morning.
Thank you all so much for your input. After I study the links and the various ideas I will probably have more questions, then use a combination of procedures.
Jim, since we have the twin sister (brother) to your Newport I might have some questions specific to our model. Part of this project will be moving the leveling control panel.
Thanks again everybody for your helpful advice. Ya all are great!
Sherman
 

jbeletti

Well-known member
Wow, before I went to bed last night I posted my question. I expected a couple answers in a week or so. I was very happy to see several responses this morning.
Thank you all so much for your input. After I study the links and the various ideas I will probably have more questions, then use a combination of procedures.
Jim, since we have the twin sister (brother) to your Newport I might have some questions specific to our model. Part of this project will be moving the leveling control panel.
Thanks again everybody for your helpful advice. Ya all are great!
Sherman

Sherman - you have my number. Call me when you want to chat about specifics to the Newport. Also, take a look at all my photo galleries for the Newport from that link. Just go back up on the file path.
 

ORV1980

Sherman
Sherman - if you want to open up some additional storage space, check this out: https://beletti.smugmug.com/RV/2018-Heartland-Landmark-Newport/Storage-Space-Addition/

Jim,
the pictures do help a lot, thank you!
I do have a couple of questions.
1. There is a picture where you drilled a hole and filled it with silicone when you moved the leveling control panel. Was the hole to give space for the connector on the back of the panel?
2. You installed a cover over your Fantastic Fan. When I turn on my fantastic fan it raises the lid to 12”. All the covers I see are only 9” to 10” tall. Can the hight the lid opens be adjusted?
I hope that all makes sense.
Thanks,
Sherman
 

jbeletti

Well-known member
Jim,
the pictures do help a lot, thank you!
I do have a couple of questions.
1. There is a picture where you drilled a hole and filled it with silicone when you moved the leveling control panel. Was the hole to give space for the connector on the back of the panel?
2. You installed a cover over your Fantastic Fan. When I turn on my fantastic fan it raises the lid to 12”. All the covers I see are only 9” to 10” tall. Can the hight the lid opens be adjusted?
I hope that all makes sense.
Thanks,
Sherman

Hi Sherman,

1. The hole I drilled in the door was with a Forstner bit and it was to provide space for the connector on the back of the display as the connector was not flush with the back of the case.
2. I always use the Fantastic UltraBreeze cover. It's made by them for their fan and allows for full opening.
 

ORV1980

Sherman
Just a quick update.
I rebuilt the rear basement wall by doing the following: Cut it into 5 sections, Installed 2"x2"s on the floor and ceiling, Installed Velcro on the 2 bys.
I plan on doing more in this area as i have time, but having the panels easy to remove to get to any section of that area is great.

I have started rebuilding the front wall by removing the wall completely. I am in the process of moving wires and hoses around a bit, and covering holes in the floor. I also have to replace the waste pipe from the toilet because the flange broke and i don't like the repair flange.
After all that i will build some shelving, just not as fancy as Jim's because all i have for a saw is a saber saw.
I will post some pictures when it is done if anyone is interested.
Thanks, Sherman
 

jbeletti

Well-known member
Just a quick update.
I rebuilt the rear basement wall by doing the following: Cut it into 5 sections, Installed 2"x2"s on the floor and ceiling, Installed Velcro on the 2 bys.
I plan on doing more in this area as i have time, but having the panels easy to remove to get to any section of that area is great.

I have started rebuilding the front wall by removing the wall completely. I am in the process of moving wires and hoses around a bit, and covering holes in the floor. I also have to replace the waste pipe from the toilet because the flange broke and i don't like the repair flange.
After all that i will build some shelving, just not as fancy as Jim's because all i have for a saw is a saber saw.
I will post some pictures when it is done if anyone is interested.
Thanks, Sherman

Good progress Sherman! Time to get you a circular saw. Harbor Freight if you're on a budget :)
 

ORV1980

Sherman
I have mostly finished the project.
On the front wall I used the panel I removed to build a barrier around two sides of the pipes to protect them from objects sliding around during travel. I left one side open so i could slide items behind there that i do not need to access very often.
This left me an area at each end for more storage.

On one side i put a tool box with drawers to keep all my hand tools. I used to have my hand tools in 4 tool boxes. It would take me longer to find the tool i needed then to do the job.
On the other side i put my small air compressor and hoses.

I installed a couple of LED strip lights that light up the basement pretty well, but want to add some more once i find something i like.

Also i moved the Levelup control panel into the propane compartment. Much easier to see the panel to push the buttons and monitor the Auto Leveling progress.

It was a lot of work, but the extra room made it worth it. Also, it is nice to be able to easily access all equipment and pipes.

Sherman
 

ParkIt

Well-known member
Sherman - if you want to open up some additional storage space, check this out: https://beletti.smugmug.com/RV/2018-Heartland-Landmark-Newport/Storage-Space-Addition/
Impressive, Jim! Going to bookmark since my plumbing and wiring look like a couple of monkey's got drunk and just threw it all over the back of the UDC to the inside steps/kitchen wall.

I have a seeming unusual layout as well, full bathroom with separate WC & Washer/dryer are right between the front bedroom and steps down to the kitchen. Doesn't seem like rocket science to clean up a lot of that considering most run straight into the gray/black water holding tanks and my son is a plumber...he's wanted to clean all that up since I took delivery.

As far as the wall goes - mine had the built in vacuum which was smack in the middle of the storage with the vac tank behind the wall. There was a screw cap on the access side to dump/pull out the contents which would never work and took up way too much space. Luckily there was a slight "V" where the walls met in front of the UDC to about the middle of the front storage area, dangerous in any circumstance.
I removed both walls entirely from the UDC to the other panel (about mid point of front basement) then took out the vacuum. That portion of the wall to entry side was shorter in height but cut 6" off the length to protect the wiring to the main panel using small 'barn locks' vertically on the floor and ceiling, attaching locks on a piece of firring to access all electrical. Not finished yet though the inverter, converter and access to the outlet & cable behind it (the light is on the hitch side wall) will be moved back so there is better access and a lot more room in the front storage with better protection. Flipping the barn locks will be easy to just lift it out entirely and not move around while travelling.

Probably should have taken a picture but it's dark.
 

jbeletti

Well-known member
ParkIt - thanks for the kind words on my project. Many went before me and many more after. Most were better jobs than mine but mine worked for me as I'm sure yours does for you. When you get a chance to take them, share your project pics here.
 
Top