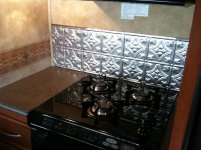
Big Country - Back Splash

Bob Vaughn

Well-known member
My wife is thinking of adding a back splash on the wall behind the kitchen sink and around the stove. I think the wall covering will come off if she does this. What is the recommended way to accomplish this?
 

boatto5er

Founding VA Chap Ldr (Ret)
Search for my backsplash installation thread. I used sheets of thin glass tiles and have had no problems at all.
 
Last edited by a moderator:
Ditto, the wife and I have done ours, and no problems.
It looks great.
A word of caution, please follow the instructions to the letter, saves a lot of cleanup headaches latter.
The Grout is epoxy, not a cement base, works great if you follow the instructions.
I thought I knew more than the Mfg.
Wrong!

Hockster
 
Last edited by a moderator:

Nabo

Southeast Region Director-Retired
Bob - I will take some pictures of what we did to our BC. I bought a backsplash from Home Depot that is a strong plastic but can be cut with scissors or cutting knife. Stay tuned.
 
Last edited:

jejinks

Member
I installed the same product as Nabo (mine came from Lowes). I used 3m glue (spray) direct to wall paper. So far so good.
 

bwc1950

Member
I'm wondering if anyone that modified or installed a new backsplash can talk about how they removed the old backsplash and if they did any damage to the wall? Thanks in advance.
 

TravelTiger

Founding Texas-West Chapter Leaders-Retired
Here's a copy of the backsplash.
View attachment 23417


It looks great!! The only thing with this material, you have to keep heat away from it. Copied from the specs of the product:

High Temperature ResistanceClass A fire rated; do not expose to temperatures over 140°F; keep heat source 3" to 4" away from panel surface

<tbody>
</tbody>


We used real tin. Harder to cut and install, but I know it will resist the heat.

IMG_5466.jpg
 

Nabo

Southeast Region Director-Retired
Erika - you are correct but we have the 3 1/2 to 4" clearance from the back eyes plus the folding lid top to help protect the back-splash. Anything is an improvement from the standard wallpaper jibboard that HL is installing on the units.

Update - went back and remeasured the distance between the back eyes and the wall and it's 10 1/2 inches. Plenty of distance.
 
Last edited:

TravelTiger

Founding Texas-West Chapter Leaders-Retired
Erika - you are correct but we have the 3 1/2 to 4" clearance from the back eyes plus the folding lid top to help protect the back-splash.

Ok, just wanted folks to know. With our stovetop, we felt it would be too close.

We did notice a new backsplash being used in the latest HL models at a recent RV show, it looks more like real tile, and is 3-D. You can actually feel the grout lines.


Sent from my iPhone using Tapatalk
 

Nabo

Southeast Region Director-Retired
Lowes, Home Depot or most other DIY stores have the backsplashes either in the tin or the plastic like we installed.
 

TravelTiger

Founding Texas-West Chapter Leaders-Retired
It's been a while and I can't recall where we got ours, but I think it was here. I got 5 sample patterns, two pieces of each (to fit the space I needed). Once we decided which pattern/color we liked, I cut to size with tin snips, and used liquid nails for metal to glue the pieces together (overlapping slightly) to make the length I needed. In our case, I used command strips to adhere to the wall, but the ends are held in place at the corners with the existing moulding that we removed and re-attached. Then I used clear silicone at the bottom where it meets the countertop, to make sure crumbs and such didn't go under the backsplash. For the top edge, I found some plastic "J" edging at Home Depot that fits on their "fake" tin. Finished it off well.
 
Last edited:
Top