BigHorn 3160EL Interior Step Modification

Gadgetman

Member
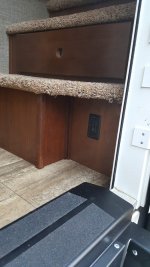
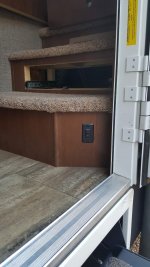
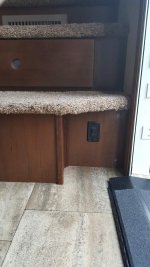
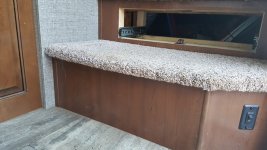
Went to install the Morryde StepAbove in our 2016 BH3160EL and ran into a problem with the interior bottom step (it's in the way to fold up the Morryde steps!).

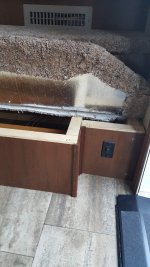
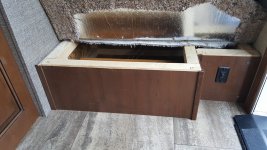
Seems the StepAbove upper part of the frame was hitting the top of the bottom interior step about 2/3's of the way between the angled corner and the hall light switch (see photos).

I pulled the top of the step off and changed the panel with the switch on it, and added a piano hinge to the step itself so it would fold up out of the way to store the Morryde steps.

Came out pretty good if I do say so myself (LOL!)
 

Attachments

  • After1.jpg
    After1.jpg
    81.2 KB · Views: 308
  • Before2.jpg
    Before2.jpg
    83.6 KB · Views: 315
  • After2.jpg
    After2.jpg
    89.7 KB · Views: 296
  • Before1.jpg
    Before1.jpg
    238 KB · Views: 339
  • After3.jpg
    After3.jpg
    99.4 KB · Views: 299

mlpeloquin

Well-known member
Looks good. Don't know if you could add a piece of plywood to the back of that opening in order to make a small storage cubby hole to store small things.
 

Oregon_Camper

Well-known member
In your last picture you show the bottom step off. What did you have to do in order to remove the step (top piece)? I have a squeak in mine, and I'd like to remove that same step to fix it.
 

Gadgetman

Member
In your last picture you show the bottom step off. What did you have to do in order to remove the step (top piece)? I have a squeak in mine, and I'd like to remove that same step to fix it.

Oregon_Camper

Well, after searching with a mirror, I couldn't find any screws going upward so I used a flat pry bar and just muscled it off. There were 4 screws whose heads pulled through the plywood but didn't really damage anything. Removed the carpet, cut a 2" strip off the back edge of the step to add the piano hinge, re-assembled the two step pieces and hinge, then re-carpeted. Screwed the strip down from the top. The screw heads went down into the carpet don't even show.

See the attached photo and you'll see how the framing is done underneath. If your squeak is the top piece you could add a few more screws to snug it up.
 

Attachments

  • After4.jpg
    After4.jpg
    295.5 KB · Views: 149

Oregon_Camper

Well-known member
Oregon_Camper

Well, after searching with a mirror, I couldn't find any screws going upward so I used a flat pry bar and just muscled it off.............

Thanks for the info. Now, if Winter would just go away, I could get my Bighorn out of storage. :(
 
Top