Door Latch and other suggestions

Crossbow

Member
For some reason my Landmark 365 didn't come with any way to secure the outer door when it was open and only the inner screen door is closed. In windy conditions this can be untenable as the outer door is blown back and forth. Please include this simple outside latch fix in new RV's.

I have an Arlington and have lived in it almost a year now. One thing that took an awfully long time to get used to is the switch layout next to the door. It seems to be way to haphazard as to the reason one switch is one place and another is somewhere else. I work in an industrial environment as an engineer and in the oil and gas industry we could never get away with this design. For one, there is no labeling on many of the switches. How do you even know what that switch does or what is it's on or off position? Second, similar function switches should be together. You wouldn't mix lighting with pumps, etc. Some lights switches are on the top, some in the middle, and some are on the bottom with a host of things in between. there doesn't seem to be any sense other than random layout. This makes getting used to what switches are where, a long learning curve.

Also a major problem with RV's that sit for any length of time invites rats to get in and chew on the plumbing. This should be in protected channels are at the very least be of the type that has a braided steel covering over the hose. I bought my Arlington with every amenity possible including a 6.5 kw generator, washer / drier, etc. and had a rat come in a eat a hole in the plastic water tube behind the switching panel which flooded my basement and sagged the liner under the trailer. Paying over 100k for a trailer that then gets a leak doing this kind of damage in the first year is not good.

Next, put a screened drain hole in the bottom liner where water is used in the trailer. This would be under the kitchen area and under the bathroom / sink area. This way if any leaks develop, the water has a place to go instead of pooling and sagging everything down from the weight since it has no where to go. This does not compromise the insulation if you purchase the correct drain. It would also be a good indicator that a leak has happened early on.

Next, Give someone at least the option to purchase high quality carpet. The carpet that comes with the trailer is low fiber counter and low end. My wife and I are an older couple and I sold my house to live in my 5th wheel to simplify our lives and I want her to have the same semblance of quality living as she did in our house. I don't care that it weighs 30 lbs more than the cheaper carpet, I want fine carpet in my $120k trailer.

Next, use real wood trim please; not the paper covered trim that looks like wood. Soon as that junk gets wet it comes off the form and looks terrible. Any part in my trailer this happens to I replace with real wood trim. Also finish out the trim around the top of the shower and in the bedroom around the bed. It makes no sense to have wallpaper meet with wallpaper in a corner and not put in the trim to cover that. It looks odd and incomplete.

Don't get me wrong.. I am not nitpicking. I love the trailer. It has everything we need to live comfortably, it just isn't perfect.
 

jbeletti

Well-known member
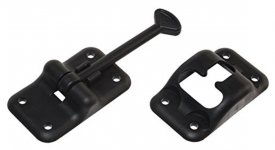
The newer RV exterior doors has what's called a "friction hinge". Like you, I'm not a fan.

I added one of these to my door (Amazon link).
Google ChromeScreenSnapz387.jpg

Be sure to use butyl tape when installing this.
 

Crossbow

Member
The newer RV exterior doors has what's called a "friction hinge". Like you, I'm not a fan.

I added one of these to my door (Amazon link).
View attachment 55721

Be sure to use butyl tape when installing this.

I thought about adding them but how do you know that you aren't going to drill into only fiberglass or into a wire in the wall? If this was installed in the beginning they would know what is behind what and could even add a cross member to screw the latch into. Like you, I think the friction hinge is not very good in windy situations.
 

jbeletti

Well-known member
I thought about adding them but how do you know that you aren't going to drill into only fiberglass or into a wire in the wall? If this was installed in the beginning they would know what is behind what and could even add a cross member to screw the latch into. Like you, I think the friction hinge is not very good in windy situations.

There is no wiring in the door, so you're safe with those 4 screws. For the most part, there generally isn't any wiring inside the side walls. Especially in that sweet spot where you will mount the hook side of that latch. If by chance you hit a stud while trying to screw into the side, just drill a pilot hole.

Don't fail to use some butyl tape when you do this install. I not only mushed the latches onto the butyl, onto the side of the coach and the door, but I wrapped the screw threads in butyl. Did it help? Don't know, but it didn't hurt :) Use a credit card, plastic putty knife, caulking tool or other plastic edge to clean up the butyl that smushes out after you complete the install.
 

Oregon_Camper

Well-known member
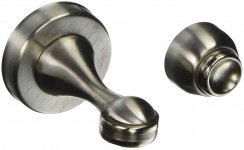
Allow me to provide another solution. The one Jim Beletti is showing you is pretty much the standard for RV's. The problem is you have to go out of your RV to hook/unhook it. In a prior RV we had that type of device to keep the door open, and when our son was younger, he pulled on the door, trying to shut it, not knowing it was "locked" in...Ouch!!

We have moved to using this solution below. The small part attaches to you door and the "arm" is attached to the side of the RV. Then you can swing the door open and it is held open with the strong magnet. You can then open/close the door while inside your RV!! I also have one of these on my baggage door that swing out horizontally. It keeps that door open AND stops the handle from banging on the side of the RV. Win-Win!!

Link to device on Amazon.

71V4awrqg2L._SL1500_.jpg
 

porthole

Retired
I thought about adding them but how do you know that you aren't going to drill into only fiberglass or into a wire in the wall? If this was installed in the beginning they would know what is behind what and could even add a cross member to screw the latch into. Like you, I think the friction hinge is not very good in windy situations.


Use 3M brand body side molding double stick tape. There are several different ratings (pounds) and some versions are indoors only.

I would at least try that before drilling holes if you are uncertain.
 

jbeletti

Well-known member
The item Oregon Camper has shown is becoming more popular with some of our Heartlanders.

Potrhole's idea of using 3M Trim Tape is a great one and I think it would work best with the item Oregon Camper has shown.
 

Crossbow

Member
Allow me to provide another solution. The one Jim Beletti is showing you is pretty much the standard for RV's. The problem is you have to go out of your RV to hook/unhook it. In a prior RV we had that type of device to keep the door open, and when our son was younger, he pulled on the door, trying to shut it, not knowing it was "locked" in...Ouch!!

We have moved to using this solution below. The small part attaches to you door and the "arm" is attached to the side of the RV. Then you can swing the door open and it is held open with the strong magnet. You can then open/close the door while inside your RV!! I also have one of these on my baggage door that swing out horizontally. It keeps that door open AND stops the handle from banging on the side of the RV. Win-Win!!

Link to device on Amazon.

View attachment 55746

Good Idea about the magnet. I think I will try something like this especially since it looks to be stainless and not plastic.
 

Oregon_Camper

Well-known member
Good Idea about the magnet. I think I will try something like this especially since it looks to be stainless and not plastic.

Correct, it is not plastic.

Funny thing is we discovered this from looking at the door in our master bedroom. It has one of these to keep that door open....check yours. You might have one too. That way you can see the look/feel of the latch.
 

mlpeloquin

Well-known member
Allow me to provide another solution. The one Jim Beletti is showing you is pretty much the standard for RV's. The problem is you have to go out of your RV to hook/unhook it. In a prior RV we had that type of device to keep the door open, and when our son was younger, he pulled on the door, trying to shut it, not knowing it was "locked" in...Ouch!!

We have moved to using this solution below. The small part attaches to you door and the "arm" is attached to the side of the RV. Then you can swing the door open and it is held open with the strong magnet. You can then open/close the door while inside your RV!! I also have one of these on my baggage door that swing out horizontally. It keeps that door open AND stops the handle from banging on the side of the RV. Win-Win!!

Link to device on Amazon.

View attachment 55746

3M makes great tape. If you use 3M 94 primer first, it will hold even better.
https://www.amazon.com/3M-Primer-Pi...D=31KbA77KRcL&preST=_SX300_QL70_&dpSrc=detail

It even comes in pen applicators. https://www.amazon.com/s/?ie=UTF8&k...122458:kwd-56789775456&ref=pd_sl_8yc099bx8e_e

3M site - https://www.3m.com/3M/en_US/company...3M-Tape-Primer-94?N=5002385+3293194218&rt=rud
 

Oregon_Camper

Well-known member
The item Oregon Camper has shown is becoming more popular with some of our Heartlanders.

Potrhole's idea of using 3M Trim Tape is a great one and I think it would work best with the item Oregon Camper has shown.

The 3M tape is a good idea, however the magnetic latch I linked above, comes with screws to attach it to your RV. The back plate screws off...you attach the "plate"...then reattach the pieces. I guess you could use the 3M tape and the screws. :)
 

mlpeloquin

Well-known member
If you are worried about wiring behind the wall, get a non contact voltage tester. They don't cost much. You should not have 12VDC behind that wall. Most 12VDC wiring in in the ceiling for the lights. It is sensitive enough that you can fallow the wiring in the wall of your house. It is also great to check the campground ground connection so that "HOT SKIN" is not present.

https://www.homedepot.com/p/Klein-T...gclsrc=aw.ds&dclid=CMD2nvWt89cCFRFnfgoduG0CVw
 

Shortest Straw

Caught In A Mosh
The suggestion Oregon camper gave you will not work in heavy winds. Ask me how I know. It is a good way to keep the door open in calm to slightly breezy conditions, but when the winds gust you need a way to latch the door. Mr. Beletti's suggestion is much more effective.
 

travelin2

Pennsylvania Chapter Leaders-retired
The suggestion Oregon camper gave you will not work in heavy winds. Ask me how I know. It is a good way to keep the door open in calm to slightly breezy conditions, but when the winds gust you need a way to latch it.

X2. Added the magnetic catch right next to the OEM RV catch/hook. Really like it over the standard hook when conditions permit. However there is a limit in windy conditions that eventually will require using the OEM hook or shut the door.


Sent from my iPhone using Tapatalk
 

Oregon_Camper

Well-known member
The suggestion Oregon camper gave you will not work in heavy winds. Ask me how I know. It is a good way to keep the door open in calm to slightly breezy conditions, but when the winds gust you need a way to latch the door. Mr. Beletti's suggestion is much more effective.


Camped with this for 2 years, never once has the door closed due to wind. You must camp in hurricane or tornado zones....
 

Crossbow

Member
Correct, it is not plastic.

Funny thing is we discovered this from looking at the door in our master bedroom. It has one of these to keep that door open....check yours. You might have one too. That way you can see the look/feel of the latch.

In our Landmark 365 Arlington there are only sliding doors on the inside except for the pantry and the washer/dryer door.
 

porthole

Retired
The 3M tape is a good idea, however the magnetic latch I linked above, comes with screws to attach it to your RV. The back plate screws off...you attach the "plate"...then reattach the pieces. I guess you could use the 3M tape and the screws. :)

I have the same catch on our painted steel back door of the house, held on only by 3M tape.

At least using the 3m tape without screws will give you the knowledge if knowing if the magnetic catch will even work. And it is better then drilling holes in the side of your full body paint RV.

For those that tried it and it didn't work, is your door equipped with the 'friction hinge' ?

- - - Updated - - -

If you are worried about wiring behind the wall, get a non contact voltage tester.


Unless things have changed ....the laminated side walls are built at the lamination plant and then shipped to the RV assembly plant. No wiring. The main reason you see all of your outlets and other items on perpendicular walls, false walls and cabinets, above and below the living qtrs.
 
Top