- Home
- Forums
- HEARTLAND RVs GENERAL AREA
- Appliances - For all Heartland brands
- Stove / Cooktop / Range / Propane Ovens
You are using an out of date browser. It may not display this or other websites correctly.
You should upgrade or use an alternative browser.
You should upgrade or use an alternative browser.
Furrion Kitchen Appliances in 2017 models
- Thread starter danemayer
- Start date
danemayer
Well-known member
Manuals and install instructions/diagrams sent!
They have not arrived. I just tested the email address and it's working correctly. Could you check that you sent them to manuals@heartlandowners.org and resend if necessary.
If the files are large, you might have to send them in separate emails as some email systems have size limits.
Thanks,
Dan
LBR
Well-known member
The vent is 24+" wide and 2.5+" deep.Can anyone post pictures of the gas range with oven vent on the back? I'm installing the new oven in my Coachmen and Foreign/LCI makes no mention of a vent. Even though I have seen them in pictures.
Would appreciate any help!

Thanks LBR! It looks like the vent comes with the oven, that's great!
One last question, the installation manual mentions that I need a separate propane line for the oven and the range. I doubt any of the RV manufacturers have done this, but was curious if anyone knows if there are two propane lines ran to their new oven.
You guys have already been a ton of help. My parts are ordered and waiting on delivery. Hopefully I don't have to run an additional propane line up into my slide-out.
Now I need to con the DW to abandon cooking for a bit so I can hack apart her cabinets and countertop.
Hopefully the new oven makes it worthwhile.
LBR
Well-known member
The competition's forum activity is nonexistent.
And sometimes you get more than you ask for here, so the 2 sites kinda balance out... Lmbo.
Bones
Well-known member
Chingo77,Will do, I apologize it's not a Heartland! The competition's forum activity is nonexistent.
I don't think that is a problem. If we can help you we will. Pictures allow people who are visual to better understand your situation. I personally like to see pictures. It is also a good way to document your project for future reference.
Chingo77,
I don't think that is a problem. If we can help you we will. Pictures allow people who are visual to better understand your situation. I personally like to see pictures. It is also a good way to document your project for future reference.
And.... several Heartlanders are considering a retrofit in their units and even though Chingo drank different KoolAid, his process will likely be similar to the process required in a Heartland retrofit.
Bones
Well-known member
FunnyAnd.... several Heartlanders are considering a retrofit in their units and even though Chingo drank different KoolAid, his process will likely be similar to the process required in a Heartland retrofit.
")
Bob Vaughn
Well-known member
Most auto parts stores sell tiny grommets like these. You may have to ask the clerk because small as they are they tend to grow legs and walk out the door.....Have any of the small rubber grommets failed yet? I remember having to replace them on the Atwood and other brands when I had them in other coaches. I saw these smaller grommets on the Furrion and was hopeful the fitment was tight enough for them to say put when removing the grates and not tear apart.
Let us know what issues you experience.
Soooo, it's been a long weekend. Attempted to get the new range and oven installed, along with corian countertop modified.
Some things went well, some didn't. Upon oven removal, it was nice to find the existing propane hose kinked almost completely closed. Then you Forest River. I'm sure that contributed to the oven that took forever to get to 350 degrees.
As far as the countertop, I have messed with it a lot and think that I may need to buy a new piece. I'm not expecting it to turn out amazing, but it's a lot of work and I'm over it. The old arrangement was a u shape, and I needed to fill a gap in the back, and attach a front piece. And cut out the old recess that was built-in. I think it will be passable given more time and effort. More on that later. For now I will be using plywood scraps. Turns out, I will be glad about that.
I tore out the existing cabinet, and had planned on re-using the lower drawer. I am not a woodworker, and don't have a wood shop. If you are, please stop vomiting.
I carefully followed the Furrion directions and cut in the openings. Drawer works good. Opening is correct in size and shape. Since the new oven is shelf supported, I did that.
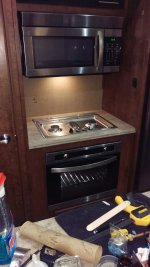
Moment of truth, attempt to slide the oven in. The opening is took short by 1/2". The oven has 4 rubber feet that are exactly a half-inch tall. I remove these because I want to see it installed and get our place back together. Wife, kid, dog, everyone is impacted by a kitchen remodel. I fear that the removal of the feet will lead to a medium size fire, but proceed anyways. What can go wrong. I'm sure those feet need to be there, but the oven clearly measures 20.75", not the 20.25" in the instructions. So I will have to rebuild that, modify the shelf and opening, yada, yada, yada.
So, the oven goes in, with some force and splintered wood. Next is the oven vent them the range. Oven vent is easy. Go to "drop" the range in and of course the opening is too small. By 1/4". So, for now I have a fake countertop on, it's not the end of the world.
And let's not mention the gas connections. I have a tee, but of course it needs a swivel on one side to make it tie together. So, I have a working range and no oven for the time being. And no countertop. But, at least I have to go to work tomorrow. It will get done, but will take some time.
Hope you enjoy this.
One last thing, how much clearance do you have between the top of the cooking grates and the bottom of the oven? I have 14" but the microwave gets hot now, even with the fan on high. Anyone have time to measure? I haven't even told you about the slip down my ramp (we have a 13 year old Chesapeake Bay Retriever with hip problems) on a frosty morning while carrying the countertop, or the 2.5 days where said dog has had explosive diarrhea mostly inside, leading to the removal and subsequent destruction of approximately $300 in rugs and towels, plus labor for cleaning. It's been swell. Will be done someday. The oven seems nice, way bigger than the old one. A 13x9 casserole dish fits without having to throw it in at an angle. I am sure it will be worthwhile when it's done.


Some things went well, some didn't. Upon oven removal, it was nice to find the existing propane hose kinked almost completely closed. Then you Forest River. I'm sure that contributed to the oven that took forever to get to 350 degrees.
As far as the countertop, I have messed with it a lot and think that I may need to buy a new piece. I'm not expecting it to turn out amazing, but it's a lot of work and I'm over it. The old arrangement was a u shape, and I needed to fill a gap in the back, and attach a front piece. And cut out the old recess that was built-in. I think it will be passable given more time and effort. More on that later. For now I will be using plywood scraps. Turns out, I will be glad about that.
I tore out the existing cabinet, and had planned on re-using the lower drawer. I am not a woodworker, and don't have a wood shop. If you are, please stop vomiting.
I carefully followed the Furrion directions and cut in the openings. Drawer works good. Opening is correct in size and shape. Since the new oven is shelf supported, I did that.
Moment of truth, attempt to slide the oven in. The opening is took short by 1/2". The oven has 4 rubber feet that are exactly a half-inch tall. I remove these because I want to see it installed and get our place back together. Wife, kid, dog, everyone is impacted by a kitchen remodel. I fear that the removal of the feet will lead to a medium size fire, but proceed anyways. What can go wrong. I'm sure those feet need to be there, but the oven clearly measures 20.75", not the 20.25" in the instructions. So I will have to rebuild that, modify the shelf and opening, yada, yada, yada.
So, the oven goes in, with some force and splintered wood. Next is the oven vent them the range. Oven vent is easy. Go to "drop" the range in and of course the opening is too small. By 1/4". So, for now I have a fake countertop on, it's not the end of the world.
And let's not mention the gas connections. I have a tee, but of course it needs a swivel on one side to make it tie together. So, I have a working range and no oven for the time being. And no countertop. But, at least I have to go to work tomorrow. It will get done, but will take some time.
Hope you enjoy this.
One last thing, how much clearance do you have between the top of the cooking grates and the bottom of the oven? I have 14" but the microwave gets hot now, even with the fan on high. Anyone have time to measure? I haven't even told you about the slip down my ramp (we have a 13 year old Chesapeake Bay Retriever with hip problems) on a frosty morning while carrying the countertop, or the 2.5 days where said dog has had explosive diarrhea mostly inside, leading to the removal and subsequent destruction of approximately $300 in rugs and towels, plus labor for cleaning. It's been swell. Will be done someday. The oven seems nice, way bigger than the old one. A 13x9 casserole dish fits without having to throw it in at an angle. I am sure it will be worthwhile when it's done.
Chingo - great article with pics - thank you.
Your work looks great. When you get time to finish it all out, it will be amazing. Sorry about the dog but thanks for the chuckle!
And while you don't own a Heartland (yet!) - your contribution on a subject that many are curious about and interested in doing is really appreciated - thanks!
Your work looks great. When you get time to finish it all out, it will be amazing. Sorry about the dog but thanks for the chuckle!
And while you don't own a Heartland (yet!) - your contribution on a subject that many are curious about and interested in doing is really appreciated - thanks!
Last edited:
Jesstruckn/Jesstalkn
Well-known member
Looks great your wood work look good in the pictures.
We are really considering this mod.
What was the cost of the 2 units together.
I would have to add the gas line all the way back and up into the slide. But thats not a real problem and I would probably do a better job the the factory on that one.
Can't wait to see it done and your opinion if you think it was worth all the work you went through.
Looking forward to more here.
Sent from my XT1585 using Tapatalk
LBR
Well-known member
One last thing, how much clearance do you have between the top of the cooking grates and the bottom of the oven? I have 14" but the microwave gets hot now, even with the fan on high. Anyone have time to measure?
View attachment 49592
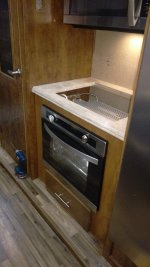
We have 18" from top of grates to lowest part of convection/microwave.
We previously had the all-in-one Atwood oven/range. We full-time, and are trying to find an oven that actually works as intended. Hopefully this will work better. Will keep you posted, may take a few days. Sounds like I will need to reconfigure things to lower the cooktop a couple more inches and revise the face for the corrected openings.
I did hook-up the oven yesterday and ran it up to 450, the precious one would never get past 400. The fan and auto-ignition are nice.
I did hook-up the oven yesterday and ran it up to 450, the precious one would never get past 400. The fan and auto-ignition are nice.
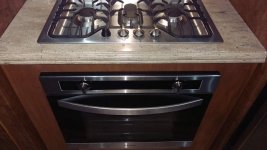
It is done. Spent Friday night and most of Saturday building a new cabinet face from 1/2" birch plywood and re-installing. I will say, it turned out way better the second time. I was able to shorten everything up and pick up slightly more than an inch of clearance between the range and the microwave. I also saved the drawer underneath. Looking at pictures online, every Furrion oven has a blank panel underneath it. Also, I spoke with Furrion about their crappy dimensions, they didn't seem to worried about it. They did say it was fine to remove the mounting feet. Make the opening 20.5" tall, or you will be disappointed.
I managed to save the countertop and got it modified to fit the new range dimensions. Because I was using my old range cover, the piece I was fitting had gaps about 1/8". I used the Kragle (aka Krazy glue ge)l to splice the pieces, then sanded the seams about 1/8" below the surface. After sanding the seams, I mixed corian sawdust (I have lots, in my nose, eyes, ears, everywhere) and Gorilla clear epoxy to tint the glue to match the countertop. Filled the remainder of the seams and waited. And waited.
I also cut and repaired the propane line where it was kinked. The hose had a memory and wouldn't stay open. I used an oxygen/acetylene hose repair kit that I bummed from work. Cut the hose, reused the hose fitting and crimped on a new ferrule. Then checked for leaks.
After the glue was dry on the counter, sanded seams with 220 grit until they were flat, then wet sanded every with 400 grit. Do this outside FYI. After that, buffed it with rubbing compound and Voila! Looks like new.
Even managed to find some stain that almost matched.
Slid everything in, hooked everything up, checked for leaks, and then cleaned for an hour.
When you install the range, Furrion instructions call for mastic under the perimeter of the range. I did this, and immediately regretted it. Turns out if you wire the oven backwards, the light will work, fooling you into thinking all is well. Then, when you try to light the oven, the gas solenoid and igniter don't work. The mastic putty from above sucks when you have to pull the cooktop back out to troubleshoot the wiring. Flipped the wires, now everything works. When I reinstalled the range, I just put putty at the corners and mid-way.
We ordered backslash online, but it's pretty cheesy and we will have to find something else. Suggestions? We want something thicker than the press on backslash we found online.
Not the easiest project I've done, but hopefully will be worthwhile. All told, the oven and cooktop were $1200 delivered and taxed. I spent $30 on propane tees and another flexible metal hose. Plywood and miscellaneous was another $60 probably. I bought a sander and a buffer as well, but tools don't figure into the equation.
Thanks for checking it out.
Attachments


Similar threads
- Replies
- 3
- Views
- 7K
- Replies
- 9
- Views
- 2K
- Replies
- 5
- Views
- 4K