Luck Finally Ran Out...

kakampers

Past Heartland Ambassador
Well, our luck finally did run out! Not complaining though...two years of constant use and no problems with leaks...until today! Crap happens!

Went to get something from cargo bay on roadside...noticed large amount of water in center of cargo floor. Emptied bay, removed panels and noticed water had been leaking, apparently from bottom of water heater at the inlet. Looked rusty and platform it sits on was wet. Went to investigate, and while moving the water lines attached at back of water heater...it suddenly started spraying water from top connection where the check valve is installed, which is directly above where we first saw water.

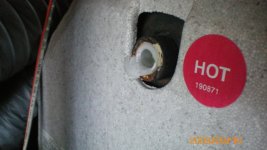
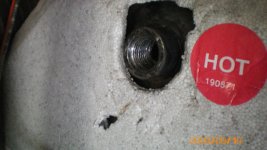
We realized that the plastic check valve was leaking...but here's the BIG problem...DH went to remove the check valve...it snapped off, leaving half of it stuck in the threads of the water heater...UUGGHHH!!:mad:

So now he's out trying to find a replacement valve, hopefully metal...and an easy out to try and remove the rest of the valve without damaging the threads...

What's the point of this post...to let everyone know...if you need to replace that check valve...BE VERY CAREFUL!:eek:

P.S. DH just called, he found a brass check valve! Funny part was, when he walked into the RV repair shop with the plastic one in hand...the guy knew exactly what it was and what happened...he fixes these all the time. Told him easiest way to remove the plastic stuck in threads...either use square screw driver to "bite" the plastic as you turn..OR..small hack saw to cut the pieces in half and just pop them right out...let ya'll know how it works out!
 

mrcomer

Past Ohio Chapter Leaders (Founding)
Bummer Kathy, but luckily you know exactly hot to fix it. If it is not too much trouble would you post some pictures?

Thanks and good luck,
Mark
 

tmcran

Well-known member
I had that happen to me on a TT. I got an extractor and used that to remove the part that twisted off. Be very careful with a hacksaw.Is is very easy to cut the threads.
 

kakampers

Past Heartland Ambassador
What exactly do you mean by an "extractor"? We've tried an easy out..hasn't worked. Working on breaking pieces out now...problem is the sealant that was used has dried like concrete! This is going to be slow going...:(
 

2010augusta

Well-known member
Same thing happened to me!, I replaced with a brass ball valve. I could not find a check valve, but I didn't go the an RV store just a plumbing store.
 

kakampers

Past Heartland Ambassador
OK...Well this turned out to be the job from..you know where!!:eek:

When this thing snapped off, alot of it was sticking out past the threads...trying to remove the part left in there was extremely challenging. We tried everything trying to break it all loose, to no avail...we finally had to take hours to chip the plastic away, piece by piece, to expose as much of the threads as possible. The problem was that the sealant that was used apparently caused the plastic to pretty much be "fused" to the threads.

Once we got it down far enough we were able to use a tap to re-thread the opening and remove the rest of the plastic. If you ever have to do this...make sure you've got an appropriate drill bit to remove the remaining plastic close to the threads, and a 1/2" NPT tap ON HAND...it'll save you alot of time and running around!

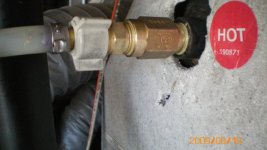
We we're able to find a brass back-flow preventer valve (made by Camco), and a brass nipple...don't think we'll have any more problems from that thing!:)
 

Attachments

  • 000_0003-1.jpg
    000_0003-1.jpg
    123.9 KB · Views: 174
  • 000_0002-1.jpg
    000_0002-1.jpg
    123.4 KB · Views: 177
  • 000_0006.jpg
    000_0006.jpg
    125.3 KB · Views: 172
  • 000_0007.jpg
    000_0007.jpg
    123.7 KB · Views: 176

jmgratz

Original Owners Club Member
Thanks for the photos...tough job but Ken can handle it...a couple of beers, a few choice words and voila it is done. Looks like a plumber did it.. LOL
 

Tom of Ypsi

Well-known member
Thanks for the pics and and written instructions on how to do this. Will put this in a file for future references that I hope I will not need.
 

mrcomer

Past Ohio Chapter Leaders (Founding)
Wholly crap guys. Whod a thought that little ol thing would cause so much headaches? So what was the costs of the brass valve versus the plastic one.

Thanks for the pictures and the information.

Great job you two.

Mark
 

vangoes

Well-known member
Just wondering.......could a torch be used to melt the plastic inside the threads? Just wondering, because I know my bottom fitting has a slight leak and the plastic fitting will also probably break when torque is applied to remove it. Not looking forward to the task!!!
 

imchud

Well-known member
OK...Well this turned out to be the job from..you know where!!:eek:

When this thing snapped off, alot of it was sticking out past the threads...trying to remove the part left in there was extremely challenging. We tried everything trying to break it all loose, to no avail...we finally had to take hours to chip the plastic away, piece by piece, to expose as much of the threads as possible. The problem was that the sealant that was used apparently caused the plastic to pretty much be "fused" to the threads.

Once we got it down far enough we were able to use a tap to re-thread the opening and remove the rest of the plastic. If you ever have to do this...make sure you've got an appropriate drill bit to remove the remaining plastic close to the threads, and a 1/2" NPT tap ON HAND...it'll save you alot of time and running around!

We we're able to find a brass back-flow preventer valve (made by Camco), and a brass nipple...don't think we'll have any more problems from that thing!:)

Nice Fix... I had to do the hacksaw thing to my by-pass valve, only took 2 hours:rolleyes:
 

kakampers

Past Heartland Ambassador
Yeah...Who'd a thunk??? The worst part is the brass valve only cost $10...by the time we were done, buying things and trying to get that dang plastic out of there...we spent about another $60.

At least now it's done...the water heater will rot out before that fitting will...LOL:)
 

kakampers

Past Heartland Ambassador
Just wondering.......could a torch be used to melt the plastic inside the threads? Just wondering, because I know my bottom fitting has a slight leak and the plastic fitting will also probably break when torque is applied to remove it. Not looking forward to the task!!!

We tried that...that's part of the other $60 we spent...didn't budge it!!
 

JohnDar

Prolifically Gabby Member
We tried that...that's part of the other $60 we spent...didn't budge it!!

Is that why the foam insulation around the fitting looks melted? Knowing what the jungle looks like behind the basement walls and the cramped working conditions, I'd be leary about waving a torch around back there.
 

caissiel

Senior Member
I have worked on many trailers after I improved the hot cold shower problem in most trailers. This check valve has a spring in it that drops the hot water flow when the shower hose is shut and restarted, When the hose is put on after closing it shoots cold water for a short while. I replace the valve with a small brass valve that fits right in. The best $20.00 investment my friends do. They shower with a big smile. I feel the cold water lines to the shower should also have the same spring check valve so the pressures are equalized, but this method might be problem for winterizing. Since there is no access to the tank other then removing the panel. It sure is a better problem the having a cold run on the shower though. Its realy anoying when drycamping. I only use air to winterize my unit so the Valve for me is never a problem. I will change that valve as soon I receive my unit if the shower gives me the cold shower treatment.

PS thanks for the pics, also make sure that your tank is completly dry before installing the insulation, my experience with Fibreglass insulation is that it rots the outside of the tank in no time, not sure about the new foam. I removed the insulation on my water tank 11 years ago and never lost a tank yet.
 

Bobby A

Well-known member
Well, our luck finally did run out! Not complaining though...two years of constant use and no problems with leaks...until today! Crap happens!

Went to get something from cargo bay on roadside...noticed large amount of water in center of cargo floor. Emptied bay, removed panels and noticed water had been leaking, apparently from bottom of water heater at the inlet. Looked rusty and platform it sits on was wet. Went to investigate, and while moving the water lines attached at back of water heater...it suddenly started spraying water from top connection where the check valve is installed, which is directly above where we first saw water.

We realized that the plastic check valve was leaking...but here's the BIG problem...DH went to remove the check valve...it snapped off, leaving half of it stuck in the threads of the water heater...UUGGHHH!!:mad:

So now he's out trying to find a replacement valve, hopefully metal...and an easy out to try and remove the rest of the valve without damaging the threads...

What's the point of this post...to let everyone know...if you need to replace that check valve...BE VERY CAREFUL!:eek:

P.S. DH just called, he found a brass check valve! Funny part was, when he walked into the RV repair shop with the plastic one in hand...the guy knew exactly what it was and what happened...he fixes these all the time. Told him easiest way to remove the plastic stuck in threads...either use square screw driver to "bite" the plastic as you turn..OR..small hack saw to cut the pieces in half and just pop them right out...let ya'll know how it works out!

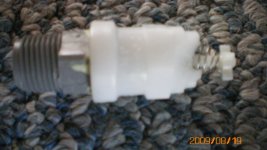
Just wondering, have you sterilized your lines lately with bleach ?? I had the same problem on my old SOB, the check valve stopped working after I used the bleach and water to sanitize my lines. I guess it could be a considense but not sure, my brother in law had the same thing happen to him after he bleached his lines. BTW, if anyone notices that when you open a faucet to cold water and it works fine and then you switch it over to hot water side and you get nothing, chances are your check valve in the hot water tank died. Just an FYI cause it happened to me.
 
Last edited:

kakampers

Past Heartland Ambassador
The valve didn't stop working...it cracked apart from becoming brittle and starting leaking. We fulltime, so sanitizing with bleach is not something that is necessary...it's used daily.
 

kakampers

Past Heartland Ambassador
Is that why the foam insulation around the fitting looks melted? Knowing what the jungle looks like behind the basement walls and the cramped working conditions, I'd be leary about waving a torch around back there.

No...actually it's not melted...it's kind torn up from the awl and screwdriver "slipping" while trying to chip away at the plastic.
 

caissiel

Senior Member
Thats exactly what happened to mine and when I removed it voila the cold shower stopped. So now I remove it and place an accessible shut off valve instead when friends complain.
 
Top