Power for Backup Camera

simsfmly

Ohio Chapter Leaders-retired
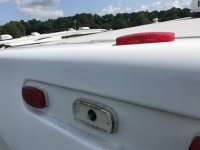
Doing the recon to install my new Backup Camera on my 2013 BH 3670. I know I need to tap into the running lights.

However, these lights at the rear look totally sealed. How do I get to the wiring? Do I try and pop the red lens off (then there are screws inside)? Do I try and pop the whole light assembly off?

Thanks in advance.
 

Dmetcalf

Well-known member
I have never done this but it would seam reasonable to me to pop off the sealed assembly and access the hot & ground wire going to the market light to wire up your camera. Hope this isn’t too terribly hard for you.
 

WillyBill

Well-known member
I have never done this but it would seam reasonable to me to pop off the sealed assembly and access the hot & ground wire going to the market light to wire up your camera. Hope this isn’t too terribly hard for you.

The lens pops off and wires are accessed by unscrewing the fixture and pull it out- wires will follow out of the hole behind it. Most have 4-6" of wire -just "T" off of those-if it actually has a ground wire use that instead of grounding to the frame.

WB
 

Lynn1130

Well-known member
If your camera is to truly be a "backup" camera you need to find the backup light power wire rather than constant power. That way the camera is powered when the vehicle is in reverse. If you want a rear view camera find a full time powered wire.

I seem to recall that I accessed the wires from under the rear of the truck prior to the lights but you need to trace the wires to the various lights. Also you can remove the entire light assembly easier than prying a lens off. Removing the assembly is generally how you replace bulbs anyway.
 

simsfmly

Ohio Chapter Leaders-retired
If your camera is to truly be a "backup" camera you need to find the backup light power wire rather than constant power. That way the camera is powered when the vehicle is in reverse. If you want a rear view camera find a full time powered wire.

I seem to recall that I accessed the wires from under the rear of the truck prior to the lights but you need to trace the wires to the various lights. Also you can remove the entire light assembly easier than prying a lens off. Removing the assembly is generally how you replace bulbs anyway.

Thanks for your reply.

Understand the difference. Really want to go the "easy" way and just tap into the running lights. That way I can control power from the cockpit.

Not crazy about taking off the entire light assembly, re caulking it, etc. if just popping off the lens will get the same thing accomplished.
 

simsfmly

Ohio Chapter Leaders-retired
IMG_8967.jpg

Used a screwdriver, popped that baby off. Two phillips head screws and I should be able to access the wires behind it.

Next question: I've got room above and below to mount the camera. I should use below, correct? My thinking is, if the running lights are going to be on, I want the shield to shade it from the lights above it.
 

Jesstruckn/Jesstalkn

Well-known member
View attachment 62381

Used a screwdriver, popped that baby off. Two phillips head screws and I should be able to access the wires behind it.

Next question: I've got room above and below to mount the camera. I should use below, correct? My thinking is, if the running lights are going to be on, I want the shield to shade it from the lights above it.
Yes if you put it about you will just have the glare from the lights.

Just pop it out and tap into the wires.

I have been using these "Positap" connectors and really like them. They are really easy to install.
72694ef42f2f0de7a0b948dd4c083e31.jpg


Sent from my SM-N950U using Tapatalk
 

wdk450

Well-known member
I know this is up on a ladder (actually you would be much safer doing this from the roof) , but I tried this, found the camera would not work right, found low voltage (about 6 volts?) with the standard incandescent clearance/LP lights, changed all lights out to LED lamps (1/10 current draw) and still only had about 9 volts at the top clearance lights. You need to check this voltage with a multimeter.

When I reported this previously, someone suggested that I needed to pull off all of the undercovering, access all the wiring, and find where the voltage was going. I wired separate power to the camera instead.
 

Lynn1130

Well-known member
Not crazy about taking off the entire light assembly,

I am not sure what set up you have but most vehicles, including mine take about three screws to remove the assembly. It slides right out from there. This is how most service department replace bulbs when they burn out. Popping off the lens, in many cases breaks the tabs that hold the lens, compromise the seal of the lens, and create more issues than you can imagine. That is why the "remove the entire assembly" system was developed for replacing light bulbs.

That way I can control power from the cockpit.

I am not sure what you are trying to do. If it is a backup camera, you control the power with the shift lever. Reverse powers the camera. If you want a full time camera, that is not a "backup camera" :)
 

Lou_and_Bette

Well-known member
View attachment 62381

Used a screwdriver, popped that baby off. Two phillips head screws and I should be able to access the wires behind it.

Next question: I've got room above and below to mount the camera. I should use below, correct? My thinking is, if the running lights are going to be on, I want the shield to shade it from the lights above it.

Mine is connected to the running lights and I control it by turning on the parking lights of my TV, Your question about where to place it is answered by "it depends." Mine is a wireless camera and I wanted the antenna to be as high as possible so receiver in truck would be able to pick up the signal. Works pretty well, have occasional short periods (10-15 seconds) of signal loss but recovers quickly. Good luck
 

wdk450

Well-known member
I am not sure what set up you have but most vehicles, including mine take about three screws to remove the assembly. It slides right out from there. This is how most service department replace bulbs when they burn out. Popping off the lens, in many cases breaks the tabs that hold the lens, compromise the seal of the lens, and create more issues than you can imagine. That is why the "remove the entire assembly" system was developed for replacing light bulbs.


I am not sure what you are trying to do. If it is a backup camera, you control the power with the shift lever. Reverse powers the camera. If you want a full time camera, that is not a "backup camera" :)

Lynn:
Using the clearance lights for camera power gives you a rear looking camera whenever the truck parking lights (Usually turned on with the headlights) are on. Turn off the headlights/parking lights, no rear camera.
 

Lynn1130

Well-known member
Lynn:
Using the clearance lights for camera power gives you a rear looking camera whenever the truck parking lights (Usually turned on with the headlights) are on. Turn off the headlights/parking lights, no rear camera.

I totally understand that. I have wired a few in my day. The question was "backup camera". My suggestion was the "backup light". That gives you a "backup camera". If you want a selective controlled camera or a full time camera then state that and not "backup camera". :)
 

Oregon_Camper

Well-known member
It is really a 15 mins job. The marker light pops right out of the rubber gasket....giving you easy access to the 12v power the is always on, when you're connected to the truck and have headlights on.

If you're still looking, I just posted a new video on YouTube, showing the install of the new Furrion 4 Camera solution. Note..I still need to add the camera over the door, so my current install is only using 3 of the 4 cameras.

I just backed into our site about 1 hour ago and the new rear camera has a microphone that send audio to the display. I am shocked at how well it works. I asked my wife i she was yelling, she said "Nope..I was simply talking in normal voice"....AWESOME!!!

Here is the link to the video on YouTube

https://youtu.be/Zzi68Njnk-A
 
Top