Securing Your Batteries

Jimsryker

Well-known member
I looked in a bunch of threads and tried to sort via "Secure Battery" and other combinations with no luck, so I will take the lazy route here and just ask. I have just purchased a new AGM 12V battery for my Cyclone 3010 to replace the terrible excuse of a battery that came with my trailer.

If you know the characteristics of an Absorbed Glass Mat (AGM) battery, I no longer have maintenance concerns or venting issues that I need to work on. I have to basically secure it and hook it up. I plan to put it in the battery compartment up front and in a manner that allows for the planned inverter. It's a behemoth of a battery and it would just about secure itself by virtue of it's weight but we know that's not sufficent. So. I'm sure that other's have crossed this path and I was hoping to hear/see the solutions that others have done themselves or vendors have done to secure their batteries. I won't be using a battery box. Not needed. I am thinking straps?? I weld so I could fab metal brackets?? You never know where the next great idea will come from so have at it guys. And gals... :)

Thank you in advance!

Jim
 

bdb2047

Well-known member
I put AGM'S in .I put a peice of rubber on floor,to stop from slideing used some 3/4X3/4 wood around outside of batteries also on floor and used a strap with fricton catch,similar to wht is used to hold down chairs, to hold them in place.I think in normal travel they would stay in place on ther own. I also changed charger to use withAGM.
 

Jimsryker

Well-known member
So, you secured your wood to the floor of the trailer? My battery compartment is metal on the floor so I'm wondering if yours is and did you just screw the wood on to the floor creating "frame" around the battery then secured any up and down motion by using straps? Didn't think of wood... Thanks!
 

TandT

Founding Utah Chapter Leaders-Retired
Jim,
JMHO I would cut 1/2 inch ply and put over the existing sheet metal floor.
Better weight distribution over the floor and a better surface to secure to. Trace
 

Jimsryker

Well-known member
Jim,
JMHO I would cut 1/2 inch ply and put over the existing sheet metal floor.
Better weight distribution over the floor and a better surface to secure to. Trace

Thanks Trace. I was already thinking along those lines to avoid chaffing and it's good to see an experienced guy like you with the same thoughts.

Jim
 

BuckO

Member
Jim,
Since you mentioned that you can weld, I will mention what I did. I was also concerned with the weight distribution on the sheet metal in the front compartment. I use two 6 volt lead acid batteries with a box, but the mounting is the topic. I made a frame the size of my battery box out of angle iron and secured it to the frame section that passes through the compartment. It is attached to the frame with self tapping screws and I use side supports that angle from the unsupported side back to the frame. The batteries sit about 1/4 inch off the compartment floor and are very secure. May not be really necessary, but it gave me piece of mind. I would also still recommend a battery box unless you have a good way of covering the battery connections.

Best of luck on your project!

Buck
 

bdb2047

Well-known member
Correct my floor is wood where batteries are.

So, you secured your wood to the floor of the trailer? My battery compartment is metal on the floor so I'm wondering if yours is and did you just screw the wood on to the floor creating "frame" around the battery then secured any up and down motion by using straps? Didn't think of wood... Thanks!
 

Jimsryker

Well-known member
Jim,
Since you mentioned that you can weld, I will mention what I did. I was also concerned with the weight distribution on the sheet metal in the front compartment. I use two 6 volt lead acid batteries with a box, but the mounting is the topic. I made a frame the size of my battery box out of angle iron and secured it to the frame section that passes through the compartment. It is attached to the frame with self tapping screws and I use side supports that angle from the unsupported side back to the frame. The batteries sit about 1/4 inch off the compartment floor and are very secure. May not be really necessary, but it gave me piece of mind. I would also still recommend a battery box unless you have a good way of covering the battery connections.

Best of luck on your project!

Buck

Thank you BuckO. I have something in mind along these lines. I plan to post with photos. Since I am the crown prince of procrastination, don't anyone hold your breath! Haha.
 

JohnD

Moved on to the next thing...
Thank you BuckO. I have something in mind along these lines. I plan to post with photos. Since I am the crown prince of procrastination, don't anyone hold your breath! Haha.

However, I am the President of the Procratinators Of America Club!

Where our motto is . . .

Why do something today when I can do it tomorrow . . . or the next day . . . or the next day! :p
 

TandT

Founding Utah Chapter Leaders-Retired
I was going to start a procrastinators group, but I never got around to it.
Trace
 

Jimsryker

Well-known member
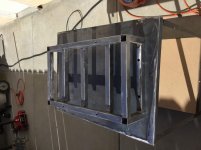
I have constructed a battery mounting rack that will allow me to slid my rather large battery into the battery compartment while protecting the "lip" or edge of the opening to the battery/generator compartment. I have chosen a rather large battery that weighs in at 154 lbs. so this was a concern for me. I could not see my lifting it and placing it inside without making contact with the comparatively fragile aluminum and plywood frame to the compartment.

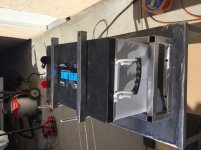
I had some left over 1" tubing so it's stout to say the least. More than enough to support the weight but hey, a penny saved is a penny earned. Haha. I planned it and cut 15 pieces, predrilled them, welded in the couplers and then assembled it. I have drilled the floor of the battery compartment and plan to bolt it into place, slide in the battery and secure it once the paint drys on it. I had concerns about a 154 lb battery, but recall reading stories here of batteries weighing in at 180 to 200 lbs. all told so I think I'll be OK. Here are a couple of photo's. I plan to post more when I do the install. I hope it all goes as planned.

image.jpg

image.jpg

The last pic. shows how the battery will be secured but the other threaded rod and hardware are not shown here.
 
Last edited:

Jimsryker

Well-known member
Ha. Correction. 156 lbs.! One heavy battery. 255 amp hours. Not the most but pretty good for a single battery at that weight.
 

Jim.Allison

Well-known member
Looks good Jim, the important thing is to keep it from sliding when you stop or heaven forbid you hit something and to keep it from jumping up when it gets jostled around. It appears that you have accomplished that. I cant wait to see the final install.
 

JohnD

Moved on to the next thing...
I have constructed a battery mounting rack that will allow me to slid my rather large battery into the battery compartment while protecting the "lip" or edge of the opening to the battery/generator compartment. I have chosen a rather large battery that weighs in at 154 lbs. so this was a concern for me. I could not see my lifting it and placing it inside without making contact with the comparatively fragile aluminum and plywood frame to the compartment.

I had some left over 1" tubing so it's stout to say the least. More than enough to support the weight but hey, a penny saved is a penny earned. Haha. I planned it and cut 15 pieces, predrilled them, welded in the couplers and then assembled it. I have drilled the floor of the battery compartment and plan to bolt it into place, slide in the battery and secure it once the paint drys on it. I had concerns about a 154 lb battery, but recall reading stories here of batteries weighing in at 180 to 200 lbs. all told so I think I'll be OK. Here are a couple of photo's. I plan to post more when I do the install. I hope it all goes as planned.

View attachment 34313View attachment 34314

The last pic. shows how the battery will be secured but the other threaded rod and hardware are not shown here.

My monitor seems to be sideways . . . :eek:
 

Bob&Patty

Founders of SoCal Chapter
Good job Jim, Looks stout.

John, I think that the assembly was hanging on its side to be painted. You could pick up your monitor and turn on its side.
 

Jimsryker

Well-known member
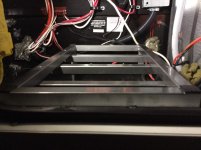
I have installed the rack and bolted it into place. I plan to wait until the paint fully dries before sliding the battery in so I don't mar the paint. 7 days according to the manufacturer. Note the heigth of the rack compared to the edge of the opening. I have placed the 1/4" ply in to isolate the battery from the cross members. Next step will be sliding the battery in and prove/disprove my theory that it will even work.

image.jpg
image.jpg
 

Jimsryker

Well-known member
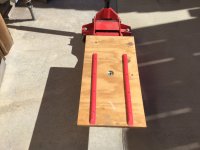
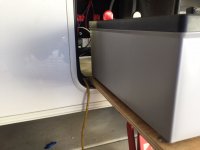
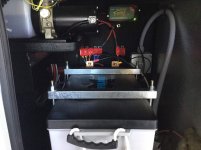
Well, project complete. There's a benefit to sitting in stop and go traffic. Gave me time to come up with this solution to securing the plywood so it would not slide off the jack and possibly drop my very expensive battery and doing damage. I also added the plastic rails I had left over from another project to reduce friction so the battery would slide easily.

image.jpg

I pre-staged the rods and used a nut to secure them while while bolting the retaining bars on with the nylon locking nuts. Didn't what them to turn...

image.jpg

I kneeled the trailer down just about as far as it would go and jacked up the battery just about as far as it would go and they lined up perfectly. Here it's ready to slide in.

image.jpg

Slid in like butter with those plastic rails. Without them, the battery would not budge in my testing. Too much contact friction but this resolved that concern. I then hooked up all the connections.

image.jpg

And here is the final result. I have a battery tender connected and it's stats meet the requirements from the battery manufacturer but it will not be the final solution. When I've got the coin, I plan to install a hybrid inverter/charger with a controller that will be more agile in handling my charging needs.

image.jpg
 
Top