- Home
- Forums
- HEARTLAND RVs GENERAL AREA
- Exterior Components - For all Heartland brands
- Frame / Landing, Leveling & Stabilizing Gear
You are using an out of date browser. It may not display this or other websites correctly.
You should upgrade or use an alternative browser.
You should upgrade or use an alternative browser.
SOLVED: Leveling system display failure
- Thread starter kbausano
- Start date
Oregon_Camper
Well-known member
Re: Leveling system display failure
Ken,
My sister has that happen on her 5th wheel. We tried to unplug it...plug back in, but that did not work. End the end, she had to get a replacement controller.
I did a YouTube video for the replacement process, if you'd like to watch it
https://youtu.be/eCtx8USquVs
Here is a link to get the controller on Amazon.
https://amzn.to/2KyBWA0
kbausano
Well-known member
Re: Leveling system display failure
Thanks Jim...we’ll give it a shot. We are in Albuquerque overnight on our way to our grandsons graduations. We pulled in to a park and couldn’t even coax the system to deploy.
Sent from my iPhone using Tapatalk
Ken - call Lippert at this number. Leave a message with your call back number: 866-524-7821
Thanks Jim...we’ll give it a shot. We are in Albuquerque overnight on our way to our grandsons graduations. We pulled in to a park and couldn’t even coax the system to deploy.

Sent from my iPhone using Tapatalk
Re: Leveling system display failure
Leave them a message now - they'll likely call you back in the morning.Thanks Jim...we’ll give it a shot. We are in Albuquerque overnight on our way to our grandsons graduations. We pulled in to a park and couldn’t even coax the system to deploy.
Sent from my iPhone using Tapatalk
kbausano
Well-known member
Re: Leveling system display failure
Thanks for all the suggestions.
Jim...I called Lippert and was walked through checking on the electric module connections, both on the ceiling of the front compartment and on the back of the control box. Jim (at Lippert) was very helpful and said that 60% of the time, it is a loose connection on one of these two modules. Ken found the loose wiring module on the control box and voila! We have liftoff!
Thanks so much....we are again on our way!
....Deidra
Ken,
My sister has that happen on her 5th wheel. We tried to unplug it...plug back in, but that did not work. End the end, she had to get a replacement controller.
I did a YouTube video for the replacement process, if you'd like to watch it
https://youtu.be/eCtx8USquVs
Here is a link to get the controller on Amazon.
https://amzn.to/2KyBWA0
Leave them a message now - they'll likely call you back in the morning.
Oregon_Camper
Well-known member
Re: Leveling system display failure
Perfect!!!!
Now you owe Jim Beletti a cold beer!")
Perfect!!!!
Now you owe Jim Beletti a cold beer!
murry135
New York Chapter Leaders - retired
Re: Leveling system display failure
Deidra,
I am troubleshooting the same display issue for one of my club members who has a 2017/18 Big Horn, can you tell me where the module was located in the front compartment?
Murry
Thanks for all the suggestions.
Jim...I called Lippert and was walked through checking on the electric module connections, both on the ceiling of the front compartment and on the back of the control box. Jim (at Lippert) was very helpful and said that 60% of the time, it is a loose connection on one of these two modules. Ken found the loose wiring module on the control box and voila! We have liftoff!
Thanks so much....we are again on our way!
....Deidra
Deidra,
I am troubleshooting the same display issue for one of my club members who has a 2017/18 Big Horn, can you tell me where the module was located in the front compartment?
Murry
I had good luck when I called Lippert with my “Rear Sensor” error that prevented me from retracting legs.
My location of the main controller unit required me to open the front storage door by the pin box, crawl into area where my oil reservoir is & located it in the center of roof, which is the bottom of my bedroom closet.
It takes some effort but with the Lippert tech rep on the phone with you, you will find it & trouble shoot it easily.
My problem required me to find the rear sensor. After cutting 2 holes in the belly, I found it located on cross member behind my spare tire carrier which is just to rear of my fresh water tank. I unplugged the connection (easy) & put dielectric grease on pins & plugged in. Solved problem!
To repair the bottom I found Jim Belleti’s posts when he opened & repaired the underbelly a few years back. It is worthy of creating a document to be available in the HUG user guide section. Still it was a lot of work laying on my back on crushed limestone rocks at my campground!
Thank’s Jim & Lippert!
Sent from my iPad using Tapatalk
Wondering for others as well, my corplast was cut open from the factory with a flap just behind the road side rear wheel. Is there where yours was located?
Thx
Brian
CDN, the sensors (rear & front) are located halfway between both side frame I beam. If the flap is close to one side I don’t think it is access to the rear sensor.
Bob
Sent from my iPad using Tapatalk
Can someone post a picture of what one looks like? Maybe it can be added to the HUG?
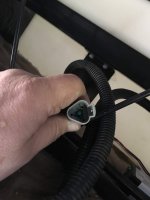
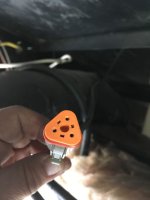
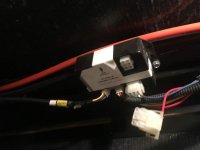
Orion 7144 here are photos of the main control unit with sensor located in the front cabinet behind the pin box. It has a single wire that supplies power & the other wires go to pump & rear sensor. (Photo 4)
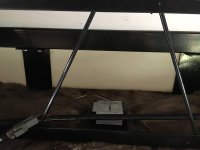
photo 5 is of the rear sensor located in the center of the cross member located just behind my fresh water tank.
The connector plug is shown in these photos 1-3. When I unplugged it & put dielectric grease on the pins & reconnected it, all was fine.
the hardest part is having the courage to open the underbelly, locating the sensor & then repair the underbelly. Oh yes, then digging the gravel out of my elbows & knees!
Bob
Attachments
-
 DFEC71EB-C228-4A18-8F0C-D6E9FE4EC38E.jpg50 KB · Views: 46
 -
 0F88189F-BF95-4C6C-822E-3AFE1874D523.jpg39.3 KB · Views: 42
 -
 6FFCF11C-C22C-4E75-8135-97AF00600B02.jpg51 KB · Views: 41
 -
 7A9E2549-B851-4233-B1E0-FCB15D7D8C2F.jpg45.8 KB · Views: 42
 -
 510A65A8-04FB-4315-B33A-682880A71040.jpg54.2 KB · Views: 39
Lou_and_Bette
Well-known member
When my rear sensor fell off the frame (was laying on top of the chloroplast) due to the screws backing out, I found it by first finding the cross members (look for screws in the middle of the belly) then removing 3-4 screws on the side and peeking into the center. Found mine on second try. This beats cutting multiple random holes.
When my rear sensor fell off the frame (was laying on top of the chloroplast) due to the screws backing out, I found it by first finding the cross members (look for screws in the middle of the belly) then removing 3-4 screws on the side and peeking into the center. Found mine on second try. This beats cutting multiple random holes.
Lou, great “ Purple Monkey” sleuthing skills. Makes one wonder how it came loose or was it poorly attached at the factory.
However in my case the rear sensor was & is firmly attached to the cross member. This required me to do “ Exploratory Surgery” on the underbelly to find it. Found it on the second try & after the unplugging & plugging it worked!
I found Jim Beletti’s post to add more rock wool insulation plus sealing up incisions by adding 1x6 inch treated boards & screws plus the “super tape” from Amazon. 5,000 mile trip in May through a couple major thunder storms while towing - it’s working fine!
Bob
Purple Monkey! Someone has attended Terry Cooper's electrical seminar
Purple Monkey! Someone has attended Terry Cooper's electrical seminar
Yes! Best time & $ well spent at Goshen Rally last year!!!
Sent from my iPhone using Tapatalk
Similar threads
- Replies
- 17
- Views
- 2K
- Replies
- 0
- Views
- 3K
- Replies
- 4
- Views
- 1K
- Replies
- 7
- Views
- 2K