Teejay---24RBS shocks.

DavidB.

Member
Hi Teejay,

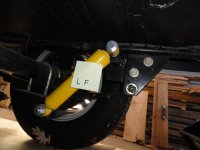
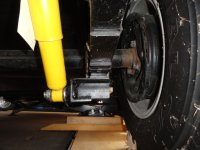
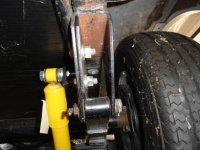
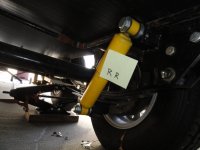
Just read in another post that you installed 4 shocks on your 24RBS.

I plan to do the same.

Have you noticed a differance in ride or wear on tires or suspension? and if so, how.

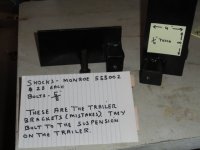
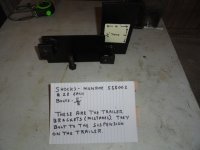
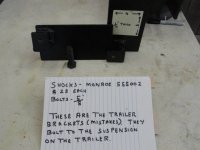
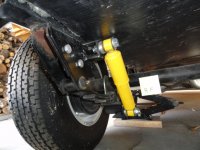
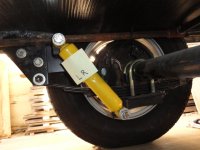
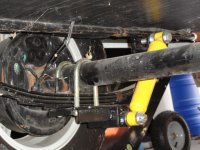
Would it be possible for you to post the make and model of the shocks.
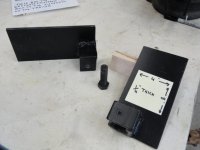
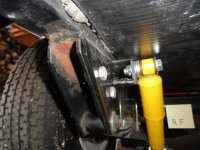
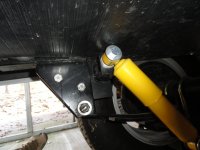
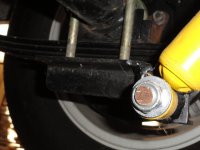
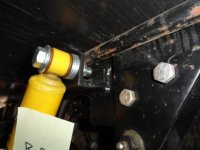
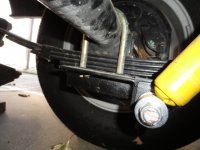
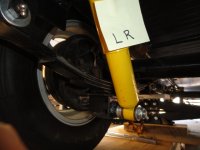
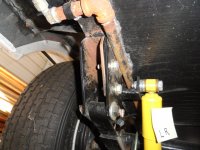
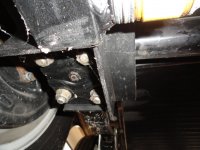
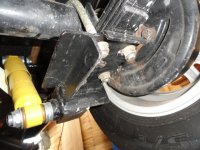
And the attachement points/brackets.

Thanks in advance,

DavidB.
 

TeJay

Well-known member
DavidB,
We just god back from the holidays and trying to catch up. Give me a few days and I'll get some pictures and information out to you regarding the shock install. Since I did the upgrade we have not traveled to much so I can't give you much info. However having taught automotive for 35 years I have to believe that adding shocks will do much for ride improvement as well as keeping the tires on the ground after encountering bumps. Tires will actually show a wear pattern if your shocks are bad. When a tire hits a bump it bounces. With no shocks the tires continue to bounce. They may not actually come off the ground but the weight is oscillating up and down until the energy is absorbed. That continuous bouncing will wear a cupping pattern into a tire. Shocks help to reduce the oscillations by absorbing that energy into the shock (heat). Remember that the laws of physics state that energy does not just disappear. It has to dissipate or be converted into another form of energy. If we reduce the bounding then we reduce the effect of that bouncing on the entire trailer and truck combination. If I found the correct shock and got the angle of compression good it has to improve all aspects of the ride and suspension. I selected the shock based on the travel distances from compression to extension and the weight factor.

TeJay
 

DavidB.

Member
Thanks Tejay for the prompt answer,

I've noticed some cupping and wear issues on all 4 tires, only 2849 miles.

I have an appointement on the 9th of Jan. for to take a look at the suspension
and at the same time, will have the tires balanced.

On our old trailer ('98 Prowler 24 LZ), from memory, we did over 21,000 miles (and counting.....)
with even wear on all 4 tires (tires were balanced) with no cupping nor toe and camber issues.
No shocks on that unit.
We sold the old girl in May 2011.

Thanks in advance for the info and pictures (eagerly anticipated).

DavidB.
 

TeJay

Well-known member
DavidB,
One thing with trailers. There can be issues with alignment but it is different from a car. Cars have caster, camber and toe and SAI. When bushings, tie rods, etc. wear in a car alignment angles change and tires wear. The only issue with trailers would be simply not installing something correctly from the factory. One side of an axle might be closer to the front than the other. That will cause tires to wear. Worn suspension parts on a trailer don't directly affect the position of the trailer tires. You might have broken or weak springs which will cause tilting and sagging of the TT. Overloading your TT will also cause issues with the tires and suspension. But loading is within our control. Without getting to technical almost nothing (except miss alignment from the factory) that is wrong with a trailer/axle setup will cause tire wear like in a car. If you hit a curb hard one can bend an axle but then you would know what you did and expect tire problems. Poor quality tires will allow problems that do exist with the axles to show as the tires wear excessively for the miles put on them.
Our first trip was last March and we put on about 2,000 miles. When we got home I realized that the tires were not radial as I had ordered. The tires were fine so I sold them for $100 and got some radials. I will stick by my previous post regarding radial tires and I have to believe that shocks will also help a lot. Here's a good true story concerning radials. Back in the early 80's I restored a 53 GMC pickup. It had a solid straight axle on the front or no independent suspension. I had a very difficult time keeping the thing on the road with the original bias tires. When you hit a bump with one tire it moved the truck the other way. I had to keep both hands tight on the steering wheel and it was not fun to drive. I went to the shop on a Saturday and put some worn radials on it. I drove home with just two fingers on the wheel. I was amazed and surprised at how much difference the radials made.
I don't know if you're still under warranty but with so few miles on your TT the dealer should find out wht your tires are worn, fix it and put some new tires on it as well. It's supposed to be warm again tomorrow so I'll get some pics of my set up.

TeJay
 

DavidB.

Member
Thanks Tejay,

Should have an answer later next week re suspension and components set up, as you say broken spring(s) and alignment.

I too have the bias tires and not in love with them.
Will try to go to radials in a few months.

Thanks again,
DavidB.
 

PeternLiane

Well-known member
Radial tires are the best.

I really would like to see the pictures of how the shocks were installed too. I am interested in that too.
 

TeJay

Well-known member
Sorry guys,
I've been a tad busy with some medical things and have not posted my shock set up. I did take some pictures and will try to post before the end of the weekend.

TeJay
 

TeJay

Well-known member
Sorry that it's taken me so long to get to this post. Spent some unexpected time in the hospital but all is well and we're are gearing up for a trip to FL. I'll explain my shock post then try to add the pics. I hope it works.
You'll need access to a welder and metal cutting stuff. The four top shock mounting plates are shown in the pics. After having built them I believe the LR and the RF are the same and the LF and the RR are the same. I cut, fit, welded, refit, etc each mounting plate and still messed two of them up. I got something reversed and had to redo them. You will see what I'm talking about when you start. I selected the Monroe shock based on the compressed and extended distance. I then positioned the shocks top and bottom mounting positions in the mid travel range and to also achieve as vertical a mounting position as possible. The top mount is placed inside the spring body mount and held in place with two bolts. The body leaf spring mount already had one hole in it. Once the plate is located I added another hole then drilled matching holes for the two mounting bolts. Once the plates are located you can trim off the metal sticking past the angled part of the body spring mount. It is not necessary to have it cause it serves no purpose. The shock mounting bolts are longer than necessary and I used washers to space the shock as needed to maintain its vertical position. The bottom mounts simply use the existing leaf spring u-bolt mounting plate. I welded a piece of angle iron the length of the plate off to the side but on the bottom. Remember to leave enough room so you can still bolt the plate to the leaf spring using the u-bolts. I also added another piece of angle iron to mount the shock bolt. That bolt is welded to the plate. I welded it because I thought that it would provide more support for the action the shock will be exposed to. I might also add that on the 24RBS there is a black pipe gas line that runs along both sides of the rear frame. The pipe did get in the way but I managed it overcome it as an obstacle. I don't believe that HL will built two units exactly alike so you might not have that problem.
If you have any problems e-mail me. If you want you can call and maybe I can talk you through something.
TeJay
 

Attachments

  • DSC00652.JPG
    DSC00652.JPG
    139.1 KB · Views: 44
  • DSC00653.JPG
    DSC00653.JPG
    136.4 KB · Views: 42
  • DSC00654.JPG
    DSC00654.JPG
    131.7 KB · Views: 41
  • DSC00655.JPG
    DSC00655.JPG
    138.4 KB · Views: 40
  • DSC00656.JPG
    DSC00656.JPG
    139.1 KB · Views: 48
  • DSC00657.JPG
    DSC00657.JPG
    140.3 KB · Views: 43
  • DSC00658.JPG
    DSC00658.JPG
    140.2 KB · Views: 42
  • DSC00659.JPG
    DSC00659.JPG
    137.7 KB · Views: 45
  • DSC00660.JPG
    DSC00660.JPG
    132.8 KB · Views: 42
  • DSC00661.JPG
    DSC00661.JPG
    140.2 KB · Views: 41
  • DSC00662.JPG
    DSC00662.JPG
    144.1 KB · Views: 38
  • DSC00663.JPG
    DSC00663.JPG
    130.5 KB · Views: 37
  • DSC00664.JPG
    DSC00664.JPG
    140.6 KB · Views: 36
  • DSC00665.JPG
    DSC00665.JPG
    137.3 KB · Views: 32
  • DSC00666.JPG
    DSC00666.JPG
    134.5 KB · Views: 36
  • DSC00667.JPG
    DSC00667.JPG
    137.6 KB · Views: 33
  • DSC00668.JPG
    DSC00668.JPG
    144.1 KB · Views: 34
  • DSC00669.JPG
    DSC00669.JPG
    145.2 KB · Views: 34
  • DSC00670.JPG
    DSC00670.JPG
    140.1 KB · Views: 34
  • DSC00671.JPG
    DSC00671.JPG
    145.2 KB · Views: 34

TeJay

Well-known member
I'm going to further explain some of the pictures. Maybe it will help since everything that I was working with, except the shocks and bolts, was black. It's sometimes difficult to determine exactly what you're looking at.
4th PIC- Top brackets (TB) and angle iron welded. The holes were not 5/8" but pilot holes. When these were made they slid up inside the trailer leaf spring mounting bracket (TLSMB) very nicely. Once you get them made and all the angle iron is correctly located you just have to hold them in place with a vice-grip, locate the hole (s), drill and mount.

5th-PIC - This shows RF TB and angle cut from the plate. Once it's located just mark it, remove and cut it off.

10th - PIC View of bottom U-bolt plate. Since all the bottom plate brackets were mounted to the TT I didn't have one off to get any better pictures. There are at least two more later on.

11th - PIC This is the RR. Notice the propane gas line at the top. It's location made putting the top nut on difficult. However I didn't want to change the location of this mount because any change would affect the shock angle and travel distance. That change would then affect the dampening effect of the shock.

13th - PIC Again shows the propane gas line location.

14th - PIC A side view of the bottom U-bolt plate. I welded three pieces of angle iron on the original plates. One runs the length to give it more strength. The second runs across the end used to mount the shock. It is necessary so you can have something to weld the last piece of angle iron. That's needed so you'll have something to drill and weld the bottom shock mounting bolt.

16th - PIC Shows propane gas line again.

17th - PIC This shows the bottom of the U-bolt plate and the angle iron welded on.

I hope this gives a little more detail of how I did this. We are headed to FL next week. I'll take it out for a short trip to determine if all is well before we start. I can't imagine how this set up could break. If I hit a really big bump and exceed the limits of the shock it might break a weld so I'll have to be careful and see how it goes. If I do break one I'll just remove the shock and continue. It didn't have shocks before so it can't hurt. I really think some who have tried this had to flat of an angle for the shock to work properly and it caused extra strain on the mounting brackets.

TeJay
 

TeJay

Well-known member
Hey guys,
Just drove the camper today for a short trip to make sure everything with the shocks is OK. It road very well. I am pleased with the handling. I noticed that the trailer did ride much better. I took several back roads to put them to the test. The camper seemed to ride much smother than before. It did bounce but settled as I would expect it to do. Here's how I always showed my students how to check shocks. Jump on the bumper or fender of a car and compress the shock. When you let up the vehicle will rebound up to or slightly above it's original position then settle and come to a stop. If you have anymore movement than that your shock is defective. That's how the camper handled. When I was doing my research to pick a shock I went to several suspension sights and found some charts. I used the Monroe charts to determine which shock would work for the 24-RBS. I also talked with a Monroe tech and told them what I was doing and the weights involved. I think that shock will do the trick. If you have something heavier then I would call the Monroe techs and select another one. Always keep in mind how the shock is to be attached. The total travel of the shock and the room you have to try and keep the shock as vertical as possible. I've looked under thousands of vehicles over the years. Very few shocks are actually mounted perfectly vertical. So it's OK to not be vertical but common sense tells you that there is a limit how far towards the horizontal you can go. If you have any questions don't hesitate to get in touch with me. I think this is a good MOD and I want you guys to be successful with it. Even though we'll be in FL I'll check the forum most every day and can answer any questions.
TeJay
 

TeJay

Well-known member
Update,
Left AR. Sat morning and headed to FL. We are in the panhandle near Pensacola. I guess we've traveled about 700-800 miles. Some of the 4-lane limited access through LA, MS, and LA have been bouncy, and at times very roller coaster. The TT and TV traveled very well. We also had very bad head and cross winds. Had absolutely no problems with handling. Passing 18-wheelers cause no movement of the V or TT. My truck is a 2010 F-150 with the 4.6-L aluminum engine. I installed air bags and filled them with 20-lbs of air to maintain a level setup. I also changed the TV shocks to Bilstein. We kept the speed between 60-65. Our mileage averaged 10.6. Very happy with the setup. Absolutely no white knuckle driving at any time during these first few hundred miles. I'd recommend adding shocks to any TT that does not have them. When we would hit a bump the TT would dip once then settle as it's supposed to.
TeJay
 
Top