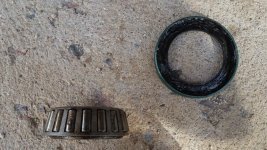
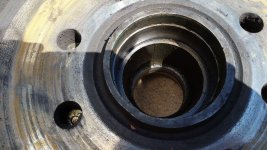
Trying to repack bearings, ran into a few snags. Advice needed!

8amps

Well-known member
Another 8amps exiting day! We have been doing lots of work in anticipation of getting back on the road the end of this month. One thing really needing Attention was our wheel bearings. Hadn't been done in over a year and approx 11000 miles.
Soooo. All started off so promising, frame raised, tires removed, etc. Upon removing the seal, it has blown and there are bits of the spring everywhere. Cannot get the race out, nowhere to jain any leverage or traction. It appears so worn, cant get race out and bearings is very pitted and worn. Got the races and gearings ready to install but at standstill, until we can remove original races.
any thoughts ideasetc appreciatr! Thanks!
 

rxbristol

Well-known member
What are you using to get it out? I used a good punch and a 4lb sledge hammer and just kept working my way around the race. I put the hub on a couple of blocks of wood to allow room for the race to pop out.
 

JanAndBill

Well-known member
Another 8amps exiting day! We have been doing lots of work in anticipation of getting back on the road the end of this month. One thing really needing Attention was our wheel bearings. Hadn't been done in over a year and approx 11000 miles.
Soooo. All started off so promising, frame raised, tires removed, etc. Upon removing the seal, it has blown and there are bits of the spring everywhere. Cannot get the race out, nowhere to jain any leverage or traction. It appears so worn, cant get race out and bearings is very pitted and worn. Got the races and gearings ready to install but at standstill, until we can remove original races.
any thoughts ideasetc appreciatr! Thanks!

They can be a little stubborn sometimes, especially if they've got hot. As the previous poster said, I have a large punch with flat point and sharp edges that I use. You need something that can catch what little bit of edge there is on the race. I use a large ball peen hammer, as I prefer something i can control a little better. ALWAYS wear safety glasses when doing this as the alloy metal in the race is brittle. Small pieces of the race can chip off and cause severe damage to eyes.

If you still can't get it, there is a tool called an internal race puller that you might be able to rent at your local auto parts box store. Also don't know your mechanical ability, but sometimes you can weld a small bead on a few places around the interior of the race. When it cools the race will shrink. Napa used to sell something like nitrogen in a can, that you direct on the race to cool it, causing it to shrink which makes it easier to remove. I've also used a diamond burr on a Dremel tool to dig pockets where I could catch with a punch. Don't like to do it, but have also had to heat the hub slightly.

The key is patience.
 

cookie

Administrator
Staff member
Nice video, but I would like to point out a couple of things.
One when pounding steel against steel, always wear safety glasses. I saw none in the video.
That is not the proper way to repack bearings.

On edit, while I was watching the video Bill posted the same comment about safety glasses. Sorry.

Peace
Dave
 

Az_Ernie

Well-known member
Nice video, but I would like to point out a couple of things.
One when pounding steel against steel, always wear safety glasses. I saw none in the video.
That is not the proper way to repack bearings.

On edit, while I was watching the video Bill posted the same comment about safety glasses. Sorry.

Peace
Dave
Good catch Dave. I didn't watch the complete video. That is definitely NOT the way to pack wheel bearings. Just wanted OP to see how to replace the bearing race.
 

whp4262

Well-known member
I also use a good punch with a flat point and sharp edge and work my way around the race. I use light blows with a ball peen hammer until I move the race out enough to get a better bite with the punch and then I use heavier blows still working around the race till it's out.


Sent from my iPhone using Tapatalk
 

DougS

Doug S
I have tried a round punch and found the inside lip of the cup was too small. I now use a square piece of solid stock to drive the cup out. I found that using a square shaped punch gives you two points for contact where a round punch only gives you one point of contact. In this case a square peg does fit in a round hole.
As for the video, there are many other videos on line that are better. Three things that I saw wrong was the way he packed the bearings, the way he seated the outside bearing, and laying the tools on a dirty driveway then using them.
 

8amps

Well-known member
Hi, thanks for all the replies. I posted that late last night after a long hot frustrating day. Sorry about all the typos.
Ok, let me see if i can explain it better, and understand it right in the first place.
Removed the lug nuts, took off the tire and then the grease dust cover. Ours has the zerk fitting on the end. There was a lot of grease. We bought this unit used last year. Original owner had the bearings repacked a few months before (and i had the receipt). Whether this was a lazy/lousy job by that rv shop, or we had a failure in there I don't know. But on the rear left axle, the grease seal was uneven in the hub (before we even attempted to take it off). Once we got it off with the seal puller, there were little bits of a very fine spring in it (with lots of grease). On the front left axle, the seal was in place but on removing it, there was no spring but lots of grease and the bearing was severely pitted and worn, where perhaps the spring got in there and chewed up.
bought new races, bearings - originally thought we'd repack. However, the inner race is so worn, there is no lip or edge to get the punch anything to punch, it just slips off. Have the whole hub assembly in freezer hoping race might shrink a bit.
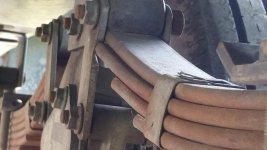
Not sure if this is related but earlier this spring we had a broken spring hangar on the left rear axle. Had it replaced on our way to Boerne, TX rally. Noticed when we had tire off yesterday, the 2nd largest leaf spring is misaligned and rubbing on outside shackle, which was nearly worn through. I would imagine a failure was imminent on that. We replaced that but can't get the leaf to realign unless we loosen the u bolts. The clip holding them together is not tight. When the hangar sheared off, the whole axle shifted. The right side rear axle leaf spring is rubbing on the inside shackle so it appears that it is still shifted somewhat. Can replace that shackle too, but that doesn't address the underlying cause. Tire wear at this point looks normal, but they are less than one year old goodyear g614, probably 10,000 tow miles on them.
Could this be affecting the bearings as well?

Ps cookie, i watched your video on packing a bearing (disc brake install) and it was very helpful.
 

danemayer

Well-known member
Once you take the suspension parts out, it can be difficult to realign them. It helps if both sides of the axle are off the ground, free to move, with the frame properly supported.

we had a broken spring hangar on the left rear axle
If you really mean that the hangar, welded onto the frame, is what broke, the obvious question now is whether the new hangar was welded into the correct place. You might try to get a thin straight edge piece of metal in to see if the hangars are all aligned left to right. Also be a good idea to measure the distance from center of each hangar to center of adjacent hangars. Since this is a 2010 BH, you probably have Lippert suspension. If I recall correctly, the spacing should be 29.75" center-to-center.
 

JanAndBill

Well-known member
inner race is so worn, there is no lip or edge

Not saying it's not possible, but I've never come up on one yet that didn't have an edge. Granted it's not much of an edge, that's why I and others have said you need a flat point on the punch with SHARP edges. If you just absolutely have no edge, then take a diamond burr and make one in the race.

Have the whole hub assembly in freezer hoping race might shrink a bit.

Shrinking a part for a press fit requires a temperature differential between the two parts otherwise they shrink or expand equally. You either have to cool the race or heat the hub. Welding small beads inside the race causes expansion followed by contraction as it cools. The race cools faster than the hub causing shrinkage, and gives you an edge to put a punch on. Just takes a steady hand.

As to the seal failure I would most likely attribute it to improper installation.


8amps

Well-known member
Also with the races, I was expecting a notch in which to put the punch and drive it out. There is no notch in these races and hub. Is that just with cars?
I'm attaching a photo of the shifted leaf springs. This is right rear inside shackle. Left rear outside looked the same. 20150816_093229.jpg
This is wheel bearing with pitting, not grease. It can look the same in photos. But very rough to touch.20150816_093505.jpg

Thanks Dan, it is Lippert suspension (7000 # axles anyway). I will go measure.
 

jnbhobe

Well-known member
Nothing more I can say you guys got it covered. If you look closely you may find little knoches in the hub for the drift to fit in to drive the race out.
 

cookie

Administrator
Staff member
I'm attaching a photo of the shifted leaf springs. This is right rear inside shackle. Left rear outside looked the same. View attachment 39353

I looks like your spring pack is misaligned. Usually caused by a loose U-bolt holding it to the axle.
You can loosen the U-bolt and pound the out of line spring back into place. Or if the U-bolt is already loose you could pound it in and then re-torque the U-bolt.

Peace
Dave
 

whp4262

Well-known member
You also might be able to grind a small half moon shaped notch in the hub above the race edge with a small die grinder. Just enough to get a bite with a punch, you would have to have 2, positioned across from each other. I've seen hubs with these notches manufactured into the hub.


Sent from my iPhone using Tapatalk
 

rxbristol

Well-known member
Good observation on the leaf-spring rubbing. Most, including me, may have overlooked that during an inspection.
 

8amps

Well-known member
I measured the center of the hangars. They are all exactly 29.75" apart. Front, center and back. However, left to right on the frame, they look a little off. The closest approximation I could make was to use a yard stick. On the right side (door side) they seem pretty even. On the left side (the one we are having issues with and the side the hangar was replaced) is off. The front and back ones seem about even, perhaps the rear one is further in but no more than 1/8 inch. However the center one (which as far as I know is original) the outside is flush with the frame where all the others sit inside the frame 1/8 to 1/4"
 

MTPockets

Well-known member
Mary/Phil... You are getting good advice and when it's all done you'll be experts.... My entire career revolved around the bearing business, teaching proper bearing handling, maintenance, etc. and the real key to long bearing life is doing it right the first time. Clean grease, clean hands, clean parts, careful installation, also correct tools. Never re-use a seal, even if bearings are good. It's not hard to nick the seal rubber during install, or cause a retaining spring to pop out. That may have happened at last install. Also, always replace both bearing and race; sometimes I've known where only the bearing was replaced because of the difficulty removing the race. Regarding the spring shift, there could be wear on the bushings or the U-bolt torque was not proper. Our u-bolts were all under spec when new and I checked them frequently and always found 2 - 5 nuts below torque every time for nearly three years. Last couple times they have all been good... Pretty much the same scenario with my MorRyde pin box mounting nuts. Keep at it, you'll get it.
 

8amps

Well-known member
Hi Terry,
Thanks for the encouragement. Boy oh boy, a project can really grow! It's really outside our skill set and general handiness and it helps to have this forum to ask questions. Which to experienced people probably sound stupid, but I'm anxious to learn and more importantly to do it right. It never occurred to me that the trailer shop that welded on the hangar wouldn't put it in the right place. That is why I took it to someone who I thought knew what they were doing. I have found in my limited experience with RVing that a lot of people will put a band-aid on something (without saying it's a band-aid and needs further attention) to get you on the road/out of their hair. And when you're a full timer, you don't have the luxury of dropping it off and letting them fix it when they can get it in. At the moment, we were supposed to move today, but obviously we are unable to go anywhere without wheels (literally!) Here's the race. I tried with the punches we have and absolutely cannot get any grip. You can see the ever so tiniest edge if you tilt it at an angle. But the stuff I read about getting the races out said be careful about going at an angle or you'll damage the hubs!!! I'm curious to see what the other side of the axles look like (but almost afraid to look). Thanks again to everyone for the suggestions...
20150816_131527.jpg.
 

MTPockets

Well-known member
With that tiny raceway edge, it's necessary to have a tool with a very flat edge to keep it from slipping off the race edge. Also, a heavy hammer and give it a lot of muscle. Hit it hard and solid, switching side to side until it drops. The bearing manufacturers advice is to always use a brass drift/punch which is softer than steel so you can't damage the hub surface. Those are hard to find, but it's what I always taught for proper handling.
 
Top