Universal Docking Center Plumbing Upgrades

wyleyrabbit

Well-known member
Hi Everyone,

This is a follow-up to this old thread, but I suppose this is more of a modification now. :eek:

In the year that we've had it, we had three leaks in our Bighorn: one very minor and two big enough that our basement floor was literally covered in water and everything in the basement soaked. All of the leaks were a result of failures in the black plastic fittings, and I know this because I could see the water coming out of the fitting. Aside from the hassle of having to deal with mopping up after a leak and doing my own repairs (we were camping in a town that had no RV dealers), I lost an entire day of my vacation and the kids lost a day at the beach.

As a preventative maneuver, I spent part of this past weekend upgrading the plumbing behind our universal docking center. With the exception of the lines to and from the water pump (Jim B's recommendation...thanks Jim), and to the freshwater tank, I changed out all of the plumbing lines to PEX, and all of the brittle plastic fittings back there to brass. The brass fittings should outlast not only the trailer, but also outlast me. :rolleyes: My hope is that this upgrade will result in years upon years of no water leaks.

It's a very different look now, as the spaghetti is gone and is now replaced with straight runs of PEX.

I forgot to take the camera with me, so I will take and post pictures shortly.

Cheers,
Chris
 

2010augusta

Well-known member
Cant' wait to see the pictures, the PEX upgrade and cleaning up the hose mess is still on my short list of things to do. I hope this fixes all of your leaks and you can have more trouble free camping this year.
 

beardedone

Beardedone
This is on my list to do now since I re-retired today. Were you able to fish all the new Pex very easily or did you have to butt join to the old piping and pull it through.
thanks in advance
 

aatauses

Well-known member
I would also like to see some pictures and more about the actual piping you used (size, fittings, etc). The reason I am interested is we have a leak about every 2-3 weeks, usually it is in the fitting where fresh water comes in. However I have replaced two of the plastic fittings you are talking about, one with brass and the other with a a heavy duty plastic (the ACE hwd did not have that in brass)---Where did you get the brass fittings? and did you need to use a pez tool for the fittings or did you use something else?
thanks
al
 

wyleyrabbit

Well-known member
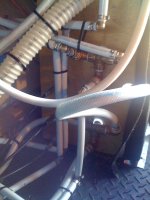
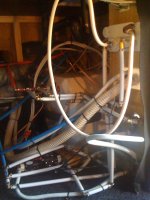
I have to start by apologizing for the quality of these photos. I didn't take either of our cameras with us last trip, so these are the best the camera built in to my iPhone could do.

There are two flexible hoses that go to the freshwater tank, one for water and the other one apparently for ventilation and I left both of those hoses alone. As mentioned before, I also left the hose that goes to the water pump at the recommendation of Jim Beletti here.

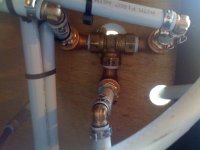
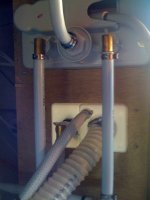
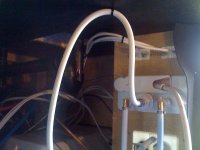
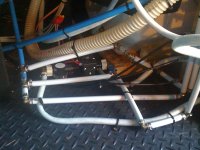
Misc iPhone pics &.JPGMisc iPhone pics &.JPGMisc iPhone pics &.JPGMisc iPhone pics &.JPGMisc iPhone pics &.JPGMisc iPhone pics &.JPG

I removed several meters of the flexible tubing, and all of the white PEX pipe you see in these photos is what I installed.

The PEX pipe is standard 1/2" PEX, and is available at our local Home Depot store. The brass fittings are all from HD as well, and the only ones that were a bit tricky were the threaded 90° elbow pieces which HD also carries but in a different isle. I used the Waterline brand Surlok crimp tool and PEX crimp rings. I also zap-strapped everything that seemed to make sense, and a few places that probably didn't.

As you will quickly see, I am definitely not a plumber but did my best, learning as I went along. I'm pleased to say that after hooking up to the campground water supply, we had no leaks or even drips back there. Whew.

I strongly believe this modification is a significant improvement to the plumbing system and now without the evil plastic fittings, we should be leak free for years to come. I would prefer to not see behind this wall again for a very very long time.

I certainly welcome any comments, questions, or suggestions.

Cheers,
Chris
 

wyleyrabbit

Well-known member
I should also mention, I zap-strapped the hose for the outside shower to the ceiling so it stays out of the way of everything else. It used to get caught up on other things back there, but now it works much better. You can see this in one of the pictures. :eek:
 

ralphpam

Well-known member
One of our 5 leaks flooding our basement was a water pump line and it is a tough one to get to and fix! We have learned to only put plastic on the floor in the basement and have gotten really good at cleaning up the mess!
 

wyleyrabbit

Well-known member
One of our 5 leaks flooding our basement was a water pump line and it is a tough one to get to and fix! We have learned to only put plastic on the floor in the basement and have gotten really good at cleaning up the mess!

Rather than getting good at cleaning up, wouldn't it be better to roll up your sleeves and fix the problem? I hope to never have another leak in our basement.
 

wyleyrabbit

Well-known member
I should also mention one if the essential tools to have before you attempt this is a good PVC/PEX cutter. Having 90° perfectly straight ends on the PEX is essential to having a good connection with the fitting. I got mine at HD as well.
 

caissiel

Senior Member
Nice Job

I am also inspired, I have added a surge tank and will be fixing the connections with Pex fittings when I get back home.
 

wyleyrabbit

Well-known member
Chris,
Very Nice. I'm inspired. Can you give an approximate cost and time to complete the project?

Well, first would be my plane ticket. ;) Heh heh.

Seriously, let's see:

  • Surlok PEX crimp tool (by Waterline): ~$45
  • generic PVC/PEX cutter: ~$20 (don't even try to use a knife...this works better and a knife is just dangerous around this stuff)
  • really good wire cutters: ~$20 (for removing old PEX crimp rings)
  • 1/2" PEX crimp rings: ~$40 for pack of 100
  • 1/2" PEX elbow barb fittings: ~$25 for pack of 25
  • 1/2" PEX barb tee fittings: ~1.50 each, buy a dozen and return what you don't use
  • 1/2" PEX pipe: ~$8 for 20'
  • white thread tape: ~$0.65 per roll

I also had to buy some other pieces that don't seem to be on HD's website.

  • 90° 1/2" FIP to 1/2" MIP brass elbow (don't buy non-brass or it will rust)
  • 1/2" MIP to 1/2" hose barb (for connections out of bottom bypass valve to flexible hoses...PEX connectors don't work well with the flexible hose, although the PEX crimp rings will work fine)
  • a bag of zap straps with a loop on the end, so if you want to screw anything down, you can other wise you can just snip off the loop
  • a measuring tape and a sharpie marker are handy for measuring out each run of pipe. Also, try not to bend the PEX too much. Better to have 2 straight runs, than a bent and weakened PEX pipe.
You'll also need a couple of good crescent (or better) wrenches, and some good pliers. A couple of good flashlights, work lights, or similar would be good, 'cause it's kinda dark in the basement.

The whole project, excluding shopping for stuff, probably took me the better part of 5 hours, which I spread out over 2 days. I did the project out on the farm where we store the trailer, and my family was at home in our "sticks & concrete house" (we have no bricks :p) so there was no immediate need for plumbing during the project.

I suggest doing the project in a logical and methodical manner, replacing one section at a time. It would be really easy to get stuff mixed up back there.

Hope this helps.

Cheers,
Chris
 

watchthebox

Well-known member
Rather than getting good at cleaning up, wouldn't it be better to roll up your sleeves and fix the problem? I hope to never have another leak in our basement.
You've done a great job replumbing your rig! Thanks for the pictures and instructions! Looks like I have another project to schedule.

As much as I enjoy tinkering with things, these sort of discussions make me wonder why Heartland couldn't have done a better job to begin with, so we don't all have to become experts at plumbing. My first encounter with the backside of the UDC was after experiencing leaking after the first use of the black tank flusher. When I took off the wall to investigate, I found the tubing had popped off the fitting at the back of the UDC, and noticed that the strap that was supposed to hold it on had never been crimped at all! I cringe to imagine what else (more critical) might fail in the future due to similar substandard workmanship.
 

wyleyrabbit

Well-known member
You've done a great job replumbing your rig! Thanks for the pictures and instructions! Looks like I have another project to schedule.

As much as I enjoy tinkering with things, these sort of discussions make me wonder why Heartland couldn't have done a better job to begin with, so we don't all have to become experts at plumbing. My first encounter with the backside of the UDC was after experiencing leaking after the first use of the black tank flusher. When I took off the wall to investigate, I found the tubing had popped off the fitting at the back of the UDC, and noticed that the strap that was supposed to hold it on had never been crimped at all! I cringe to imagine what else (more critical) might fail in the future due to similar substandard workmanship.

In Heartland's defense, I think they get the UDC as a mostly complete kit from their supplier. That said, it would be nice if they insisted their UDC supplier did a better job and used better components. I still insist the black plastic pieces are evil and the direct cause of all of the leaks we had, and probably most of everyone else's leaks too.

This was the biggest project I've done on the rig so far. I do enjoy tinkering on stuff and love learning new things. The people on this forum are such a great resource.

Let me know if you have any questions, and be sure to share pictures of your finished project.

Cheers,
Chris
 
Top