Vent cover replacement 1987 Mallard

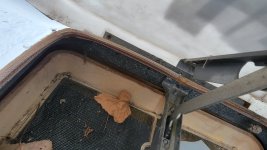
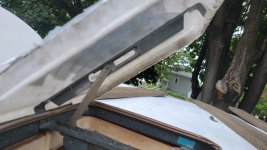
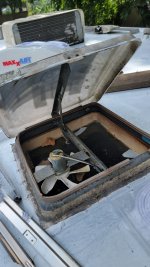
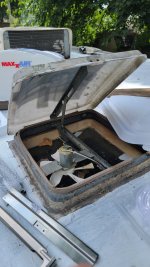
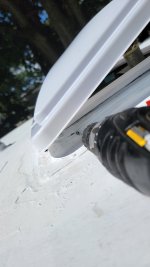
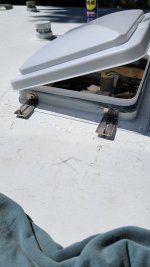
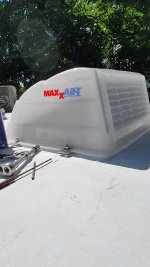
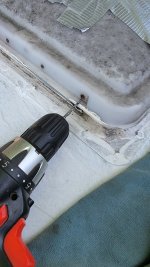
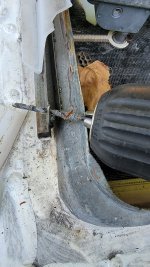
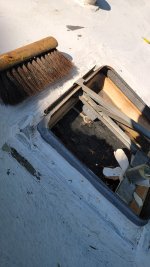
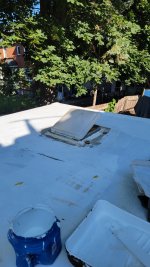
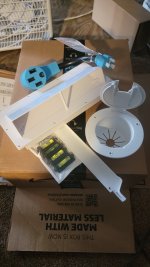
I looked for 15 minutes, didn't see
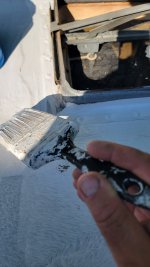
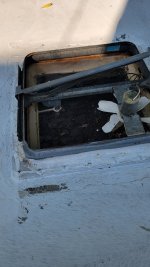
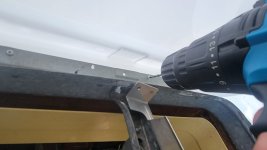
what would help, so this vent needs to be replaced, pics included, seems to be secure and not removable, any suggestions how to take off? So new one can be put on. Looking at it I would Crack the plastic and rip everything off, any one have any other ways to get it off. Then I may have another question on how to put on new vent cover, maybe/might be able to do that on my own...go Detroit Tigers...
Scott
 

Attachments

  • 16937656135235901415381509026543.jpg
    16937656135235901415381509026543.jpg
    894.3 KB · Views: 24
  • 1693765645015361946095455148924.jpg
    1693765645015361946095455148924.jpg
    761.9 KB · Views: 18
Replacing this vent, it is securely fastened, seems unremovable, 2nd post on this subject, I turned in 2 pics and couldn't figure out why I couldn't send in more pics with my last post...just thought of the word I was thinking about, RIVETS, my vent lid is secured with/by RIVETS, I believe is the word, holding on the plastic old cover...Scott
 

Attachments

  • 16937662306844418670330107583415.jpg
    16937662306844418670330107583415.jpg
    1.9 MB · Views: 22
  • 16937662650123823551449179779691.jpg
    16937662650123823551449179779691.jpg
    1.9 MB · Views: 23

Bogie

Well-known member
Yes the cover appears to be riveted to the frame. Your pics don't show it, but you have you looked at the hinge? I would think you should be able to separate the cover from the frame there. The pivot on the raising arm that slides along the bracket should also be releasable.

Take a look at the pics from this one on Amazon. It might give you a better idea.

https://www.amazon.com/CampN-Univer...vent+lid,todays-deals,159&sr=1-6-catcorr&th=1

Alternatively, you could replace the whole vent, frame and all, for a bit more cost. Really not that hard to do. Just need to be careful when removing the Dycore from the roof material.
 

cookie

Administrator
Staff member
Drill out the old rivets then mark the holes on the new cover, drill correct size holes then pop rivet the new cover in place.

Peace
Dave
 
Ok, thanks for your reply, I used Awesome cleaner on the whole roof, 3 days ago, extremely low price cleaner at Dollar Tree, today I scrubbed around 3 vents on the roof by spraying with the Awesome spray bottle, washing/spray down roof again today with water hose, 2nd coat of Duck roof paint going on tomorrow, I will go to the link after I post this and have a look, was thinking I could drill out the rivets, they sent tiny bolt, nut, washer, to tie on new plastic cover to vent opening metal brackets, either before I apply 2nd coat of paint tomorrow or wait till Tuesday to install vent covers, I may get more suggestions, on the repair, We will be getting Rain here in the Thumb of Michigan Wednesday, hopefully get my 2 new plastic covers installed and the big Max Air over that, it ain't gonna be releasable with out more work, I think I may Crack the plastic by hand or drill through those rivets in the morning, that is silver Duck tape on lid of cover and I think this cover might be original from 1987, when this Mallard was built, looking at my other post >the administrator Dave said I should drill the rivets out, probably go that route, I will post and send in pics tomorrow for the other do-it-your-selfers. Scott.
 
Couple pics of the work in progress, I learned to drill the rivets out from the inside/back of the rivets where the drill bit has a "o" circle hole for the drill bit to bite through the rivets, more cleaning with Awesome cleaner from Dollar Tree Store, works really good on grime, rinse off with hose, dry in Sunshine, then paint over with Duck rubberized roof paint, this plastic cover was mounted in 1987 I believe...Scott
 

Attachments

  • 20230904_113829.jpg
    20230904_113829.jpg
    1.6 MB · Views: 9
  • 20230904_094522.jpg
    20230904_094522.jpg
    2.1 MB · Views: 10
  • 20230904_100711.jpg
    20230904_100711.jpg
    1.5 MB · Views: 7
  • 20230904_095930.jpg
    20230904_095930.jpg
    1.8 MB · Views: 9

wdk450

Well-known member
It seems to me that when I replaced this cover due to hail damage (here in California!!!), all you had to do to remove the cover is tilt the lifting mechanism full up, lift the cover a little more until the arm reached the hole at the end of the cover arm slit in the metal edge, pop the arm roller through the hole, tilt the released cover to full vertical, then (on the roof) slide the cover to the right or left in its 2 part tubular slit hinge (tubular hinge attachment on cover, slit tubular hinge mating mount on vent frame.
Looking on You Tube there are a number of vent cover replacement videos, but they all seem to show a conventional hinge with 4 mounting screws to the fan frame.
 
Thanks for your reply, I have 1 more vent cover, maybe to replace in the future, it still looks in good shape, however it needs an Air Max vent cover, when I do replace it I will look at what you said, reading your reply it seems you said lift vent cover up vertically and slide the hinge completely off 1 way or the other, they sent replacement metal parts to use, I have not seen the YouTube video yet on replacing Vent covers, found alot of Solar power ideas for Travel Trailers, I will look for the YouTube videos on this subject later, my Trailer is a 1987 Mallard Travel Trailer survivor...what do you own, in 1987 to now these hinges are rusty and I applied WD-40, I should have used my passed away Brother's old tin oil spray pump old fashioned pump "sprayer"...I received almost all his 1,000's
of power tools and wrenches, anyway new pictures posted here of the results...Scott.
 

Attachments

  • 20230905_155005.jpg
    20230905_155005.jpg
    553.7 KB · Views: 8
  • 20230905_124614.jpg
    20230905_124614.jpg
    1.3 MB · Views: 8
  • 20230905_133803.jpg
    20230905_133803.jpg
    1.5 MB · Views: 8
  • 20230905_134959.jpg
    20230905_134959.jpg
    1.6 MB · Views: 7
  • 20230905_182647.jpg
    20230905_182647.jpg
    2 MB · Views: 7
Work goes on, just looking back at
a post from Bogie, to me, he said I should have checked the hinge, I didn't quite understand what he was getting at, wdk450, you sort of explained it further, saying take off full mechanism with the metal arms attached to the old plastic vent cover and I should have installed the new vent cover with the new metal arms, interesting, anyway probably 5 years from now, the 3rd plastic vent cover from 1987 will probably start cracking...the pictures I took and sent in sort of explain the work to this point, for future reference for a do-it-yourselfer, Scott, how bout them Lions, vs KC on Thursday Night Football...
 

Attachments

  • 20230904_094114.jpg
    20230904_094114.jpg
    2 MB · Views: 6
  • 20230904_094522.jpg
    20230904_094522.jpg
    2.1 MB · Views: 6
  • 20230904_100412.jpg
    20230904_100412.jpg
    2.1 MB · Views: 7
  • 20230904_100841.jpg
    20230904_100841.jpg
    2.1 MB · Views: 11

wdk450

Well-known member
I have a 2008 production trailer, so the hinge design might of changed, or my 73 year old mind might have been deceiving me as to how the repair exactly went about 10 years ago.
 
Hey, wdk450, I believe I have finished my Mallard Travel Trailer roof repair for the time being, we just had a small rain shower, probably not enough rain to be able to tell if any rain drips are getting to inside of Travel Trailer, looking at the hinge briefly yesterday, I don't know if it would slide out in order to slide in the new replacement metal brackets, seemed rusty, and the hinge seems locked in place, could have been a completely different design in 1987 when this Mallard was built, well I have new exterior plastic pieces too install, this afternoon or tomorrow, I will post some before and after pics with the new exterior parts...some talk the Lions may win against KC, Thursday Night Football, 2023, 1st game season...Scott, & I have almost decided to keep the front panel plastic cover, original, I will buy 10/20 tubes discount plastic glue cement, and place a plastic piece in the back of panel and glue everything together, cracks and all...
 

Attachments

  • 16940324410602092006521156710754.jpg
    16940324410602092006521156710754.jpg
    1.5 MB · Views: 7
  • 20230906_131906.jpg
    20230906_131906.jpg
    2.8 MB · Views: 8
  • 20230906_131822.jpg
    20230906_131822.jpg
    2.9 MB · Views: 8
  • 20230906_131849.jpg
    20230906_131849.jpg
    3 MB · Views: 8
Top