What did you do to your camper today?

JohnD

Moved on to the next thing...
Oh yeah . . . sold my old set of five BlowMax tires and wheels from our old 2013 Heartland Trail Runner!

The guy that bought them remodels kitchen cabinets and plans to use them on one of his utility trailers.

These are the photos I took of them yesterday to put in the Craigslist ad:

Wheels4sale1-P1000283.jpg Wheels4sale2-P1000284.jpg Wheels4sale3-P1000285.jpg
 

TravelTiger

Founding Texas-West Chapter Leaders-Retired
Well, thanks to our electrical issue that fried the television, we went searching for a replacement. Sad, because this 37" TV wasn't but 2 years old and fit perfectly in the space, replacing the OEM 32".

Turns out, 37" TVs are not made anymore. You can find lots of 32" or 39" and 40". (Refurbished and used are available, but cost more than new!) So we went up to a 40" and now TV is slightly bigger than "hole", but still looks good and we will still be able to secure it with the travel straps.


Sent from my iPhone using Tapatalk
 

pegmikef

Well-known member
Applied another coat of Rejex wax on the cap and started my final PM/check in preparation for our departure next week to a cooler climate and then on to our MO, OK, LA, TX fall rally circuit.
 

Miltp920

Well-known member
cyclone sofa shelf.jpgshelf hardware.jpgpantry shelf.jpgInstalled a shelf in our living room slide. Heartland did not design any drink holders into the 3100 cyclone sofa. I connected the shelf to the window valence. I think it will hold a pop or cup of coffee. Tractor Supply had a pretty dark brown paint, matched as good as I think I could have done. Previously, I added a shelf in the pantry. We do not have the double door fridge, so there is a narrow pantry to the right of the fridge. Doubled the storage square footage of that cabinet.
 

travelin2

Pennsylvania Chapter Leaders-retired
I have never figure out why they design these cabinets with no shelves. Just dead wasted space.

Agree. One doesn't buy kitchen cabinets like that for their S&B, if they still have one!! I've added some shelving in our BH as well.


Sent from my iPhone using Tapatalk
 

'Lil Guy'

Well-known member
Picked up the 'Lil Guy' in Kerrville and brought him home to clean up and store again. He was left up there for a week due to truck issues. Had the turnover ball setup with the 20K companion hitch installed in new truck and it's a little high. Rode home with his nose in the air like he was proud to be behind the new truck.lol The Baker luck happened. DW backed up to the hitch this morning. I set the hitch and locked it, she did the pull test and immediately turned off the truck, hit the lock feature on the fob, threw the keys in console with all windows up and shut the door. Does anybody know what it costs to get a locksmith out on Sunday? I hadn't registered the truck with the apps yet and couldn't get them to open the door till it is registered. Good sthing the park was crowded.
 

JohnD

Moved on to the next thing...
Friday I decided to tackle the project of mounting the MaxAirII vent cover to one of the new fangled Ventline ceiling vents on my Prowler.

The brackets lined up . . . the holes in the brackets didn't.

I went up on the roof with a bracket in hand and figured out where the holes should be . . . then drilled a hole in the determined spot on each bracket . . . then climbed back up in the 95 degree heat and proceed to mount the lid.

I attached the lid to one side of the vent . . . then attached the other two brackets with the cotter pins . . . almost done . . . right?

WRONG!

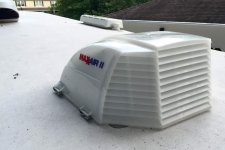
Closed the lid to latch it down only to discover that these new vents are bigger than the standard metal ones from days past, and the lid closed off center over the vent and about halfway into the other brackets.

So . . . the MaxAirII will spend more time sitting out in the garage while I figure out how to mount this thing . . .

Or maybe find another brand of vent lid covers that has actually taken the time to make something that fits today's new RV's!

I had already contacted MaxAir once and they said they don't make brackets to fit these new Ventline vents . . . but advised me that I could drill holes in my roof and mount it that way . . . NOT!

Well, if they want to sell any more MaxAirII vent covers in the future they'd better get off of their rear ends and make brackets to fit as these new Ventlines are showing up in most of the new RV's out there!

I have three vents I need to cover . . . thought I already had one taken care of with this vent cover.

Here are the photos:

MaxAirIIbracket-P1000332.jpg MaxAirIIbracket-P1000335.jpg MaxAirIIbracket-P1000334.jpg MaxAirIIbracket-P1000338.jpg MaxAirIIbracket-P1000336.jpg MaxAirIIbracket-P1000341.jpg MaxAirIIbracket-P1000344.jpg MaxAirIIbracket-P1000342.jpg

Looking at these photos, I think I have come up with another idea . . . will try it later this week before we take off for our next campout!
 

JohnD

Moved on to the next thing...
I would check and see if they make a shorter mounting kit. I think they do.

Already checked . . . they told me to drill holes in the roof and mount these brackets directly to the roof.

Don't want to drill holes in the roof.
 

Jesstruckn/Jesstalkn

Well-known member
Already checked . . . they told me to drill holes in the roof and mount these brackets directly to the roof.

Don't want to drill holes in the roof.

you could always cut and re-bend those brackets. measure the distance that it is off in that last pic, divide it by 2 and shorten each side that much. looks like about 1 1/4" each side
 

'Lil Guy'

Well-known member
John, mine went on the 1st time but my vents had metal lips without the little brackets molded on. I used 2 screws with nuts and bolts to hold them on. What if you just took a dremmel or grinder (if they are molded) and remove them and drill threw the sides like the instructions show? Make sure of the sides of your vent are the right size. I think those extended lips are your problem. Just a thought. Measure how far it's off and subtract the brackets and see if that is the problem. Again mine has no brackets and you just drill into the side of the vent. I think I had Debbie on the inside helping at some point in the install. Good luck.
 

JohnD

Moved on to the next thing...
you could always cut and re-bend those brackets. measure the distance that it is off in that last pic, divide it by 2 and shorten each side that much. looks like about 1 1/4" each side

I had an extra bracket . . . tried to bend it and it broke.

- - - Updated - - -

John, mine went on the 1st time but my vents had metal lips without the little brackets molded on. I used 2 screws with nuts and bolts to hold them on. What if you just took a dremmel or grinder (if they are molded) and remove them and drill threw the sides like the instructions show? Make sure of the sides of your vent are the right size. I think those extended lips are your problem. Just a thought. Measure how far it's off and subtract the brackets and see if that is the problem. Again mine has no brackets and you just drill into the side of the vent. I think I had Debbie on the inside helping at some point in the install. Good luck.

Yup . . . that is the same way this one fit on our old 2013 Heartland Trail Runner.

Took me less than 10 minutes to install it on that trailer.

I thought about grinding down those tabs, but I don't want to do that to the trailer . . . not to mention that I have three vents to do . . . too much grinding!

I'm still trying to figure out why Ventline/Dexter put those tabs on there in the first place?

There must be something that hooks to them . . . but I can't even find these ceiling vents on their website.
 

Jesstruckn/Jesstalkn

Well-known member
If bending them will brake them. Then cut em and overlap them to the length you want, put them in a vice and drill 2 holes side by side through them and rivet or bolt them back together. Just a suggestion if you rally want them on there.
 

'Lil Guy'

Well-known member
I had an extra bracket . . . tried to bend it and it broke.

- - - Updated - - -


Yup . . . that is the same way this one fit on our old 2013 Heartland Trail Runner.

Took me less than 10 minutes to install it on that trailer.

I thought about grinding down those tabs, but I don't want to do that to the trailer . . . not to mention that I have three vents to do . . . too much grinding!

I'm still trying to figure out why Ventline/Dexter put those tabs on there in the first place?

There must be something that hooks to them . . . but I can't even find these ceiling vents on their website.

Call them up. A 4" disc grinder would take about 30 seconds to remove that piece from the vent. Just make sure that that will be the right dimension.
 

Roller4tan

Well-known member
When I installed my vent covers I removed a mounting screw from under the dicor inline with the bracket on the cover. I ran the screw through the slotted hole in the bracket. No drilling, however I didn't have those tabs on any of mine.
 

tomsws6

Active Member
What did I do today? I looked at it and said " Good god this thing is huge, I need a bigger truck!"
 

Attachments

  • camp.jpg
    camp.jpg
    94.7 KB · Views: 91

porthole

Retired
Since our trailer is older, these roof vent issues are not an issue :rolleyes:

Just put our third vent cover on. I used the Traveling Vent cover version. This particular version was originally purchased in parts unknown, made it's way to the Goshen for sale table, then under the table, then a tug-o-war between potential buyers, then it traveled to other parts unknown, including I believe Mississippi and Louisiana, then back north to upstate New York and finally resting at the Jersey Shore. It may take 2-3 years before this cover sees as many miles on the roof as it has seen under a roof.

- - - Updated - - -

While at Goshen one of the Heartlanders parked next to us decided to lighten his cargo load for future travels, so he gave me a package of 198 style LED bulbs (thanks again Eric).
There were just enough to replace two bulbs that I had just burned out on the golf cart and to replace all the amber lights on the Cyclone.
I had a few red LED 198's for the motorcycle in stock, so they went in the rear marker lights.

- - - Updated - - -

Upgraded my fine glassware for evening libations.
 

Attachments

  • Cyclone_roof_vent.jpg
    Cyclone_roof_vent.jpg
    67.9 KB · Views: 65
  • Cyclone_rear_LEDs.jpg
    Cyclone_rear_LEDs.jpg
    64.3 KB · Views: 67
  • Red_solo_cup.jpg
    Red_solo_cup.jpg
    127.2 KB · Views: 70

JWalker

Northeast Region Director-Retired
Added a second set of 4 tread steps to the Elkridge. What a difference. Don't need to carry around a separate step anymore. Thanks Jim & Colleen for the steps.

20kfadk.jpg


206h72h.jpg
 

travelin2

Pennsylvania Chapter Leaders-retired
Installed a grill on the screen door so our 2 yr old granddaughter doesn't push the screen causing any damages to it or anything worse.
4ff9db7abbe166909a5cbd840d9be150.jpg


Sent from my iPhone using Tapatalk
 
Top