You are using an out of date browser. It may not display this or other websites correctly.
You should upgrade or use an alternative browser.
You should upgrade or use an alternative browser.
What did you do to your camper today?
- Thread starter MagnoliaTom
- Start date


CoveredWagon
Well-known member
Started installing Centramatic wheel balancers and replacing the capped lug nuts with solid ones from NAPA.
JohnD
Moved on to the next thing...
You can also change the quartz or Halogen bulbs to the LED equivalent. Little heat and saves on power.
I may start looking around for a replacement lamp instead, although for now this fix is providing nice subtle lighting over the dinette.
- - - Updated - - -
Gave her a bath and loaded up the essentials. Heading to the RV show in Raleigh next Friday. Time to get the season started.
You need to come out west to our Mountain Region HOC Rallies . . .
We love Fireball out here!
rahewett
Well-known member
Maybe some day. Still doing that 4 letter word so we just don't get to travel that far. But if you ever make it to the east side there's always some in the freezer chillin.I may start looking around for a replacement lamp instead, although for now this fix is providing nice subtle lighting over the dinette.
- - - Updated - - -
You need to come out west to our Mountain Region HOC Rallies . . .
We love Fireball out here!
Sent from my SM-G950U using Tapatalk
JWalker
Northeast Region Director-Retired
Gave her a bath and loaded up the essentials. Heading to the RV show in Raleigh next Friday. Time to get the season started.
Sent from my SM-G950U using Tapatalk
That is my type of essentials… LOL.
justafordguy
Well-known member
You can also change the quartz or Halogen bulbs to the LED equivalent. Little heat and saves on power.
Agreed, put some soft white LEDs in there and you probably won't need the shield anymore.
1776RedBeard1976
Member
Actually more for me than the camper. Have to maximize my purchases before BP changes my retirement purchasing structure from Cabela’s.
New Treager smoker.
View attachment 55941
I was thinking about pulling the trigger on this. Have you been able to use it yet?
rjr6150
Well-known member
I was thinking about pulling the trigger on this. Have you been able to use it yet?
I haven’t been sitting in my garage since Xmas. The reviews I’ve read speak highly of it. Only negative and I don’t really consider it a negative is the cooking area size.
dykesj11
Well-known member
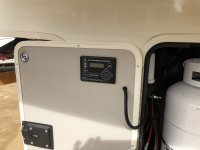
LevelUp Control Panel relocation
I am waiting on materials for RO water system. I am using Jim Beletti's pictures of his RO install to plan mine out. While reviewing all the pictures he's posted for various projects, I came across the relocation of the LevelUp control panel. Mine started out in the big black box on roof of the cargo bay on door side. I knocked it loose first time I pulled the loaded up Mor Ryde slide out. This is pretty easy mod. The cable ran from cargo bay into door side propane compartment into generator compartment. I cut the connector off and pulled the wiring back into the generator compartment and then ran it to the other side through available pass-thrus. I drilled a 1/2" hole for wiring and rubber grommet and cut a hole for the control panel. Popped the control in, ran wiring inside the door to rubber grommet and then reconnected to wiring using butt splices.

I am waiting on materials for RO water system. I am using Jim Beletti's pictures of his RO install to plan mine out. While reviewing all the pictures he's posted for various projects, I came across the relocation of the LevelUp control panel. Mine started out in the big black box on roof of the cargo bay on door side. I knocked it loose first time I pulled the loaded up Mor Ryde slide out. This is pretty easy mod. The cable ran from cargo bay into door side propane compartment into generator compartment. I cut the connector off and pulled the wiring back into the generator compartment and then ran it to the other side through available pass-thrus. I drilled a 1/2" hole for wiring and rubber grommet and cut a hole for the control panel. Popped the control in, ran wiring inside the door to rubber grommet and then reconnected to wiring using butt splices.
Attachments
Re: LevelUp Control Panel relocation
Nice! PM'd you my phone number if you want to chat about RO systems.
I am waiting on materials for RO water system. I am using Jim Beletti's pictures of his RO install to plan mine out. While reviewing all the pictures he's posted for various projects, I came across the relocation of the LevelUp control panel. Mine started out in the big black box on roof of the cargo bay on door side. I knocked it loose first time I pulled the loaded up Mor Ryde slide out. This is pretty easy mod. The cable ran from cargo bay into door side propane compartment into generator compartment. I cut the connector off and pulled the wiring back into the generator compartment and then ran it to the other side through available pass-thrus. I drilled a 1/2" hole for wiring and rubber grommet and cut a hole for the control panel. Popped the control in, ran wiring inside the door to rubber grommet and then reconnected to wiring using butt splices.
View attachment 56760
Nice! PM'd you my phone number if you want to chat about RO systems.
We had camping Weather last week but we got hit with tail of the Texas low and snow arrived again Thursday. I am working on designing a old camera pan/ tilt head for full size residential dish as our Wineguard carry out will no longer function on the new satellite setup for Shawdirect. Roof mount is 3k installed, not in the cards right now.
We went to the RV show today and looked at all the new trailers comparing our purchase a year ago on the Heartland Bighorn. We still made the correct choice.
We went to the RV show today and looked at all the new trailers comparing our purchase a year ago on the Heartland Bighorn. We still made the correct choice.
Howdy!
Been working on things preparing for our trip this year to Alaska. Packed wheel bearings and checked brakes. Installed new gray water valve. Repaired a short in the running lights. Changed oil and filter in the generator. Repaired water pump. Last but not least I’m installing a 12 volt inverter in the bedroom for when we boondocks.
“Happy Trails”
Chiefneon
carl.swoyer
Well-known member
Power washed the roof membrane. Two coats of roof protection. Resealed the roof.
I did use a roll of erthabond that was sticking to everything in my tool box.


Sent from my XT1254 using Tapatalk
I did use a roll of erthabond that was sticking to everything in my tool box.


Sent from my XT1254 using Tapatalk
carl.swoyer
Well-known member
I finished my roof seal. The last picture shows a red line. This is where I found issues with the underlying screws. On both sides I found about five or six screws that had chafed through the roof membrane. I opted for a bead of self leveling sealeant along the top edge of the rain gutters and the roof . The screws had actually made small holes. Next project changing the entry stairs.Power washed the roof membrane. Two coats of roof protection. Resealed the roof.
I did use a roll of erthabond that was sticking to everything in my tool box.
Sent from my XT1254 using Tapatalk

Sent from my XT1254 using Tapatalk
I too, did a power wash yesterday and a UV sealing today of the roof. And the day before installed a power fan in the bedroom. I'm glad installing the power fans are done. Put a remote in the kitchen (nice) and a cheap 3 speed reversible 2 speed one in the bathroom (noisy) and the bedroom is 10 speed reversible but quiet. Going to enjoy them.
TravelTiger
Founding Texas-West Chapter Leaders-Retired
This weekend, we installed a Zarcor CloZure window shade/window on our front door.
This replaces the frosted glass with a clear tempered glass (from LCI) and a stick-on, removable shade that slides to the side to open and close via a handle that is accessible with the door closed, by way of the opening in the screen door. (You will reuse your existing frame, and new sealant is included.)
Installed:

Blind closed in full sun:

Blind open in full sun:

View of door from outside:

The project was fairly easy to do. The finished project helps cut the sun streaming through the front door window, and gives one an easy view out from the door.
I highly recommend this upgrade! It's available in "room darkening" and "light beige".
http://zarcor.com/rv_products/index.php
Sent from my iPhone using Tapatalk
Oldelevatorman
Well-known member
Yesterday I finished up with the Dri-Wash & Guard on the upper parts of the trailer that the DW couldn't reach. Noticed some caulking that needs to be redone on the roof and bulb seals on the kitchen and living/dining area slides that are shot. Had a mobile guy come out and look at it and they will order the seals and do the caulking in between rain storms here in the Santa Clara Valley wine country. Time to run my two generators also since it's been a few weeks.
Sent from my iPhone using Tapatalk
Sent from my iPhone using Tapatalk
CoveredWagon
Well-known member
Replaced the frosted glass in the door as well. Never made sense to my why it was frosted. Someone knocks on the door and you have to look out some other window to see who’s there. Duh! Anyway not sure about needing or wanting the shade although I’ve given it some thought.
Bob.jr
Well-known member
What brand of clear caulk are you using?I finished my roof seal. The last picture shows a red line. This is where I found issues with the underlying screws. On both sides I found about five or six screws that had chafed through the roof membrane. I opted for a bead of self leveling sealeant along the top edge of the rain gutters and the roof . The screws had actually made small holes. Next project changing the entry stairs.
Sent from my XT1254 using Tapatalk
Sent from my SAMSUNG-SM-J327A using Tapatalk
Similar threads
- Replies
- 7
- Views
- 714
- Replies
- 2
- Views
- 316