You are using an out of date browser. It may not display this or other websites correctly.
You should upgrade or use an alternative browser.
You should upgrade or use an alternative browser.
And so it begins
- Thread starter porthole
- Start date
recumbent615
Founding MA Chapter Leader-retired
Re: And so it begins - mods to personalize the rig
I need to do the same thing. I bought the genturi system last year and have not used it yet.
Sent from my iPhone using Tapatalk
I need to do the same thing. I bought the genturi system last year and have not used it yet.
Sent from my iPhone using Tapatalk
porthole
Retired
Re: And so it begins - mods to personalize the rig
The Camco people are good to deal with as well. My Gen-Turi had a broken pipe. No damage to the box or the plastic it was wrapped in, someone packed it that way.
No problem, they were sending another right out, offered to next day it but we would have been on the road before it arrived. With the Cyclone you need the 18" extension.
Wanted to buy a second "bungee & clips" set, no problem, they threw them in with the replacement pipe n/c.
Camco being as big as they are now I was surprised at the customer service.
porthole
Retired
Re: And so it begins - mods to personalize the rig
Not exactly a trailer mod, but it is for the trailer.
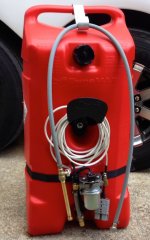
First year at a Dover Speedway I had to add gasoline to the Cyclone tank using 5 gallon jugs. A real pain since the fuel pipe is so low and the EPA fuel jugs are not user friendly.
2nd year I had picked up a 14 gallon fuel tote from Tractor Supply ($100). This was better but the squeeze pump handle took forever and was tough on the hands. I made up a hose that allowed gravity fueling as long as I could get the truck close to the trailer. First two years we were wide open on our site with no campers for 2 spaces to the left, right or in front of us, and just 1 small travel trailer behind us.
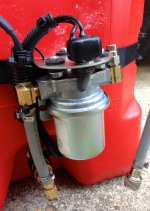
This year instead of tempting fate with our open space, I added an electric fuel pump to the tote. Works pretty good. A bit slow, but it gets the job done when gravity can't. Airtex pump and a few fittings and some hose.
I used a ratchet strap to mount it to the tank. The tank plastic is fairly stiff, so the strap works real good at holding the pump.
A standard marine fuel disconnect was used to make the hose detachable and on the other end a simple ball valve.. I also had just enough 12 gauge wire and a spare industrial battery connector in the garage.
The trailer already has one of the battery connectors under the frame to use a macerating pump to pump out the tanks when we get home.
Attachments
streetdoc
Member
Handly or Handy? I'm assuming this:
http://www.redlinestands.com/catalo...-p-783?zenid=d3bd1fcebb57d93baebb2da8f15cd14f
I don't secure it. I use a Condor, which is made so that it can be used free standing.
http://www.amazon.com/Condor-PS1500-Floor-Stand-Motorcycle/dp/B0083VBDF4
The Condor has a quick detach provision, small plate that you bolt down to the floor and use thumb screws to attach.
View attachment 27876
I did bolt that plate down initially, by find it is unnecessary as long as the bike is properly tied down.
I use a piece of 2x10 in front of the chock to limit forward movement.
I still have a BikePro chock and quick mount plate for one side of the trailer, only because I have been a bit lazy in removing the hold down plate. If needed, I do have a second Condor to use in the trailer. I have only needed that for one trip so far.
For now though, I keep the second Condor in the house garage and park the bike in the chock. Surprising how much more room you have to move around when the bike is upright.
Unless things have changed, you have 1" of plywood for your garage floor. There are also 5 steel cross members underneath, they will be inline with the hold downs you have in the trailer.
If you look back far enough on my thread, you will see that what I lack in bolting down the chock I make up for by having numerous tie down attachment points.
I use 5.
Two forward and out attached to the driving light brackets.
Two out and slightly back attached to the passenger floorboards.
One around the rear wheel straight back.
I do not compress the springs more then an inch, the bike does not have to be tight. I let eh bike ride on it's own suspension.
20K mile snow with now issues.
I also have a Bike Pro that was given to me, modified it to have some steel arms coming out to the side with eyelets. I use ratchet straps to secure the chock in place. I then load up the Gold Wing and strap it down, three straps per side.
streetdoc
Member
Gave up with the wet carpet (and wood) and mold and ripped out the left side toolbox framing.
I still have not found where the water is coming in, but it is not getting past the water dam I put in.
//heartlandowners.org/showthread.php/11365-And-so-it-begins?p=135046&viewfull=1#post135046
From the opposite side I could see that it is in there and well sealed.
What I am now thinking is that water is getting above the J-wrap from "somewhere" and the carpet is wicking it up. The carpet was again soaked and the after pulling it out I could see that the OSB side boards were damp and moldy. The bottom board was soaked and with mold.
I found PVC trim at home depot, 1/2" thick by 11 1/4" x 8', $40 for two pieces.
http://www.homedepot.com/p/Veranda-...-Fascia-White-H120WWS1/203733425#.UXqiJkoTT-t
More to follow
Took me two days but I have read through every post, WOW, great information. I noticed this same type water leak on my 4100 King, traced it back and figured it to be not enough cocking behind the trim ring for the cargo door openings. I have not had any issues with water in these compartments since then. I check after each good rain storm just to make sure.
danemayer
Well-known member
Took me two days but I have read through every post, WOW, great information. I noticed this same type water leak on my 4100 King, traced it back and figured it to be not enough cocking behind the trim ring for the cargo door openings. I have not had any issues with water in these compartments since then. I check after each good rain storm just to make sure.
Hi streetdoc,
Welcome to the Heartland Owners Forum and thanks for joining in the discussion.
porthole
Retired
Something that has been on my list of things to do since day one. Had one on our 2003 Sunnybrook TT. I know landmarks use to come with them as well.
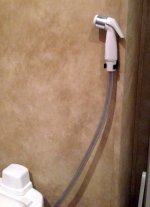
Toilet spray nozzle.
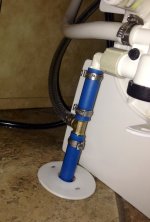
There are 2 ways to do this. The sprayer is available from Dometic. There is a different valve at the top of the bowl that feeds the hose. That version is after the foot operated valve, so the nozzle only gets pressure when the foot pedal is depressed, and some of that pressure is diverted to the bowl.
I decided to plumb it in before the foot valve.
Used a Pex Tee 1/2 x 1/2 x 3/8, 3 clamps, a Home Depot kitchen universal sprayer and hose. The hose end opposite of the nozzle is a straight 3/8 which nothing in the plumbing dept matched up to any fittings, so the simple way was cut the fitting off and just clamp it to the tee.
All parts under $20, 15 minutes to install and test.
Thought about adding a 1/4 turn valve, but will wait and see how this works out.
Attachments
Last edited:
szewczyk_john
Well-known member
I have not yet bought into any of the newer plumbing stuff yet but I have looked into them since it is a must have now. Are you using the sharkbite system with the barbs? is that the better tool to buy?
porthole
Retired
John, the push connectors (barbs or rings) and crimps at Home Depot are the Sharkbite brand. I am not using the Sharkbite tool-less push on fittings (well I am for a couple of things).
I don't know if it is better or not, but I like the system. And these crimps do not damage the hose.
I don't know if it is better or not, but I like the system. And these crimps do not damage the hose.
Last edited:
recumbent615
Founding MA Chapter Leader-retired
I installed "mid ship" blinkers - turn signals - directionals.
These are LED combo units, running and turn.
I wired it for blink only to get the most attention.
I used a Curt brake light controller (about $25), # C56196
http://www.etrailer.com/p-C56196.html
This controller was wired in, in front of the door on top of the under belly. I already have a "patched" hole there from some other installation.
Jon Holbert noticed them from a good distance away at the PA rally.
Duane,
I know this is an old post, but I am looking at doing a similar "upgrade" and I have two questions:
1: Why did you install a new light and not just replace the existing light right next to it?
2: did you have to use the break light controller? I could see that you would need to if you were going to replace ( so it was marker and blinker ) but where you just used them as blinkers, was it required or is there an added benefit from going that route?
As always thanks for your input.
PS Where did you get the lights in this upgrade?
porthole
Retired
and I have two questions:
1: Why did you install a new light and not just replace the existing light right next to it?
2: did you have to use the break light controller? I could see that you would need to if you were going to replace ( so it was marker and blinker ) but where you just used them as blinkers, was it required or is there an added benefit from going that route?
PS Where did you get the lights in this upgrade?
Thats 3 questions Kevin - but for a fellow Cycloner - I'll let ya slide.
1) I wanted something that was separate and that would stand out. That light does both with the way it sticks out. Using it as a "run - turn" light the turn did not seem to be as attention getting, which was the whole reason for doing this.
2) That depends on the wiring on your truck. Most modern vehicles no longer have separate and independent circuits for the brake, run and blinkers. They use the body computers to get two lights for brake lights or one light for a blinker. In that scenario, if you don't use some type of controller you will get your blink function, but they will also both light up whenever you tap the brakes, something I didn't want. The Curt controller does that.
3) Local trailer supply. They are standard 6" lights that you cut the oblong hole, put the gasket in then push the light into the gasket.
BTW, I made a template to cut the holes and I still have that template - and, I even know where it is (I think)
porthole
Retired
Dinette table mod. I really do not like booth dinettes, but with toy haulers you are kind of limited. We tried a stand alone table for awhile. That works, but something else to deal with all the time, and it took up extra room.
Not getting rid of the booth - can't afford to give up the storage it affords, and ours is the original version with full length drawers under the seat instead of a cavern.
Been switching the garage and dinette table back and forth. The garage table is smaller so it gives more room in the galley. But, it is smaller.
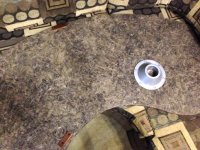
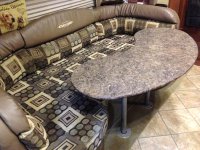
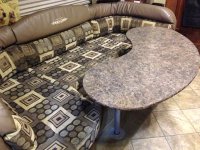
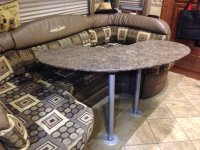
Took the galley table and removed the rear pipe holder. Added a cleat on either side of the table along the arc that the table now pivots. Seems to work pretty good, you just have to be aware that one end is resting on the pipe, not sitting in a socket.
Pic 1 is the socket removed and cleat added.
Pic 2 is the table in the normal position
Pic 3 & 4 is the table pivoted to each stop.
Attachments
recumbent615
Founding MA Chapter Leader-retired
Dinette table mod. I really do not like booth dinettes, but with toy haulers you are kind of limited. We tried a stand alone table for awhile. That works, but something else to deal with all the time, and it took up extra room.
Not getting rid of the booth - can't afford to give up the storage it affords, and ours is the original version with full length drawers under the seat instead of a cavern.
Been switching the garage and dinette table back and forth. The garage table is smaller so it gives more room in the galley. But, it is smaller.
Took the galley table and removed the rear pipe holder. Added a cleat on either side of the table along the arc that the table now pivots. Seems to work pretty good, you just have to be aware that one end is resting on the pipe, not sitting in a socket.
Pic 1 is the socket removed and cleat added.
Pic 2 is the table in the normal position
Pic 3 & 4 is the table pivoted to each stop.
Duane,
For some reason when we were talking about this mod, I had visions of it pushing out into the Galley more, to allow for easier access to get seated.... But I see that it pushes out some and will allow for that access, and even more ease when pushed in at least on the Garage end. it's a good easy mod to improve access for sure... I might give it a try. Did you have to add to the end of the pole to account for the loss of the socket space?
Kevin
porthole
Retired
Since most of the mods have been done that are possible its time to buy a new trailer and start over........Don
Were you following us around at Urbanna
There is only one mod I can't do that would make this trailer a keeper. Kitchen slide.
We have had so few problems with this trailer going into our 6th season that buying anything new does have my concerns. Granted, I did a few pre-emptive strikes, independent suspension and disc brakes), post emptive strikes (is that even a real phrase?) tires. And the issues I have had were easily taken care of by myself, including a design change and upgrade of the water tanks.
After delivery, the trailer has only been to a dealer one time for a slide issue. And in the end, I did not care for the slide repair "fix" and fixed it myself. The slide had a bit of an issue on the way home from delivery.
Last edited:
porthole
Retired
For some reason when we were talking about this mod, I had visions of it pushing out into the Galley more, to allow for easier access to get seated.... But I see that it pushes out some and will allow for that access, and even more ease when pushed in at least on the Garage end. it's a good easy mod to improve access for sure... I might give it a try. Did you have to add to the end of the pole to account for the loss of the socket space?
Kevin, you will get a chance to see and try in 2 weeks if you wait. Check it out when you pick up your motor.
Swinging out it doesn't add quite that much, but swing in it does. Plus we do have one stand alone chair, so this makes using that chair a bit better.
There is no discernible difference in height. At least the best I can tell with my not to recently calibrated micrometer eyeball.
JWalker
Northeast Region Director-Retired
Since most of the mods have been done that are possible its time to buy a new trailer and start over........Don
Yeah.....it's called "Newport"
szewczyk_john
Well-known member
I have been looking to change the seating area in my Road Warrior which is the same interior as Duane's for all the same reasons. We have decided not to make any changes due to the drawers underneath. I am now just looking to get better foam in the seat cushions and leave the rest alone?
Duane, do you guys allow your dogs on the furniture of your trailer? We do and that is why I can not use this mod, the dogs will move the table at the wrong time and cause a mess. I know of a guy that used to own a Raptor toy hauler. He mounted drawer glides between the underside of his table and the pole socket. the table would lock into place but with a gentle lift on the one side, his table would slide away from his couch by about 6 or 8 inches. I really liked his mod but he did not have kids and dogs to worry about either. He good the glides from a tool box that fell out of a truck. They were the real good ball bearing slides that incorporated a catch mechanism. He was forced to sell his unit due to medical issues and give up the RV lifestyle. I hope everyone can understand what I am trying to explain without pictures of it.
Duane, do you guys allow your dogs on the furniture of your trailer? We do and that is why I can not use this mod, the dogs will move the table at the wrong time and cause a mess. I know of a guy that used to own a Raptor toy hauler. He mounted drawer glides between the underside of his table and the pole socket. the table would lock into place but with a gentle lift on the one side, his table would slide away from his couch by about 6 or 8 inches. I really liked his mod but he did not have kids and dogs to worry about either. He good the glides from a tool box that fell out of a truck. They were the real good ball bearing slides that incorporated a catch mechanism. He was forced to sell his unit due to medical issues and give up the RV lifestyle. I hope everyone can understand what I am trying to explain without pictures of it.
porthole
Retired
John, I'm pretty sure somewhere on this forum there are pictures of the table with the slide modification.
No, the dogs are not allowed on the furniture. Doesn't stop them from trying though. We resort to putting "stuff", including the stand alone chair on the couch at night or when we leave. Lap tops - books - empty bags etc.
The dogs will then do their best to twist themselves into odd ball positions under the table. They are also not allowed in the bedroom either. Which means they do their best to completely block the landing by the bathroom.
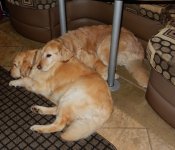
Molly just assumes "home rules" apply in the trailer.
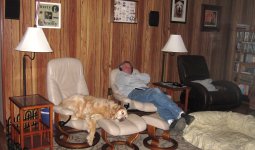
BTW, Molly girl here sleeps with her eyes part way open
No, the dogs are not allowed on the furniture. Doesn't stop them from trying though. We resort to putting "stuff", including the stand alone chair on the couch at night or when we leave. Lap tops - books - empty bags etc.
The dogs will then do their best to twist themselves into odd ball positions under the table. They are also not allowed in the bedroom either. Which means they do their best to completely block the landing by the bathroom.

Molly just assumes "home rules" apply in the trailer.

BTW, Molly girl here sleeps with her eyes part way open

