I am now steady with SteadyFast Stabilizers

bowhunt73

Active Member
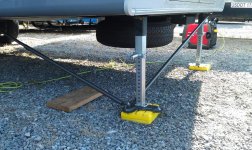
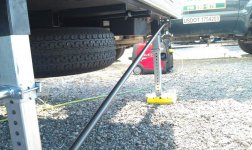
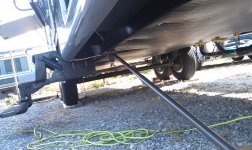
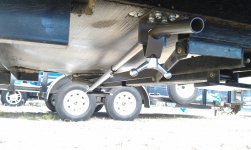
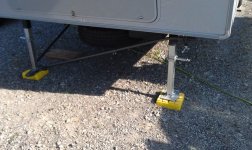
I finally put on my new Steadyfast stabilizers today. Took me about 4.5 hours. I spent a lot of time pre-building everything. With my Greystone 33CK I didn't have many options due to battery box, propane line, and spare tire. I had to install the foot on the passenger side due to the propane line on the other side. That meant that I had to put the locking bracket in front of the landing gear due to the spare tire. There was room, but I had to rotate the locking bracket 180 degrees. Everything is working great. I have three giant screw handles to tighten and then I'm steady.

I was really impressed with the quality of the hardware with this product. I'll report back after my trip to the U.P.

Pics below:

IMAG2596 (1280x765).jpgIMAG2597 (1280x765).jpgIMAG2599 (1280x765).jpgIMAG2598 (1280x765).jpgIMAG2600 (1280x765).jpg
 

camr

Well-known member
Our new SOB came from the factory with JT Strongarms, and they work terrifically.If Steadyfast aren't available, I would highly recommend the JT's.
 

bigdob24

Well-known member
I just installed the steady fast system on our Sundance and it does the job.
This is our third RV and untill I found the steady fast system nothing really work .
It locks into place and does not move at all.
well worth the money and an easy install.
Dan
 

bowhunt73

Active Member
Update....better late then never.......

On my first trip it still had a little movement. Two issues found. I use wood in the rear and those yellow squares in the front. Well, those yellow squares flex like you wouldn't believe. Those are gone! Second, I saw a little movement in my foot swivels. I had to tighten them up a little bit so that I could still move the Steadyfast foot plate, but not too loose to cause movement. After that adjustment it is rock solid. I approve this message.

Randall
 

future3490owner

Active Member
I just oreded mine today. I was just wondering if there was any reason you installed the front bar they way you did? To me it seems (and this is only from looking at pictures) that the bar would want to twist or bend by being installed on each side of a jack leg. Was there a reason why you did not attach to the part of the pad facing the front of the camper?
 

bowhunt73

Active Member
Great! You will love these bars. Let me know how they work for you. Remember you have to really fine tune the swivels for maximum tightness and still being able to swing your jacks up and down without the swivels binding. This was a step in the instructions.

As for your question.....I think it was a combination of things. Remember the bar is two bars so you can spin each bar separately to line up each end with the hardware and then tighten the bars together. I have absolutely no binding. You could install the bar in the front of the leg for sure. There were two things reasons....right or wrong. I couldn't really tell a difference between the two hook ups when I was testing. I liked how the current set up was tucked away.

Remember I was forced to go in front of the leg with the hinge due to the battery box and the alternative side (reversing the whole set up) was the propane line running back. I would have preferred to install behind the leg. There was another reason either the relationships of the pivot points or something in the instructions. I cannot remember. You can surely put it in front to give it a straight shot.

Send us pics. Are you going to work in the snow or do you have it inside? Good luck. I had to drill a hole in the pads for the rears. One hole each.

Randall
 

bowhunt73

Active Member
wildwolfproducts,

I looked for a pic and I don't have one with it down. Sorry. The website has some pics....Steadyfast.
 

bowhunt73

Active Member
One last point....that I never mentioned. I'm going to purchase a Bigfoot leveler system soon or something similar. Paul from steadyfast sent me the longer bars free of charge to prepare for a system like that. I guess that you need longer bars for that type of system.
 

future3490owner

Active Member
Remember I was forced to go in front of the leg with the hinge due to the battery box and the alternative side (reversing the whole set up) was the propane line running back.

This part I am familiar with as I have the same camper.

Are you going to work in the snow or do you have it inside? Good luck. I had to drill a hole in the pads for the rears. One hole each.

I will be working outside, so I will wait for the snow to melt and I can work on it in the driveway instead of the wet ground I am sure I will have. lol
 

bowhunt73

Active Member
Okay. Be sure to post some pics when ur done.

one last thing.....
Due to the placement of the front bars (our battery box and propane lines), it a tad tight working the big screw. Make sure that the pull pin for your landing gear doesn't interfere with the big handle on the steadyfast system. I only say this because you'll be working on all this while the legs are extended.
 

future3490owner

Active Member
I was just looking at your pictures again. Did you not use the brackets to "clamp" it to the frame? If not, was it due to water tanks being in the way? I am installing mine on Saturday, I just pre-assembled everything today.
 

theroes

Member
I installed a steadyfast today. Took about 4 hours and I had to do the same setup, the only thing I did different is order the two extra pads. I also installed the back bar in the opposite direction you did. Camp with it in two weeks can't wait tosee how it works.
 
Top