And so it begins

porthole

Retired
Next trailer I will redo that with a bigger light. The one I am using is barely sufficient, but at the time for the cost it was a good choice. As the LED's come down in price it really opens up some opportunities.

Too bad our 7-ways on the trucks and trailers weren't 10 ways with 3 unused wires. Would be so much easier to turn something like that on with a truck's up-fitter.

- - - Updated - - -

A version of my rotating table showed up on a Louisville at Goshen.

https://heartlandowners.org/showthread.php/11365-And-so-it-begins?p=370561&viewfull=1#post370561

Kind of like my ramp patio option
 

BigGuy82

Well-known member
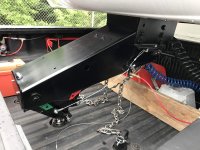
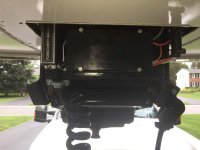
Figured it was time to finally replace my 7-way cord, couple of flat spots and an electrical tape or two patch. And my junction had to be moved for clearance with the new Goosebox. The Goosebox has a slightly different install postion and on tight enough turns the junction box was a bit close to the tonneau cover rails.

I used a Bargman junction box which appears a little 'slimmer' then the box Jerrod has been using. Was a bit tight stuffing the box, plus I also had two extra 10 gauge wires in there.
Three switches added for brake application, running lights and flasher and my small LED on the front of the pin box to light my small flag.

I used this flasher with the clip filed off. Much easier to fit size wise.

https://www.amazon.com/gp/product/B011BTMDQM/ref=oh_aui_search_detailpage?ie=UTF8&psc=1

I'm also using magnetic hooks up inside the frame to hold the coiled wires up (7 way and trialer cam pigtail)

- - - Updated - - -

Had to change our "shingle" a bit to go from a MOR/ryde to Goosebox hang.

Nice job.

For others who do this, there is a 10 way box available from etrailer that provides more space to work in.

IMG_1644.jpg
 

porthole

Retired
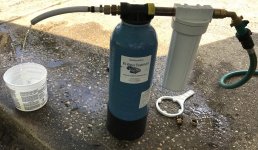
An addition I don't know if we need or not, but have wanted for awhile.

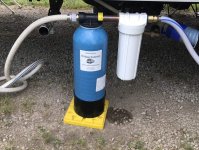
Water softener picked up at Goshen.
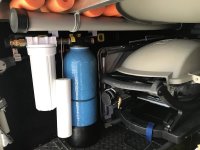
For now it will be on the ground, just no more room in the Cyclone basement for something this big to be plumbed in.

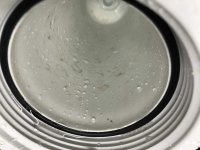
Flushing this size unit (smaller of the two offered) took about 20 minutes or so and I guess the salt is a bit dirty judging by the inside of the filter housing.
 

Attachments

  • Water_softener_1.jpg
    Water_softener_1.jpg
    176.4 KB · Views: 112
  • Water_softener_2.jpg
    Water_softener_2.jpg
    156 KB · Views: 109
  • Water_softener_3.jpg
    Water_softener_3.jpg
    69.5 KB · Views: 109

LBR

Well-known member
An addition I don't know if we need or not, but have wanted for awhile.

Water softener picked up at Goshen.
For now it will be on the ground, just no more room in the Cyclone basement for something this big to be plumbed in.

Flushing this size unit (smaller of the two offered) took about 20 minutes or so and I guess the salt is a bit dirty judging by the inside of the filter housing.
Were you referring to no more room in basement specifically, or behind the basement wall by the UDC/tanks, etc?

What you have pictured there is on my bucket list, but haven't measured and thought the whole process out yet for flushing/general maintenance of it close to the electrical equipment.

I wouldn't like it setting on the ground....same as your thoughts.....but also don't wish to loose valuable basement space.
 

travelin2

Pennsylvania Chapter Leaders-retired
Mine sits, and will sit, on the ground under the UDC based on my current filter location, also due to the method of adding salt for regeneration. The top/lid screws off of ours for the addition of salt for the regen process. Additionally to make room for that salt it helps to slightly tip the unit to allow some of the water to escape. Furthermore if the need arises to back flush the unit, the inlet and outlet lines need reversed in order to accomplish that task. Not something I would want to tackle in the basement or behind the wall. Either way you'll "lose" some space as the softener has to ride somewhere while in transit or storage.


Sent from my iPhone using Tapatalk
 

travelin2

Pennsylvania Chapter Leaders-retired
Flushing this size unit (smaller of the two offered) took about 20 minutes or so and I guess the salt is a bit dirty judging by the inside of the filter housing.

If you're going to use the water softener "rock salt" there will be some sediment left behind as it's unrefined. The cleaner softener salt is the processed softener salt pellets.
Ours uses table salt added to the top by removing the lid.


Sent from my iPhone using Tapatalk
 

porthole

Retired
Were you referring to no more room in basement specifically, or behind the basement wall by the UDC/tanks, etc?

What you have pictured there is on my bucket list, but haven't measured and thought the whole process out yet for flushing/general maintenance of it close to the electrical equipment.

I wouldn't like it setting on the ground....same as your thoughts.....but also don't wish to loose valuable basement space.

Behind the wall, there is zero real estate left.
Still have some room left in the basement though to store it while traveling.

- - - Updated - - -

If you're going to use the water softener "rock salt" there will be some sediment left behind as it's unrefined. The cleaner softener salt is the processed softener salt pellets.
Ours uses table salt added to the top by removing the lid.


Solar salt is what was provided as a starter kit.
Apparently Evaporated salt is a cleaner and purer version of salt desirable of the WS systems.

The softener I have gets charged by filling the filter assembly (sans filter) with salt and then running water slowly through it.
 

Attachments

  • Water_softener_4.jpg
    Water_softener_4.jpg
    86 KB · Views: 84

porthole

Retired
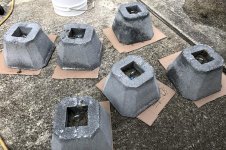
Once we left the mud at our regular Dover Racetrack campsite we moved to asphalt, a stones throw from turn 3. Since we had no place to tie down the awning and EZ-UP the pop-up we use for the dogs, a trip to HomeDepot for some deck piers.

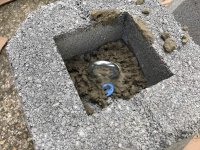
I decided to keep the piers and make them a bit more convenient to use. We can use these for at least 3 of our annual trips, Dover, Dog Camp 1 & 2.

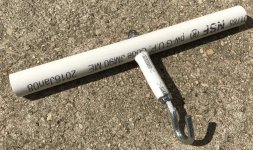
Just some concrete, eyebolts and PEX for drainage. And a tool to help pick them up and move them around.
 

Attachments

  • Awning_anchors_1.jpg
    Awning_anchors_1.jpg
    269.4 KB · Views: 112
  • Awning_anchors_2.jpg
    Awning_anchors_2.jpg
    261.1 KB · Views: 104
  • Awning_anchors_3.jpg
    Awning_anchors_3.jpg
    212.1 KB · Views: 100
Last edited:

Bones

Well-known member
Once we left the mud at our regular Dover Racetrack campsite we moved to asphalt, a stones throw from turn 3. Since we had no place to tie down the awning and the pop tent we use for the dogs, a trip to HomeDepot for some deck piers.

I decided to keep the piers and make them a bit more convenient to use. We can use these for at least 3 of our annual trips, Dover, Dog Camp 1 & 2.

Just some concrete, eyebolts and PEX for drainage. And a tool to help pick them up and move them around.

I like your idea. I may borrow it.
 

porthole

Retired
Dave, I recessed the eyebolts in case I come up with another idea and need a flat top surface, or for stacking behind the shed.
And in the pictures, the PEX is taped off to keep the concrete out.

- - - Updated - - -

It gets pretty breezy in the afternoon at Dover and these blocks were heavy enough to do the job. Our awning moves fairly easy.

I still think I would pull the awning in for a cold front thunderstorm though.

- - - Updated - - -

Using the eyebolts in the center will make better use of the weight. When we first used these I just wrapped the web straps through the hole and cinched the block. This allowed an uneven pull on the blocks at times, essentially just lifting at the sides. When I repositioned the straps to be centered as close as possible there was a noticeable difference in stability.
 

porthole

Retired
Reese Goose box update. We have about 2000 miles now on the Goose box

Pros
  • mostly a straight forward installation
  • reclaimed space in the truck bed
  • seems to tow a bit better overall
  • pull test not needed - but I still do it, it's on my checklist :rolleyes:
  • minimal maintenance, only one grease fitting
  • 1 air bag seems to do the trick
  • I think it looks better
Cons
  • packaging could be better (non issue once out of the box)
  • harder to hook up even with a camera
  • have to lift the trailer higher then what you are used to in order to disconnect, even more so if you have some stuff between the ball and tailgate
  • I dump the air when unhooking, but if you don't, the disconnect height might be even higher.
  • there is a bit less clearance between the truck's bed and trailer
  • the finish is 'just ok'

We have one camp we attend every year that at times I have had to lift my pin box high enough to clear the tailgate closed or the side rails of the truck. That is not possible now, plan B will be in order.

My first Goose box was through amazon, came on a fedex local delivery van, with the box broken apart and the hitch sliding around on the van floor. As it turned out the hitch was missing the installation stuff and the finish was damaged. That hitch was returned and I re-ordered through eTrailer

2nd hitch came secure in the box, but the air fill had three problems, the blowoff valve was hitting the non movable part of the hitch which in turn broke off the cap, two air leaks. One leak I was able to fix by replacing the o-ring.

And it turns out the air bag fill reference decal is way off.

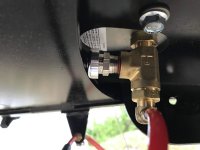
I bypassed the factory air fill and rigged my AirLift wireless remote to add and dump air, also added a dump valve. The factory way to set the air pressure is to fill it up until the blowoff valve dumps then let the hitch settle on it's own after hitting the road and a few bumps.

I found that overall about 40 psi seems to work well. 30 psi seemed to offer a slightly better ride but was bottoming out on really bad roads. Will give 35 psi a shot on the next road trip.
Using my AirLift controller I am able to max out the bag for maximum lift, which is helpful for tight turns and clearance for my roll top cover rails. I gain about 1.5" of lift.

On the last exit coming home I heard a squeak :mad:

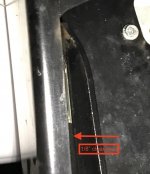
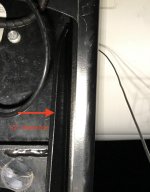
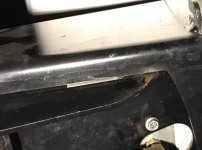
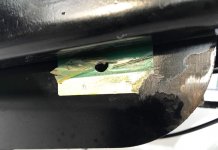
Turns out the hitch has some manufacturing issues. The fixed portion of the goose box does not have evenly cut steel on the sides. One side is cut straight and the other side is cut with an angle. This would not really be noticeable except for the movable portion is not centered in the fixed part. I have about 1/2" of clearance on the right and about 1/8" clearance on the left.

The hitch rubs on the left, has ground down the corner, removing the powder coating (and now rusting) and obliterated the decal for the air bag. And it squeaks because of this.

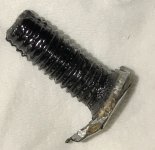
I also heard a 'pop' - 'thunk' and the sound of a screw bouncing on my truck. There is a screw that was welded somewhere in the hitch that apparently was under tension and broke free. Reese has no idea what it was. I think it might have been for the powder coating process (hanger).

Reese is sending me a new hitch, as soon as they make some !
Not really looking forward to changing it out, but I will end up removing it anyway for the tow back to Elkhart for the trade. The original factory Lippert 1621 pin box (which hasn't moved in my basement since I brought the trailer home) is going back on and once more the 300 pound ts-3 is going into the truck.
 

Attachments

  • Reese_Goosebox_issues_29.jpg
    Reese_Goosebox_issues_29.jpg
    61.9 KB · Views: 125
  • Reese_Goosebox_issues_31.jpg
    Reese_Goosebox_issues_31.jpg
    200.5 KB · Views: 107
  • Reese_Goosebox_issues_32.jpg
    Reese_Goosebox_issues_32.jpg
    211.3 KB · Views: 114
  • Reese_Goosebox_issues_33.jpg
    Reese_Goosebox_issues_33.jpg
    78.8 KB · Views: 117
  • Reese_Goosebox_issues_34.jpg
    Reese_Goosebox_issues_34.jpg
    84.3 KB · Views: 106
  • Reese_Goosebox_issues_35.jpg
    Reese_Goosebox_issues_35.jpg
    208.6 KB · Views: 106

BigGuy82

Well-known member
Reese Goose box update. We have about 2000 miles now on the Goose box

Pros
  • mostly a straight forward installation
  • reclaimed space in the truck bed
  • seems to tow a bit better overall
  • pull test not needed - but I still do it, it's on my checklist :rolleyes:
  • minimal maintenance, only one grease fitting
  • 1 air bag seems to do the trick
  • I think it looks better
Cons
  • packaging could be better (non issue once out of the box)
  • harder to hook up even with a camera
  • have to lift the trailer higher then what you are used to in order to disconnect, even more so if you have some stuff between the ball and tailgate
  • I dump the air when unhooking, but if you don't, the disconnect height might be even higher.
  • there is a bit less clearance between the truck's bed and trailer
  • the finish is 'just ok'

We have one camp we attend every year that at times I have had to lift my pin box high enough to clear the tailgate closed or the side rails of the truck. That is not possible now, plan B will be in order.

My first Goose box was through amazon, came on a fedex local delivery van, with the box broken apart and the hitch sliding around on the van floor. As it turned out the hitch was missing the installation stuff and the finish was damaged. That hitch was returned and I re-ordered through eTrailer

2nd hitch came secure in the box, but the air fill had three problems, the blowoff valve was hitting the non movable part of the hitch which in turn broke off the cap, two air leaks. One leak I was able to fix by replacing the o-ring.

And it turns out the air bag fill reference decal is way off.

I bypassed the factory air fill and rigged my AirLift wireless remote to add and dump air, also added a dump valve. The factory way to set the air pressure is to fill it up until the blowoff valve dumps then let the hitch settle on it's own after hitting the road and a few bumps.

I found that overall about 40 psi seems to work well. 30 psi seemed to offer a slightly better ride but was bottoming out on really bad roads. Will give 35 psi a shot on the next road trip.
Using my AirLift controller I am able to max out the bag for maximum lift, which is helpful for tight turns and clearance for my roll top cover rails. I gain about 1.5" of lift.

On the last exit coming home I heard a squeak :mad:

Turns out the hitch has some manufacturing issues. The fixed portion of the goose box does not have evenly cut steel on the sides. One side is cut straight and the other side is cut with an angle. This would not really be noticeable except for the movable portion is not centered in the fixed part. I have about 1/2" of clearance on the right and about 1/8" clearance on the left.

The hitch rubs on the left, has ground down the corner, removing the powder coating (and now rusting) and obliterated the decal for the air bag. And it squeaks because of this.

I also heard a 'pop' - 'thunk' and the sound of a screw bouncing on my truck. There is a screw that was welded somewhere in the hitch that apparently was under tension and broke free. Reese has no idea what it was. I think it might have been for the powder coating process (hanger).

Reese is sending me a new hitch, as soon as they make some !
Not really looking forward to changing it out, but I will end up removing it anyway for the tow back to Elkhart for the trade. The original factory Lippert 1621 pin box (which hasn't moved in my basement since I brought the trailer home) is going back on and once more the 300 pound ts-3 is going into the truck.

I had the same shipping problems but with eTrailer. My first hitch that I ordered with them (Reese Elite) was hanging off the skid, shipping straps broken and hitch damaged. The replacement hitch arrived the same way but thankfully undamaged. Then I ordered the Lippert Flex Aire pin box - same exact scenario, including a poorly shipped replacement. It's like they don't have a clue how to protect heavy stuff during shipment. I know that shipping heavy freight is a challenge, but proper packaging should eliminate the problem.

Anyway, you don't find the need for safety chains as a "con"?
 

TravelTiger

Founding Texas-West Chapter Leaders-Retired
Re: And so it begins - mods to personalize the rig

So Duane, you plan to use the GooseBox on the Landmark?


Sent from my iPhone using Tapatalk
 

porthole

Retired
Anyway, you don't find the need for safety chains as a "con"?

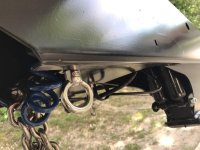
Not really, just a slight inconvenience. I have already changed how they attach after the first trip.

Originally the chains were bolted to the hitch with hooks going to the puck loops. That was a pain to connect.

I now have heavy duty stainless eye bolts bolted to the hitch and the chains are shackled to the bed loops.
With the chains left in the bed it allows an easier hookup and the chains aren't dragging across the bed when un-hooking from the trailer.

Before and after pics

- - - Updated - - -

So Duane, you plan to use the GooseBox on the Landmark?

Yes I do. And it looks like some trimming on the frame where the pin box mounts will be required as well.
The frame looks the same on the 2018 LM's as it did on our 2010 Cyclone.
 

Attachments

  • Goosebox_50.jpg
    Goosebox_50.jpg
    133.7 KB · Views: 151
  • Goosebox_57.jpg
    Goosebox_57.jpg
    85.3 KB · Views: 140

Bones

Well-known member
Dave, I recessed the eyebolts in case I come up with another idea and need a flat top surface, or for stacking behind the shed.
And in the pictures, the PEX is taped off to keep the concrete out.

- - - Updated - - -

It gets pretty breezy in the afternoon at Dover and these blocks were heavy enough to do the job. Our awning moves fairly easy.

I still think I would pull the awning in for a cold front thunderstorm though.

- - - Updated - - -

Using the eyebolts in the center will make better use of the weight. When we first used these I just wrapped the web straps through the hole and cinched the block. This allowed an uneven pull on the blocks at times, essentially just lifting at the sides. When I repositioned the straps to be centered as close as possible there was a noticeable difference in stability.
Thanks for the info

- - - Updated - - -

Reese Goose box update. We have about 2000 miles now on the Goose box

Pros
  • mostly a straight forward installation
  • reclaimed space in the truck bed
  • seems to tow a bit better overall
  • pull test not needed - but I still do it, it's on my checklist :rolleyes:
  • minimal maintenance, only one grease fitting
  • 1 air bag seems to do the trick
  • I think it looks better
Cons
  • packaging could be better (non issue once out of the box)
  • harder to hook up even with a camera
  • have to lift the trailer higher then what you are used to in order to disconnect, even more so if you have some stuff between the ball and tailgate
  • I dump the air when unhooking, but if you don't, the disconnect height might be even higher.
  • there is a bit less clearance between the truck's bed and trailer
  • the finish is 'just ok'

We have one camp we attend every year that at times I have had to lift my pin box high enough to clear the tailgate closed or the side rails of the truck. That is not possible now, plan B will be in order.

My first Goose box was through amazon, came on a fedex local delivery van, with the box broken apart and the hitch sliding around on the van floor. As it turned out the hitch was missing the installation stuff and the finish was damaged. That hitch was returned and I re-ordered through eTrailer

2nd hitch came secure in the box, but the air fill had three problems, the blowoff valve was hitting the non movable part of the hitch which in turn broke off the cap, two air leaks. One leak I was able to fix by replacing the o-ring.

And it turns out the air bag fill reference decal is way off.

I bypassed the factory air fill and rigged my AirLift wireless remote to add and dump air, also added a dump valve. The factory way to set the air pressure is to fill it up until the blowoff valve dumps then let the hitch settle on it's own after hitting the road and a few bumps.

I found that overall about 40 psi seems to work well. 30 psi seemed to offer a slightly better ride but was bottoming out on really bad roads. Will give 35 psi a shot on the next road trip.
Using my AirLift controller I am able to max out the bag for maximum lift, which is helpful for tight turns and clearance for my roll top cover rails. I gain about 1.5" of lift.

On the last exit coming home I heard a squeak :mad:

Turns out the hitch has some manufacturing issues. The fixed portion of the goose box does not have evenly cut steel on the sides. One side is cut straight and the other side is cut with an angle. This would not really be noticeable except for the movable portion is not centered in the fixed part. I have about 1/2" of clearance on the right and about 1/8" clearance on the left.

The hitch rubs on the left, has ground down the corner, removing the powder coating (and now rusting) and obliterated the decal for the air bag. And it squeaks because of this.

I also heard a 'pop' - 'thunk' and the sound of a screw bouncing on my truck. There is a screw that was welded somewhere in the hitch that apparently was under tension and broke free. Reese has no idea what it was. I think it might have been for the powder coating process (hanger).

Reese is sending me a new hitch, as soon as they make some !
Not really looking forward to changing it out, but I will end up removing it anyway for the tow back to Elkhart for the trade. The original factory Lippert 1621 pin box (which hasn't moved in my basement since I brought the trailer home) is going back on and once more the 300 pound ts-3 is going into the truck.


It almost looks like something is out of alignment. The bolt looks like it was attached to a pretty hefty piece of metal which got snapped off but I don't seem any marks on the thread itself.


Not really, just a slight inconvenience. I have already changed how they attach after the first trip.

Originally the chains were bolted to the hitch with hooks going to the puck loops. That was a pain to connect.

I now have heavy duty stainless eye bolts bolted to the hitch and the chains are shackled to the bed loops.
With the chains left in the bed it allows an easier hookup and the chains aren't dragging across the bed when un-hooking from the trailer.

Before and after pics

- - - Updated - - -


Yes I do. And it looks like some trimming on the frame where the pin box mounts will be required as well.
The frame looks the same on the 2018 LM's as it did on our 2010 Cyclone.


Did your SS eye bolt come with a load rating?
 

porthole

Retired
Did your SS eye bolt come with a load rating?


  • Stainless Steel T316 Lifting Eye Nut
  • High Quality - Marine Grade For Maximum Corrosion Resistance
  • Size: 1/2" Tap Eye Diameter: 2-3/8" Bail Size: 3/8" Width of Base: 1"
  • Working Load Limit: 2,000lbs
 

porthole

Retired
I "think" I have a new Goosebox being delivered today. Reese never contacted me but I got a notice from a freight company that they are delivering some sort of big RV part on a pallet.

https://heartlandowners.org/showthread.php/11365-And-so-it-begins?p=546564&viewfull=1#post546564

After looking at these pictures in the above link, I should have raised my trailer with the MOR/ryde spring packs when I changed out bad springs last week. MOR/ryde IS has two positions available on the springs when they are bolted on.
 
Top