You are using an out of date browser. It may not display this or other websites correctly.
You should upgrade or use an alternative browser.
You should upgrade or use an alternative browser.
Auto Transfer Switch Question
- Thread starter Greengas
- Start date
carl.swoyer
Well-known member
Re: Auto Transfer Switch Question- Another Picture
Sent from my XT1254 using Tapatalk
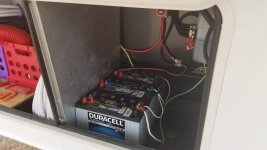
I'm thinking the cables should be shorter ( only long as it takes to reach from post to post) and alot heavier in gague .So, all the work is done and we are picking up the Beast on Tuesday. I am getting some pictures of the different installs. Here is the one of the 3 new AGM batteries all wired up.
View attachment 57046
Sent from my XT1254 using Tapatalk
porthole
Retired
Ronn, I hope they did not charge you much for the wiring - because if you intend to use the inverter you refered to earlier with any real loads, you will have to re-wire all the battery cables.
That wiring was not done by someone who knows how to install inverters correctly.
Sorry, but from what I can see with the picture blown up, the installer had no business getting your business.
https://heartlandowners.org/attachment.php?attachmentid=12964&d=1304053240
https://heartlandowners.org/attachment.php?attachmentid=52815&d=1498395530
carl.swoyer
Well-known member
Re: Auto Transfer Switch Question- Another Picture
Wire and my battery cables.
If you put a load on those ...not good. Those wires are not correct for what you have.
Please be careful.


Sent from my XT1254 using Tapatalk
Size difference between yourSo, all the work is done and we are picking up the Beast on Tuesday. I am getting some pictures of the different installs. Here is the one of the 3 new AGM batteries all wired up.
View attachment 57046
Wire and my battery cables.
If you put a load on those ...not good. Those wires are not correct for what you have.
Please be careful.


Sent from my XT1254 using Tapatalk
porthole
Retired
Looking at it again on a monitor instead of an iPad, I can see one thing done correctly, the load being pulled from the batteries is across the battery bank (positive on first battery - negative or third battery).
But that is all, all of the wiring is undersized and marginal installation at best.
But that is all, all of the wiring is undersized and marginal installation at best.
mlpeloquin
Well-known member
An easy do it yourself job. It would require you to get a proper crimp tool. I have this crimp tool and it works well. Since I live near the factory, I pick it up. Ebay has it with free shipping. https://www.ebay.com/i/381325350981?chn=ps
Wire. I use welding cable because it is very flexible.
https://www.ebay.com/i/261597242239?chn=ps&dispItem=1
Crimps can be purchased on ebay, amazon, or a number of web sites. Just remember to make sure that they are for the gauge wire you are using and for the stud size.
Last thing is not to forget heat shrink tubing to cover the ends of the crimps. Make sure that the heat shrink tubing goes on the wire prior to crimping and then slid onto the back of the lug prior to shrinking it down.
Greengas
Well-known member
Ok, let me make sure I understand this all correctly. First, I provided the installer with the large gauge wire, I believe 4/0 that you see hooked up to the switch. The installer then used smaller gauge wire to hook the batteries up to each other when it should have been the same, thick gauge stuff. The correction is to use the thick wire throughout and reduce the amount of wire that is used in doing it by making the connections between the batteries very direct, not looped.
Do I have it right oh great and knowledgeable ones!
Do I have it right oh great and knowledgeable ones!
Greengas
Well-known member
An easy do it yourself job. It would require you to get a proper crimp tool. I have this crimp tool and it works well. Since I live near the factory, I pick it up. Ebay has it with free shipping. https://www.ebay.com/i/381325350981?chn=ps
Wire. I use welding cable because it is very flexible.
https://www.ebay.com/i/261597242239?chn=ps&dispItem=1
Crimps can be purchased on ebay, amazon, or a number of web sites. Just remember to make sure that they are for the gauge wire you are using and for the stud size.
Last thing is not to forget heat shrink tubing to cover the ends of the crimps. Make sure that the heat shrink tubing goes on the wire prior to crimping and then slid onto the back of the lug prior to shrinking it down.
I've already figured I am going to redo this and heat shrink is already on hand. I've reached out to the installer and expressed my "concern" about why I provided the correct wire but it was not used throughout. Awaiting his reply. Thanks for the links for the crimp tool and wire. I really appreciate everyone's help and guidance, and, kick in the butt when needed.
mlpeloquin
Well-known member
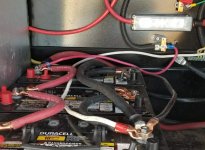
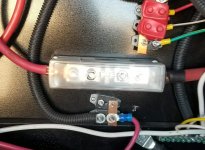
So the installer said that the photo he sent was not the final product. He then sent these two. Except for the shrink wrap tgey look much better.
ATTACH=CONFIG]57049[/ATTACH]
View attachment 57050
Good, but why did they not do it correctly the first time? Is the labor is fixed for the job, fixed price, or every minuet is charged? I hope this is a fixed price install.
Greengas
Well-known member
Fixed install price quoted before he started the job. The only thing I can figure is he did the other work to make sure everything worked then did the rest. Does not make sense to me, but...Good, but why did they not do it correctly the first time? Is the labor is fixed for the job, fixed price, or every minuet is charged? I hope this is a fixed price install.
carl.swoyer
Well-known member
At least it's correct now.Fixed install price quoted before he started the job. The only thing I can figure is he did the other work to make sure everything worked then did the rest. Does not make sense to me, but...
What did you get for the inverter
Sent from my XT1254 using Tapatalk
porthole
Retired
Fixed install price quoted before he started the job. The only thing I can figure is he did the other work to make sure everything worked then did the rest. Does not make sense to me, but...
OK, my guess is perhaps he did just use wire to make all the connections, make sure his runs were good, etc before he started cutting big wire. Makes sense, in your first picture he did not have the fuse installed, now he does.
The fact that he pulled the battery connections off of each end of the battery series is the correct way, makes the rest seem plausible.
Looks like you are on your way towards your goal.
All of the battery cables should have adhesive lined shrink wrapped ends.
Greengas
Well-known member
OK, my guess is perhaps he did just use wire to make all the connections, make sure his runs were good, etc before he started cutting big wire. Makes sense, in your first picture he did not have the fuse installed, now he does.
The fact that he pulled the battery connections off of each end of the battery series is the correct way, makes the rest seem plausible.
Looks like you are on your way towards your goal.
All of the battery cables should have adhesive lined shrink wrapped ends.
Adhesive lined, shrink wrap. I understand shrink wrap but adhesive lined?
porthole
Retired
Better grades of shrink tubing have a heat activated adhesive inside. As you heat the tubing the adhesive melts and oozes around the terminal, sealing it. Makes for a more secure, water resistant connection.
https://www.amazon.com/Ancor-Marine-Electrical-Activated-Adhesive/dp/B000QCPKE8
a good heat gun also works much better when using heat shrink, especially the adhesive lined stuff.
https://www.amazon.com/Ancor-Marine-Electrical-Activated-Adhesive/dp/B000QCPKE8
a good heat gun also works much better when using heat shrink, especially the adhesive lined stuff.
Greengas
Well-known member
At least it's correct now.
What did you get for the inverter
Sent from my XT1254 using Tapatalk
Here is the inverter I got.
- - - Updated - - -
Better grades of shrink tubing have a heat activated adhesive inside. As you heat the tubing the adhesive melts and oozes around the terminal, sealing it. Makes for a more secure, water resistant connection.
https://www.amazon.com/Ancor-Marine-Electrical-Activated-Adhesive/dp/B000QCPKE8
a good heat gun also works much better when using heat shrink, especially the adhesive lined stuff.
Since I don't have the rig here right now and I want to get the heat shrink now so I can be ready when I get the rig, what size would work for 4/0?
porthole
Retired
Depending on the 4/0, you can estimate the cable to be about 3/4" diameter with the jacket, so 1" heat shrink.
You can use a hair dryer, but a dedicated heat gun works much better. With a heat gun you can also over heat or heat too fast.
https://www.amazon.com/s/ref=nb_sb_noss_1?url=search-alias=sporting&field-keywords=heat+gun
Start in the middle, rotating the cable and work your way out. As the adhesive melts and starts flowing you should see it come out the ends of the tubing.
You want it to soften, melt, flow - not boil over.
Greengas
Well-known member
Depending on the 4/0, you can estimate the cable to be about 3/4" diameter with the jacket, so 1" heat shrink.
You can use a hair dryer, but a dedicated heat gun works much better. With a heat gun you can also over heat or heat too fast.
https://www.amazon.com/s/ref=nb_sb_noss_1?url=search-alias=sporting&field-keywords=heat+gun
Start in the middle, rotating the cable and work your way out. As the adhesive melts and starts flowing you should see it come out the ends of the tubing.
You want it to soften, melt, flow - not boil over.
Thanks, as always for the guidance. I do have a heat gun and I will go slowly. I'll also order the 1" heat shrink. Should be fun!
Similar threads
- Replies
- 24
- Views
- 2K
- Replies
- 1
- Views
- 311


