taskswap
Well-known member
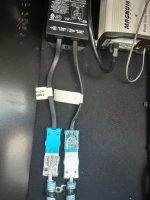
Sorry folks I would have replied earlier but was confused about which connector y'all were talking about. I agree with those above suggesting it's just for ease of connection.
If you want to use those connectors if I'm reading that photo right you don't need to wait for any special part to arrive. Measure the tabs on the terminals, if you have them. They look like standard "spade" terminals, and have gone by many brand names (Fast-On is another popular one to Molex). The brand is irrelevant. You can buy any spade-terminal connection kit on Amazon or at your local hardware store and it will work (Amazon is the cheapest option but you'll end up with a thousand of them collecting dust in your toolbox, LOL.)
Spade terminals are popular in quick-connect electrical connections because they are known as "wiping" terminals. The inside of the female end has two curled sides that act as springs. When you push them together, the ends of those curls cut a bit into the face of the flat/male/spade end. This creates a gas-tight connection, so beyond just being convenient, although they are not actually "waterproof" they are still better for more humid/damp/etc environments than ring terminals, just shoving a wire under a screw, etc. If you feel like going the extra mile, in the lifetime of your camper you may never notice the difference, but they're technically better.
If you do buy them, get the "heat shrink" style. (That's almost certainly not what Heartland would send you, by the way.) They don't really do much for the terminal itself because the connector-side stays open and air will get in. But the heat shrink on the wire side will act as strain-relief which is a good thing IMO for terminations in a camper.
These things are insanely easy to find locally at hardware stores, Walmarts, etc. I would wait until your switch arrives and see how its terminals actually are.
1. If it has screw terminals and your existing wiring was just cut/stripped ends, just connect them up as is and call it a day.
2. If it has screw terminals and your existing wiring has spade terminals on each wire, cut and strip the ends to connect to your screw terminals.
3. If it has spade terminals and your existing wiring has spade terminals, you won the RV lottery and saved yourself... 4 minutes.
4. If it has spade terminals and your existing wiring has cut/stripped ends, it's off to the hardware store for you.
One pro tip - if you do add connectors, the cheapest and lowest-quality crimper from the hardware store is better than the best pliers from your toolbox. Please please do not "crimp" these things with pliers. It will appear to work, but it is almost impossible to squeeze these with enough force to properly crimp them. All you will do is somewhat crush the crimp end around the wire. It will hold the wire, but only for a while, and it will conduct electricity, but not as well as it should and... only for a while.
A true crimp will also make a "gas tight" connection by crushing the wires as well. This is very important for the mechanical aspect of holding the wire in place. Over time as you travel around, a crimp made with pliers can work its way out due to vibration. This could leak to hot spots and even a fire. (In an emergency you can actually get the job done with a hammer, and this is exactly how some battery-terminal-sized lugs get crimped, but it takes practice to get right. Get a decent crimper, they're worth it.)