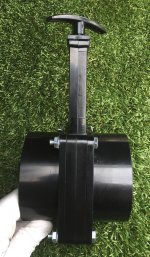
Auxiliary Gate Valve for Dump

'Lil Guy'

Well-known member
Only had my BH out once to a HL rally. Everybody had the gate valves on their rigs. While talking with Mike F. about them, he said they are a must and advised I would get little surprise the 1st time I opened the cap to hook up. Needless to say I ordered one and had it for months waiting to get my rig out of storage. Put on some rubber gloves, cap tight so I got on my knees to use both hands. Wrong., A huge surprise. I got hit with about 3 gallons of nasty grey water (I hope). I was naked by the time I got to the bathroom and in shower. DW finished the install. I've never seen that buildup before on my other 2 rigs. Thanks Mike, I would hate to see one of your big surprises.lol
 

mlpeloquin

Well-known member
Well gray water is nasty, but a lot better than brown trout with wrapping paper! If you have to replace the gate valve gaskets, use some levelers to tilt your rig toward a bucket and open slowly. Let it drain for an hour. Watch it the bucket will fill faster than you think. Then remover the levelers and raze the valve side. Now the gray/poop goop will not be a problem. I have a sewer access to get rid of the muck. And yes, use gloves!
 

gasman

Camp Socializer
You could have a damaged or displaced gasket on one of the valves or if they are cable operated valves, they sometimes don't close completely. That auxiliary gate valve will be your best friend.
 

hoefler

Well-known member
The cable operated valves are the problem, they just don't get closed tight. I replaced the cables with Barker electric units, they close tight every time and let you know when they are closed, ( indicator light ). The Barker units were less than $30 more than the replacement cables.
 

'Lil Guy'

Well-known member
I've, or should I say Debbie added the gate valve while I was cleaning up. Problem solved We dumped the tanks and flushed the black tank before leaving on our 1st and last outing. I can't imagine how this much water accumulated after we dumped. Anyway, the new add on gate valve at the hookup point should do the job until I want to get fancy about it. Did I tell everyone how good looking this new rig is sitting in my driveway?lol Can't wait to get it back on the road. Maybe I'll just tow it around the neighborhood and let everyone see it before we leave.
 

JanAndBill

Well-known member
The cable operated valves are the problem, they just don't get closed tight. I replaced the cables with Barker electric units, they close tight every time and let you know when they are closed, ( indicator light ). The Barker units were less than $30 more than the replacement cables.

The valves are the problem, not because of the design, but because of incorrect installation, by Heartland!!!! A correctly installed cable valve will operate with 2 fingers and not leak. I got so fed up with it, that I finally fixed ours myself. I put a write up in the Tools>Hug above. It's actually quicker to "fix" the problem than to "modify" your rig to put up with it.
 

mlpeloquin

Well-known member
The cable operated valves are the problem, they just don't get closed tight. I replaced the cables with Barker electric units, they close tight every time and let you know when they are closed, ( indicator light ). The Barker units were less than $30 more than the replacement cables.

I replace my cable gate valves with the standard Valterra gate valves. Just unscrew the T handle. Then remove the cable gate valve assembly from the pipe. Next remove the fasteners of the cable/gate valve holding assembly. A standard gate valve assembly is inside the cable valve assembly. Loosen the set screw and pull out the cable. Unscrew the top that attaches the cable to the assembly. Screw it onto the new valve assembly and proceed to put everything back together. Remember to lube the new seals. It helps them stay into position during reassembly. Getting the assembly back onto the pipes is tricky since it wants to be tilted into position from forward and back directions. This is do to the pipes being very stiff with no play. Be very careful because the seals can pop loose and shift during this process. You might not tell that this has happened until you get the gray or black water surprise! Next time I will look to see if cutting the pipe and doing the valve replacement would be better/easier and then connect the pipes with a rubber pipe coupling. Maybe I will look into the electric valves. Note that I asked Heartland for the plumbing schematics. If the assemblers put the valves at the tank drain opening where the engineering schematic showed, this job would have been a lot easier. There was plenty of room at the tank drain opening, but they put them where the drain pipes come together. This must be quicker and easier for the assembler. Prior to, I assume, the cables, wire, and I don't remember what else gets in the way.

Note that the baker drain valves are a 12V motor controller for a standard Valterra valve. PPL Motor Homes carry them. But $364.81 for two 1.5" and one 3" electric conversion?????
 

JanAndBill

Well-known member
How do you fix the cable valves?


Go to Tools>HUG>Tanks or here is the link http://manuals.heartlandowners.org/...ting Cable Operated Tank Valves BH 3260EL.pdf

- - - Updated - - -

I replace my cable gate valves with the standard Valterra gate valves. Just unscrew the T handle. Then remove the cable gate valve assembly from the pipe. Next remove the fasteners of the cable/gate valve holding assembly. A standard gate valve assembly is inside the cable valve assembly. Loosen the set screw and pull out the cable. Unscrew the top that attaches the cable to the assembly. Screw it onto the new valve assembly and proceed to put everything back together. Remember to lube the new seals. It helps them stay into position during reassembly. Getting the assembly back onto the pipes is tricky since it wants to be tilted into position from forward and back directions. This is do to the pipes being very stiff with no play. Be very careful because the seals can pop loose and shift during this process. You might not tell that this has happened until you get the gray or black water surprise! Next time I will look to see if cutting the pipe and doing the valve replacement would be better/easier and then connect the pipes with a rubber pipe coupling. Maybe I will look into the electric valves. Note that I asked Heartland for the plumbing schematics. If the assemblers put the valves at the tank drain opening where the engineering schematic showed, this job would have been a lot easier. There was plenty of room at the tank drain opening, but they put them where the drain pipes come together. This must be quicker and easier for the assembler. Prior to, I assume, the cables, wire, and I don't remember what else gets in the way.

Note that the baker drain valves are a 12V motor controller for a standard Valterra valve. PPL Motor Homes carry them. But $364.81 for two 1.5" and one 3" electric conversion?????

I was going to replace mine with the electric valves until I read the service instructions on how to lubricate them and a light bulb went on. Now I'm glad I didn't
 

Bob&Patty

Founders of SoCal Chapter
Frank it only takes once for a piece of TP to hold the black valve open. Picture in your mind...118*....hot asphalt....and a stuck open black tank valve. Wearing shorts and flip flops. Took off cap and whoooosh.......trout and wrapping paper all over my feet. GET ONE NOW!!!!!!!!!!!!!!!!!!!!!!!!!!!!!!!!!!!!!!!! I might also suggest that you either "blue glue" it on or use short S/S screws to keep it on. Lost the 1st one on the road somewhere and left our DNA for 300 miles before I found out is was gone (valve still stuck open). It comes off....so does the cap. Just saying.
 

'Lil Guy'

Well-known member
Never thought about it coming off on the road. Wouldn't PVC pipe cement work as well? I have the Valtera gate valve that fits like the cap.
 

JohnDar

Prolifically Gabby Member
If you dump and flush your tanks before you move the rig, you should not get a huge volume of liquid in the sewer pipe. Rather than gluing a twist-on valve to the sewer, I use a cap with a hose fitting on it. To that, I added a simple inline hose valve, with its own small cap. Hold a coffee can under the valve, open it slowly and drain any residual liquid before removing the large cap. Even if you don't have a leaking tank valve, there will be liquid behind the cap from whatever wetted the piping before you closed the cap.

Once set up on site, I connect the clear backflush adapter, with the twist-on valve on the end, then the hose.
 

travelin2

Pennsylvania Chapter Leaders-retired
Never thought about it coming off on the road. Wouldn't PVC pipe cement work as well? I have the Valtera gate valve that fits like the cap.

Same one we have. Been there for 30k miles. Shouldn't have to glue it on...


Sent from my iPhone using Tapatalk
 

mlpeloquin

Well-known member
Frank it only takes once for a piece of TP to hold the black valve open. Picture in your mind...118*....hot asphalt....and a stuck open black tank valve. Wearing shorts and flip flops. Took off cap and whoooosh.......trout and wrapping paper all over my feet. GET ONE NOW!!!!!!!!!!!!!!!!!!!!!!!!!!!!!!!!!!!!!!!! I might also suggest that you either "blue glue" it on or use short S/S screws to keep it on. Lost the 1st one on the road somewhere and left our DNA for 300 miles before I found out is was gone (valve still stuck open). It comes off....so does the cap. Just saying.

Better spread on 300 miles of road than on your feet! I lost my first one because it spun 180 degrees and the pavement wore the handle and shaft down. I staked the second one with lap seal. It stays put and can be removed if needed. Best investment ever for a RV.

- - - Updated - - -

If you dump and flush your tanks before you move the rig, you should not get a huge volume of liquid in the sewer pipe. Rather than gluing a twist-on valve to the sewer, I use a cap with a hose fitting on it. To that, I added a simple inline hose valve, with its own small cap. Hold a coffee can under the valve, open it slowly and drain any residual liquid before removing the large cap. Even if you don't have a leaking tank valve, there will be liquid behind the cap from whatever wetted the piping before you closed the cap.

Once set up on site, I connect the clear backflush adapter, with the twist-on valve on the end, then the hose.

It is surprising just how much is left in a tank when it is jostled around on the smooth highways with a leaking valve. It is more than you would like when it hits the ground in front of your feet. I will keep the external valve.
 

Bones

Well-known member
I would like to share this video about the tank flusher's and how they work. I ran across this video one day and thought it was a good watch.


travelin2

Pennsylvania Chapter Leaders-retired
I would like to share this video about the tank flusher's and how they work. I ran across this video one day and thought it was a good watch.


Yep. Same here...was interesting video.


Sent from my iPhone using Tapatalk
 
Top