Back flow valve for black tank flush

blkdodge

Active Member
HOW!!!! Does Heartland expect someone to replace a leaking black tank back flow valve, when they put it below the opening in the wall and have no excess piping to be able to gain access. Valve is located behind the removable panel in bedroom to gain access to shower valve. If I say what I'm thinking the MOD would not post this. I'm going to have to either remove sliding bedroom door, track and paneling or cut a hole and patch. Both of these choices are BS since this prone to problem valves should be located in a serviceable location.
 

danemayer

Well-known member
No problem with your post.

If it's not something you're comfortable doing, perhaps you should take it to your dealer.
 

jbeletti

Well-known member
Are you sure there's not a removable cover in the shower enclosure below the faucet? I've had them in some floor plans. Their generally white and round.

On other floor plans, there's a removable panel on the bedroom wall.

Please consider giving Customer Service a call tomorrow to inquire - 877-262-8032
 

JohnDar

Prolifically Gabby Member
You might also try opening up your basement walls and pull the lines down. They are probably not attached to anything in the wall cavity. Then you could cut the existing lines to the valve, and splice in extensions to be able to reach the new valve from the access panel.

But don't feel too bad. On some models, like mine, the anti-siphon valve is located in the wall cavity behind the toilet with NO access nearby. Hence, if it ever fails, the plumbing will be ripped out as I suggested.
 

sengli

Well-known member
I removed mine after several instances where it leaked. I pulled the associated plumbing out from behind the shower stall, from underneath too. Now I run the flush line directly thru a manual ball valve on the back of the UDC , to the line attached to the black tank. Never will it leak again. No more wondering of the pressure at the non-potable water spigot is too high or not.

And just so I can access this valve, I installed a small cabinet door in the basement wall. So I can see whats happening at any time behind the basement wall, or gain access to that one way valve whenever I need to. I always like to check the back side of the UDC whenever I hook up to any water source to make sure there aren't any leaks.
 

Attachments

  • blacktank.jpg
    blacktank.jpg
    62.5 KB · Views: 77
Last edited:

justafordguy

Well-known member
I removed mine after several instances where it leaked. I pulled the associated plumbing out from behind the shower stall, from underneath too. Now I run the flush line directly thru a manual ball valve on the back of the UDC , to the line attached to the black tank. Never will it leak again. No more wondering of the pressure at the non-potable water spigot is too high or not.


So you have the line coming from the black tank sprayer running directly to this new manual ball valve and then to the UDC hose fitting for the tank flush? This seems like a much simpler and more reliable setup. I may do this to both of my tank flusher before they start to leak.
 

blkdodge

Active Member
I removed mine after several instances where it leaked. I pulled the associated plumbing out from behind the shower stall, from underneath too. Now I run the flush line directly thru a manual ball valve on the back of the UDC , to the line attached to the black tank. Never will it leak again. No more wondering of the pressure at the non-potable water spigot is too high or not.


Great idea Sengli, thanks for the tip. The only thing I see, is that you have to remove the panel that encloses all of the plumbing every time you need to flush the black tank.
 

wdk450

Well-known member
I removed mine after several instances where it leaked. I pulled the associated plumbing out from behind the shower stall, from underneath too. Now I run the flush line directly thru a manual ball valve on the back of the UDC , to the line attached to the black tank. Never will it leak again. No more wondering of the pressure at the non-potable water spigot is too high or not.

And just so I can access this valve, I installed a small cabinet door in the basement wall. So I can see whats happening at any time behind the basement wall, or gain access to that one way valve whenever I need to. I always like to check the back side of the UDC whenever I hook up to any water source to make sure there aren't any leaks.

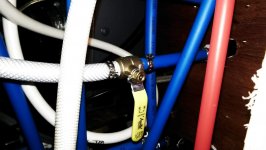
After my atmospheric valve blow up, I replaced it with a Sharkbite (brand) brass check valve, as this was locally available at an Ace hardware store (as well as Home Depots). Also, I could not find any brass replacements for the plastic one used. Recent threads on this forum on this subject have had links to a brass atmospheric breaker valve.

BTW, my valve was up in the wall next to my toilet. I had to crawl in my storage compartment crawl space corner, use a drill and jab saw on the subfloor wood above me for 2 hours to enlarge the hole enough to pull out the 3 feet PEX tubing up in the wall with the broken atmospheric breaker valve at the top of this tubing assembly. Then it took less than 5 minutes to put the new Sharkbite fitting in place, and shove the PEX back up in its place.

I have maintained since this incident happened to me in 2011, that this valve should NOT be installed where it is per manufacturers directions (see the 6th line in the "Caution" note at the top of the linked document), and the wording of that 6th line infers that leaking of water is to be expected "under normal operation". This current document has a water pressure maximum of 125 psi, where their previous documentation had no water pressure limits published.
Here is the link: http://www.bandbmolders.com/files/The_Flusher2_Install_.pdf
 

jmgratz

Original Owners Club Member
I think the design engineers in ALL fields should be required to try to replace the items they are designing. Then they may be designed to be more user friendly. It is the same in all types of things. Ever try to replace spark plugs, fuel injectors, freeze plugs, etc.
 
Top