Backup camera wiring- North Tail 24BHS

New member so may not be posting in the right place.
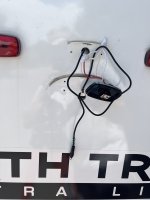
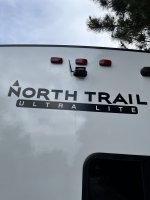
I have a Furrion camera housing on the rear of my 2023 24BHS. I removed the small panel with the 4 screws to access the wires.

Well, the wires are in there but they are not connected to anything, just a pigtail that can be completely removed from the Furrion housing. There isn’t even a hole drilled into the camper.

Anyone else have a “Furrion ready housing” that isn’t ready?

I’ll check with my dealer but I’m pretty sure I’ll get a that blank stare.

Thanks in advance for any help.


Sent from my iPhone using Tapatalk
 

fluffywhitedogs

Active Member
It seems many of these weren’t completely done. I’ve seen posts about dealers saying this is what “prepped” vs ”ready” means. My 2023 21RBSS came the same way as yours.(edit:just re-read. Mine did have a hole through the fiberglass. I initially thought there was also supposed to be a hole through the metal behind it, but this was not necessary. If you don’t even have the outside hole, it will depend on your skill and comfort level.I’ve never worked with fiberglass, and wouldn’t have wanted to do the drilling myself!)
If you want to avoid the dealer, it’s a super easy fix. Just remove the light directly above the camera hole and connect the included camera wires to those wires, then drop the wire down behind and out through the lower hole. The panel has some give so it fits no problem!
 
Last edited:
It seems many of these weren’t completely done. I’ve seen posts about dealers saying this is what “prepped” vs ”ready” means. My 2023 21RBSS came the same way as yours.(edit:just re-read. Mine did have a hole through the fiberglass. I initially thought there was also supposed to be a hole through the metal behind it, but this was not necessary. If you don’t even have the outside hole, it will depend on your skill and comfort level.I’ve never worked with fiberglass, and wouldn’t have wanted to do the drilling myself!)
If you want to avoid the dealer, it’s a super easy fix. Just remove the light directly above the camera hole and connect the included camera wires to those wires, then drop the wire down behind and out through the lower hole. The panel has some give so it fits no problem!

Thank you for the reply. I have a couple of warranty items for the dealer so I will see what the dealer says about the camera prep. Just seems crazy that the factory didn’t just connect those wire while the trailer was on the assembly line. I got spoiled having a camera on the last trailer so definitely want to install one.

If the dealer doesn’t help I’m going to do what you recommend and connect to that middle market light, bring the wires down into that Furrion enclosure (since there are already four screws holes for the Furrion). I’ve never hollowed out styrofoam in a Yeti cooler but I might get my chance.


Sent from my iPhone using Tapatalk
 

Col.Ted

Member
Has anyone actually cut through the back of their unit to install the wiring and camera system? If so, what is the gap size (if there is one)? Our Mallard 335 has a cabinet all the way across the top back area. Does anyone else have such a design? Could the back wiring possibly be accessed through a sally port and then covered with a wood tinted match plate for future access if needed...
 
Meanwhile some months later, I installed my Haloview BT7 backup camera which works very well. Posting the install just in case it helps someone else.
I removed the factory installed Furrion enclosure. Turns out there was a hole drilled into the exterior wall but you would never see it without removing the enclosure. Dumb. The hole looked to be about 3/4” and as mention drilled very low. There was Zero insulation in the wall so fishing the wire up to the center marker light went smoothly. Unfortunately I had to mount the new camera lower than I wanted in order to cover that 3/4” factory drilled hole. This camera has the same mounting hole pattern as the Furrion but since I had to move the camera lower two of the original screw holes ( now filled with caulk) are exposed.
 

Attachments

  • IMG_7283.jpeg
    IMG_7283.jpeg
    1.3 MB · Views: 11
  • IMG_7284.jpeg
    IMG_7284.jpeg
    1.1 MB · Views: 13
Top