Hello,
This is my 1[SUP]st[/SUP] go at posting in the Heartland forum!
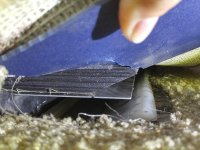
We have a 2009 Bighorn which we have enjoyed immensely, however recently we noticed that the BIG slide with the couch and the table and chairs, was leaving chunks of wood in the carpet.
After further investigation we come to find out that the “Edges” of the slide were deteriorating badly.
After going on line and seeing the “fix” that lip pert components gave, which was to adhere something plastic to the bottom of the slide, and then seeing by several folks that did not work at all I knew there had to be a better solution.
I went to our local Custom Metal shop run by Rusty Kramer of Kramer Metal Fab:
Kramer Metal Fab kramermetalfab@iowatelecom.net
745 210th Avenue 1-800-919-3676 or 641-620-8248
Pella, IA 50219 http://beadform.com/
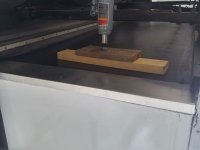
He surveyed the damage, measured and gave a possible solution. He went back to his Fabrication shop and cut-polished-bent , 2 pieces of aluminum.
They were a perfect fit.
Items needed to complete:
Procedure:
Its fixed the issue completely.
This is my 1[SUP]st[/SUP] go at posting in the Heartland forum!
We have a 2009 Bighorn which we have enjoyed immensely, however recently we noticed that the BIG slide with the couch and the table and chairs, was leaving chunks of wood in the carpet.
After further investigation we come to find out that the “Edges” of the slide were deteriorating badly.
After going on line and seeing the “fix” that lip pert components gave, which was to adhere something plastic to the bottom of the slide, and then seeing by several folks that did not work at all I knew there had to be a better solution.
I went to our local Custom Metal shop run by Rusty Kramer of Kramer Metal Fab:
Kramer Metal Fab kramermetalfab@iowatelecom.net
745 210th Avenue 1-800-919-3676 or 641-620-8248
Pella, IA 50219 http://beadform.com/
He surveyed the damage, measured and gave a possible solution. He went back to his Fabrication shop and cut-polished-bent , 2 pieces of aluminum.
They were a perfect fit.
Items needed to complete:
- Custom aluminum base plates, from Kramer Metal Fabrication
- Drill
- Bottle Jack (placed on 6x6) with wood planks.
Procedure:
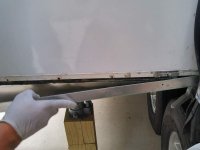
- Jack up the slide, See Pic.
- Remove lower edge trim by backing off the screws.
- Dry fit the aluminum piece to see where to put the bend in, see pic.
- Put the bend in, dry fit one more time. See pic
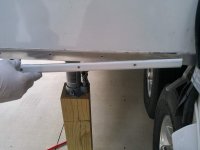
- Match up the Lower trim edge over the Aluminum edge and pre drill out the screw holes on shop bench.
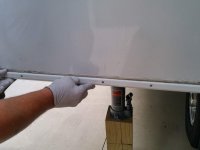
- Put the 3M windshield adhesive on the slide, couple of beads, being real careful not to get to much and not to get it on the aluminum.
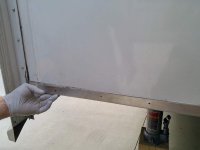
- Place aluminum. put screws back in to lower trim edge.,
- Lower jack and place board & Jack under aluminum, apply pressure to get a good seal.
- Repeat for other side.
Its fixed the issue completely.
Attachments
-
 1 Jacking up slide.jpg44.6 KB · Views: 191
 -
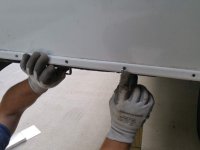 2. Remove Lower trim.jpg50.7 KB · Views: 187
 -
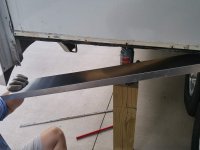 3 Dry Fit.jpg72.2 KB · Views: 182
 -
 3 Where to bend the Aluminum (see black mark).jpg114.7 KB · Views: 189
 -
 4 Drive fit 2.jpg53.5 KB · Views: 179
 -
 5 Match up lower trim.jpg47.6 KB · Views: 178
 -
 7 Put Lower trim back on.jpg59.5 KB · Views: 181
 -
 8 Reposition the jack under aluminum.jpg46.6 KB · Views: 182
 -
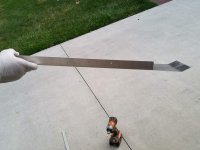 Bend made, Holes drilled.jpg97.6 KB · Views: 196