David-and-Cheryl
Well-known member
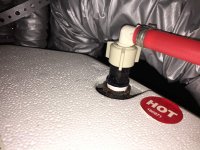
I discovered a puddle of water in my Landmark's basement, and traced it to a steady drip from the hot water outlet on the back side of the heater.
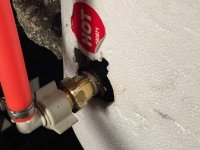
See the attached photo. I've tightened the white compression nut, but that didn't help. It actually doesn't appear that the water is dripping from that nut at all, as the area where the nut meets the black pipe connection is dry. The drip seems to be originating from lower on the black pipe, closer to where it enters the water heater.
That black fitting seems to be plastic, unlike the brass connection between the compression nut on the cold water side and the heater itself. The black fitting is round, so there's no good way to grip it with a pair of channel locks (I tried) to tighten it.
Any suggestions on what to do here? My guess is that the black fitting has a small crack in it, and that's where the leak is coming from, but that's just a guess. Before I go draining the heater and disassembling the hot water outlet, I thought I'd check for other opinions from some of the more experienced folks here. (In the meantime I've jury-rigged a funnel going to a hose to direct the dripping water outside.)
Thanks in advance for your help.


