Help ya girls out! Basement wall?!

Hello! Everyone speaks of removing this basement side wall to access things like the converter. I really need to do that as ours has likely failed or has bad fuses.

How?!?! (Scroll to pictures)


We own a Big Country 3450TS.


I’ve been learning so much from this site! We are a daughter (32) & mother (64) team doing our best to both live comfortably! I am trying to fix any thing I can or at minimum diagnose the problem. We’re handy but also know electricians who could help, once we get that far.


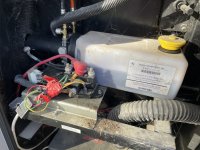
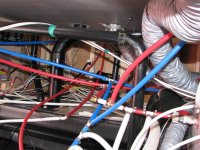
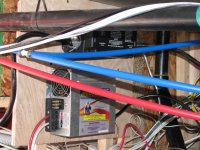
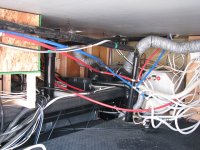
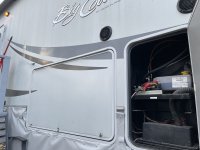
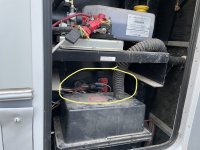
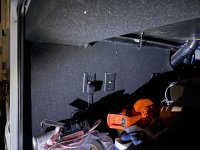
In our model, it just seems impossible that this wall comes out??? I see screws, but there is a big carpeted trim piece that is installed over the wall, plus black pipe that also hangs down over / on top of the wall. There is an outlet, a cable connection, and a vent also all on this side wall! I can crawl into this storage space and look behind the wall, and definitely see the converter mounted way back up there.


Has anyone else ran into this big piece in the way? Or can confirm your wall looks like this and comes out? A friend suggested he could cut an access into it but because the converter is so far back there, a person is going to need more space than that to get in and switch it out.


Any ideas are greatly appreciated.


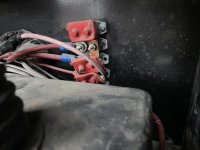
Our problems are: dim lighting with the small, switch activated lights.

If those switches are on (kitchen/living) and the furnace comes on, the lights will flicker and dim worse. Last night, the fridge also stopped being on when the furnace kicked on. We replaced the battery today and it did have a short in it. The fridge is staying on now with furnace running. However, while it seemed better for a few hours, we noticed the lights dim again/flicker when the switch lights were on and furnace came on. Any other ideas past converter stuff, please let me know.


Thanks in advance!!! <3
 

Attachments

  • 6C20B87B-7D0C-493F-93D3-3AB599E0E05D.jpeg
    6C20B87B-7D0C-493F-93D3-3AB599E0E05D.jpeg
    419.9 KB · Views: 98
  • 67128405-3CBE-425F-B248-C7281FD2A0CC.jpeg
    67128405-3CBE-425F-B248-C7281FD2A0CC.jpeg
    439.2 KB · Views: 90
  • E06A66AC-7A12-4B85-B51B-09E2A8FCF9EF.jpeg
    E06A66AC-7A12-4B85-B51B-09E2A8FCF9EF.jpeg
    479.1 KB · Views: 80
  • D0DEEB95-B490-4D68-BF70-05CE82CE2FA4.jpeg
    D0DEEB95-B490-4D68-BF70-05CE82CE2FA4.jpeg
    473.1 KB · Views: 75
  • 1765D696-5EFA-45C8-97D1-73D85D62008A.jpeg
    1765D696-5EFA-45C8-97D1-73D85D62008A.jpeg
    385.7 KB · Views: 79

danemayer

Well-known member
It does sound like the converter is not supplying 12V DC output and that's allowing the battery to get depleted. Until you get the problem fixed, a work around would be to purchase a battery charger (Walmart and other stores have them), plug it in the closest outlet, and attach the alligator clips to the battery terminals. The larger the charger, the better.

Your first two pictures look like the front storage compartment under the pin box. What you want is the pass through storage area. On most floor plans, the water connections all go to a Universal Docking Center (UDC). The removeable panel you want is usually the rear wall of the pass through storage, on the side with the UDC. Pictures 3,4,5 appear to be the other side of the pass through storage. There will probably be 3 screws toward the middle of that rear wall. A magnet will usually help locate the screws. There are probably 3 more screws that go in from the UDC.

BUT, before taking the wall down, first check your main circuit breaker panel. The power converter gets 120V AC from one of the circuit breakers; perhaps a 20 amp breaker. If that trips, the converter can't operate. Flip the breakers off and back on - don't depend on a visual examination.

If you go to the test panel that shows the water level in the holding tanks, one of the indicators shows the output of the converter/battery circuit. When on shore power, that panel will show 4 lights, indicating a full charge. Actually it's showing the higher of either the converter output, or the battery output. If it's less than 4 lights, you have no converter output. If you flip the breakers and it goes to 4 lights, the breaker was tripped.

There's another common trouble spot near the battery. A 12V manual reset mini-circuit breaker sits in between the battery and the power converter/fuse box. If that trips, the battery won't get charged, and battery power won't get to the fuse box to power lights, fridge, furnace, etc. BUT, even if it's tripped, a properly working converter will provide enough 12V DC power to operate everything. So while you'll want to be are of that, it's probably not the problem at the moment. If you have auto-levelup, you can check the voltage on the level-up control panel by cycling the mode control. When on shore power, you should see 13.2V or higher, reflecting converter output. If it's less than 13V while plugged into shore power,, either the mini-breaker is tripped or the converter is not working.

The on-board fuses on the converter will be blown if the battery terminals are connected in reverse polarity, even for a moment.

You can find out a lot more by looking at our Electrical Guide, and the 12V Block Diagram and Diagnostic Guide.
 

JohnDar

Prolifically Gabby Member
When you find the converter, make sure it’s actually securely plugged into a 120V outlet. They have been reported to have worked loose. And make sure the area around it is free of left over construction debris that can foul its cooling fan. When you pull the basement walls, be prepared to see a jungle in there. It’s a good idea to vacuum as much as possible to clean what they left behind. And if you’re handy with tools and a little carpentry, it’s OK to relocate it to a more accessible spot back there.


Sent from my iPhone using Tapatalk
 

cookie

Administrator
Staff member
I have the same floor plan in a Bighorn. I've had that wall out many times.
If after following Dan's trouble shooting you feel you need to remove the wall here are a few tips.
First you will need to empty the basement.
You will need to remove the door side half of the wall first. There are screws into that half that are accessed from the UDC. That's the place where your water and cable hookups are.
You will also have to remove that carpeted box overhead located on the door side. You have it circled in picture one.
If the sections of wall do not move after removing screws look for more screws.
Oh, those screws are all #2 square drive.

Peace
Dave
 
It does sound like the converter is not supplying 12V DC output and that's allowing the battery to get depleted. Until you get the problem fixed, a work around would be to purchase a battery charger (Walmart and other stores have them), plug it in the closest outlet, and attach the alligator clips to the battery terminals. The larger the charger, the better.

Your first two pictures look like the front storage compartment under the pin box. What you want is the pass through storage area. On most floor plans, the water connections all go to a Universal Docking Center (UDC). The removeable panel you want is usually the rear wall of the pass through storage, on the side with the UDC. Pictures 3,4,5 appear to be the other side of the pass through storage. There will probably be 3 screws toward the middle of that rear wall. A magnet will usually help locate the screws. There are probably 3 more screws that go in from the UDC.

BUT, before taking the wall down, first check your main circuit breaker panel. The power converter gets 120V AC from one of the circuit breakers; perhaps a 20 amp breaker. If that trips, the converter can't operate. Flip the breakers off and back on - don't depend on a visual examination.

If you go to the test panel that shows the water level in the holding tanks, one of the indicators shows the output of the converter/battery circuit. When on shore power, that panel will show 4 lights, indicating a full charge. Actually it's showing the higher of either the converter output, or the battery output. If it's less than 4 lights, you have no converter output. If you flip the breakers and it goes to 4 lights, the breaker was tripped.

There's another common trouble spot near the battery. A 12V manual reset mini-circuit breaker sits in between the battery and the power converter/fuse box. If that trips, the battery won't get charged, and battery power won't get to the fuse box to power lights, fridge, furnace, etc. BUT, even if it's tripped, a properly working converter will provide enough 12V DC power to operate everything. So while you'll want to be are of that, it's probably not the problem at the moment. If you have auto-levelup, you can check the voltage on the level-up control panel by cycling the mode control. When on shore power, you should see 13.2V or higher, reflecting converter output. If it's less than 13V while plugged into shore power,, either the mini-breaker is tripped or the converter is not working.

The on-board fuses on the converter will be blown if the battery terminals are connected in reverse polarity, even for a moment.

You can find out a lot more by looking at our Electrical Guide, and the 12V Block Diagram and Diagnostic Guide.
Thank you SO much for spelling that out! I was curious about a battery charger, how long would you leave it plugged in since the battery is now new? Some people are big on leaving a "trickle charge" connected all of the time. I heard that can mess up your battery and you should only do it for a few hours at a time.

My confusion was that somewhere I read it was the wall sharing that passthrough on the DOOR side. Our water area (UDC) is the other side entirely. WHAT! Wow... You have gotten me on the right track again, I can't wait to get home and try these troubleshooting tips. I am so grateful for your detailed response, it really connected the dots to what I have read in those guides & other posts. Bless you! <3
 
I have the same floor plan in a Bighorn. I've had that wall out many times.
If after following Dan's trouble shooting you feel you need to remove the wall here are a few tips.
First you will need to empty the basement.
You will need to remove the door side half of the wall first. There are screws into that half that are accessed from the UDC. That's the place where your water and cable hookups are.
You will also have to remove that carpeted box overhead located on the door side. You have it circled in picture one.
If the sections of wall do not move after removing screws look for more screws.
Oh, those screws are all #2 square drive.

Peace
Dave
That is really good to know. At some point we may modify it for another access spot. Thank you for saying so! Peace & love to you Dave.
 
When you find the converter, make sure it’s actually securely plugged into a 120V outlet. They have been reported to have worked loose. And make sure the area around it is free of left over construction debris that can foul its cooling fan. When you pull the basement walls, be prepared to see a jungle in there. It’s a good idea to vacuum as much as possible to clean what they left behind. And if you’re handy with tools and a little carpentry, it’s OK to relocate it to a more accessible spot back there.


Sent from my iPhone using Tapatalk
Oh joy, I can't wait to get in there and activate my OCD, I hope my vacuum will fit with me in this basement area! LOL. I can see the converter from afar but not the outlet, I will check that first and the fan. Thank you for your reply. :) I will snap some photos to link with this post for anyone in the future who is curious. It's turned super cold and windy so I may not be able to until Sunday, but I feel a lot better about it again thanks to all of you kind souls! Thank you!
 

cookie

Administrator
Staff member
You had a comment on leaving your battery on a trickle charge. If you can, just leave your camper plugged in all the time. The onboard intelligent charger/converter will tend to the battery. If you have a flooded battery you just need to check the electrolyte (water) every few months. You should do that anyway.
My camper has been plugged in for 11 years and I've replaced the battery once.

Peace
Dave
Awesome. We are connected to shore power 50 amp. It had a new battery 3 years ago when my mother moved in, and we just now had to replace it. We plan on it being connected like this long term. However........... since you mention it and I have a picture........... this is our battery area. I know you fill water into the battery itself if needed. But, what is in this other tank ? It seems low? Do I need to watch this as well?
 

Attachments

  • IMG_2622.jpg
    IMG_2622.jpg
    542.5 KB · Views: 63

cookie

Administrator
Staff member
That other tank in the picture is the hydraulic fluid reservoir. If your landing gear is down and your slides are out your level looks correct.
You should only check and or add fluid when the slides are in and the landing gear is retracted.

Peace
Dave
 

JohnDar

Prolifically Gabby Member
I called the space behind the walls the "Basement o' Doom" because it was a jungle back there. I fabricated access ports in the walls (the photo is for the converter and surge suppressor remounted location) and another for the panel by the water heater/back of the UDC. Originally, the converter was installed up against the back wall of the space, fan inlet facing the wall, and in a pile of wood dust & debris. It was also directly under the wall space where the black tank anti-siphon valve was hidden. Good thing I relocated it and the surge suppressor prior to it failing and causing a flood where it used to be.
 

Attachments

  • Basement jungle.JPG
    Basement jungle.JPG
    145.8 KB · Views: 58
  • Converter remount.JPG
    Converter remount.JPG
    129.2 KB · Views: 53
  • Converter access.jpg
    Converter access.jpg
    80.7 KB · Views: 51
  • Basement o' Doom.jpg
    Basement o' Doom.jpg
    159.3 KB · Views: 55
That other tank in the picture is the hydraulic fluid reservoir. If your landing gear is down and your slides are out your level looks correct.
You should only check and or add fluid when the slides are in and the landing gear is retracted.

Peace
Dave
Very good, thank you Dave!
 
I called the space behind the walls the "Basement o' Doom" because it was a jungle back there. I fabricated access ports in the walls (the photo is for the converter and surge suppressor remounted location) and another for the panel by the water heater/back of the UDC. Originally, the converter was installed up against the back wall of the space, fan inlet facing the wall, and in a pile of wood dust & debris. It was also directly under the wall space where the black tank anti-siphon valve was hidden. Good thing I relocated it and the surge suppressor prior to it failing and causing a flood where it used to be.
WOW, I can see why you would call it that. There needs to be more access ports! That is a great idea using the vent in the door, nice work! Thanks for the pictures as well. I am printing my troubleshooting steps and gearing up to talk myself into the jungle now. Going to take the GoPro in with me............ we will see how it all goes!
 
*UPDATE* Everything is going fantastic for the moment! I started on my checklist with finding the mini circuit breaker that runs the converter in the battery compartment. It was tripped! D'oh!
Reset it and so far everything inside is bright again and no dimming with furnace kicking on! It's almost too good to be true by how fast and easy that was. Thank you again for all who replied, one day I will venture into the basement O' doom, just not today! :) Here is where I found it, the one pictured with no red cap is where the reset was.
 

Attachments

  • IMG_2911.jpeg
    IMG_2911.jpeg
    303.2 KB · Views: 38
  • IMG_2912.jpeg
    IMG_2912.jpeg
    406.7 KB · Views: 38
  • IMG_2913.jpeg
    IMG_2913.jpeg
    383.6 KB · Views: 38

danemayer

Well-known member
Because that mini-breaker was tripped, the new battery wasn't sending any power to your fuse box inside. Now it is, but that doesn't mean the battery is getting charged.

Check the battery indicator on the tank level indicator. If everything is ok, you should see 4 lights. And if you check on the auto-leveling panel, you should see 13.2V or higher.
 
Yes and I’m not sure how long it may have been tripped because this was happening with the old battery too. My next tasks are researching this to see why there are no lights on it, and determining what is causing low water pressure. How else can I check the battery is getting charged?
 

Attachments

  • 542E529C-B36A-4300-B80D-7F4717CA228A.jpeg
    542E529C-B36A-4300-B80D-7F4717CA228A.jpeg
    524.3 KB · Views: 49

danemayer

Well-known member
Then you'll need to use a volt meter at the battery terminals. If you don't have a meter, check with the park or neighbor rigs.
 
Top