jpmorgan37
Well-known member
This Post was made by Slaytop in June of 2007 after a training session by a Lippert technician. Since we have a number of new members in the Forum, I thought that it would be helpful to repost it.
The session was performed by a Lippert technician on a Bighorn with a standard axle. Here are some highlights that I can comment on briefly.
Jacking.
Place the trailer on a level surface.
Don't try to lift the entire side of the trailer by jacking one wheel or by driving one wheel on a ramp so the other wheel comes off the ground. This overloads the axle, tire & wheel and can cause damage.
Lift the side of a trailer by placing a jack under the frame behind the rear spring hanger. Use wood blocks under the jack to permit it to reach a height that will lift the wheels off the ground.
It is OK to lift a single wheel if only to support that axle while changing a tire or doing service work. If the spring is beneath the axle, lift the axle by placing the jack under the spring plate. If the spring is over the axle, place the jack under the spring just forward of the axle. Only lift high enough to raise the tire off the ground.
Bearings.
Do this once each year.
Remove wheel. Remove bearing cap, bend tab washer back to permit the removal of the axle nut. Remove tab washer and discard. Pull wheel off making sure the outer bearing does not drop to the ground into the dirt. Remove outer bearing from wheel and set aside. Remove rear seal and discard. Remove inner bearing. Clean and repack bearings. Inspect bearing surfaces for heat and other damage. Replace if any damage is noticed. Inspect brake components and drum for damage or replacement. If the bearings are repacked correctly there is no need to load up the axle with extra grease. Reassemble using a new rear seal and tab washer. Tighten nut firmly while rotating wheel so everything seats well then back off. Then back off nut and tighten by hand. Bend tab of washer to keep nut in final position. Reinstall axle cap and wheel.
The use of the zerk fitting on the standard axle is ineffective and should not be relied on to grease the bearings.
Brakes.
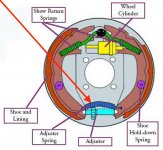
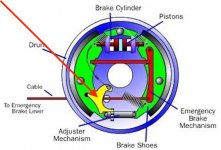
Clean brake assembly while drum is off and check the pads and actuator for wear. Remove the upper and lower springs (not the center springs on the shoe frame). Lightly lubricate with grease the flat bosses on the brake plate where the shoes rub. Remove the brake adjuster to clean and lubricate. Reassemble making sure the star adjusting wheel is lined up with the hole in the brake plate. Remove the plug in the hole to adjust the brakes.
Adjusting brakes.
When the wheel assembly is completely assembled, rotate the wheel and tighten the brakes by placing a tool in the plug hole against the star wheel. It should tighten when the tool is pushed downward outside. Tighten until the wheel can't be rotated then loosen the brakes 5 clicks of the star wheel.
Replace the plug and make the same adjustment to the other brakes.


