'Scuse my ignorance, but it looks to me like the clips are fastened to the underside of the countertop, so they kind of "push up" on the sink? Have I got that right? We only have a space between the two, but might work on it before it falls clear out. The mobile RV guy said he couldn't find any clips at all, can't imagine what is holding it in.
- Home
- Forums
- HEARTLAND RVs GENERAL AREA
- Plumbing - For all Heartland brands
- Faucets, Sinks, Showers, Fresh Water Tanks, Valves
You are using an out of date browser. It may not display this or other websites correctly.
You should upgrade or use an alternative browser.
You should upgrade or use an alternative browser.
Kitchen Sink
- Thread starter Warrstang331
- Start date
JohnDar
Prolifically Gabby Member
'Scuse my ignorance, but it looks to me like the clips are fastened to the underside of the countertop, so they kind of "push up" on the sink? Have I got that right? We only have a space between the two, but might work on it before it falls clear out. The mobile RV guy said he couldn't find any clips at all, can't imagine what is holding it in.
Actually, they are not physically attached to the sink. The clips are screwed to the 1/2" plywood frame that surrounds the opening. There are other types of fasteners for attaching an undermount sink in a home counter that won't work in a trailer. So they used little metal L-brackets and a 1/2" wood screw (if they bothered to install the clips).
JohnDar
Prolifically Gabby Member
I guess that is why our sink didn't fall all the way down, I felt all around up there and the plywood frame seems to be holding it close to the counter? Does that seem to do the trick, or should I get the clips and try to install them?
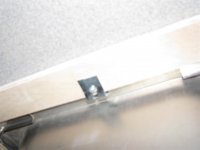
Here's the photo of mine again. The wood does not have a rabbeted edge profile to secure the flange of the sink, it just butts up to it. It's actually a dual mount sink design. Look closely and you can see how the sink flange is designed to be a drop-in or undermount installation. Whether or not HL actually installs it properly is another question.
Attachments
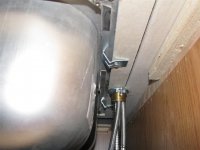
I'm going to count my blessings that all I have to do is caulk around the space between the sink and countertop - I took a picture, since I couldn't get into the space, and see some clips that might be the saving of our arrangement. They could probably be tightened and draw the sink up, but all kind of bad things could also happen.
JohnDar
Prolifically Gabby Member
I'm going to count my blessings that all I have to do is caulk around the space between the sink and countertop - I took a picture, since I couldn't get into the space, and see some clips that might be the saving of our arrangement. They could probably be tightened and draw the sink up, but all kind of bad things could also happen.
Our sink has two sponge drawers in front of it. If yours does, you can remove them to get a closer look at the front of the sink. With our countertop layout, I was able to see the backside and the right side of the sink from the corner cabinet. Removing the drawers on the left side of the sink revealed that side. Mirrors and extensions were also used to do the job since there isn't much room to be able to get my keister inside the cabinet under the sink and still be able to do anything (besides curse in a most profound way).
when my sink fell out i not only found the lack of clips but in addition was a strip of wood about 3/8"thick glued to the underside of the counter on the faucet side . the screws they used to attach the clips to it were longer than the thickness of wood so it broke the glue bond to the counter, which added to the problem
Took a peek, and couldn't find any clips in front, so was thinking about tinkering a bit, but looks like the first thing I would have to do is disconnect the drains from the sink, right?Our sink has two sponge drawers in front of it. If yours does, you can remove them to get a closer look at the front of the sink. With our countertop layout, I was able to see the backside and the right side of the sink from the corner cabinet. Removing the drawers on the left side of the sink revealed that side. Mirrors and extensions were also used to do the job since there isn't much room to be able to get my keister inside the cabinet under the sink and still be able to do anything (besides curse in a most profound way).
JohnDar
Prolifically Gabby Member
Took a peek, and couldn't find any clips in front, so was thinking about tinkering a bit, but looks like the first thing I would have to do is disconnect the drains from the sink, right?
It's been a while since I checked, but if the drain pipes are screwed together, it will give you a bit more room if you need to access the back side of the sink. If they're glued together, good luck. Fortunately, I didn't have to deal with the clips in the back since they were already there.
Going over the different forums and subjects here, some themes are a normal occurance no matter the make and model of trailer or fw. Kitchen sinks being one of the many, our Gateway had a leak that was intermittant and impossible to locate because of that fact, it took 2 1/2 years before we got it taken care of, i know this is somewhat off subject here but i believe it is pertinant.
The problem ended up being the faucet, Ron at Heartland sent me a new unit to install myself because our dealership was not able to fix the problem and actually falsified warrenty claims to Heartlnd concerning repairs made to the fw from water damages caused by the faucet leaking, luckily it was documented while we were still under warrenty and Ron worked with me for over 1 1/2 years after our warrenty was up to help find and repair the leak, he also was working with me to get the repairs done that our dealerhip did not do, long story.......after we fixed the leak, i tried to give our dealer a chance to do the right thing, left the fw with them for 2 plus months before we needed to use our rig, they didn't touch it so we left and never looked back to them, when i tried to find another dealer last year, i had no luck locateing another dealerrship, and this spring to do the water damage repairs i was told by another rep from Heartland i was to far our of warrenty and on my own, Ron has since transfered from the west to the east coast and sent me an email stateing because of the transfer he was unable to be of help anymore, the reason i got in touch with another rep.....
I am selling our Gateway now because of this problem and looking at another brand now other than Heartland, i have bragged and written a blog basically about our fiver, how much we loved it, got a lot of help from other owners on the forum for issues that popped up from time to time and appreciate all the help i did get when needed. Thank you all.
Good luck with your sink troubles, my advise would be to document everything, let your dealer try to do the repairs and if they can not, find one who can while you are still under warrenty.
mlpeloquin
Well-known member
Well, actually if I wasn't "handy" and able to do 99% of the repairs myself (I refused to re-weld the mis-aligned frame brackets for the bike rack), my coach would be at the dealer more than on the road. All relatively minor stuff (to me) but still indicative of a lack of QC. Just the other day, I installed an RVLock on the driver side slam hatch. Easy job you say? Wrong - someone at the factory cut the latch hole sloppily, resulting in a tiny gap in the upper left corner. Not a big deal - a little dab of silicone did the trick. It was either that or a new slam hatch door - I suppose I could have gone to Heartland for a new door, but they would say it was the atermarket part even though the hole was cut poorly.
Point is, RV "quality" is a relative term. In my opinion, Heartland coaches are better than most mass produced coaches but overall quality still leaves much to be desired - just look at the complaints on this forum. Your sitting in your coach and the sink just falls out? Really? The best part is that others had the same thing happen, so it's not a rarity.
The RV industry will learn the exact same lesson Detroit did in the '70's as soon as the Japanese or Koreans figure out how to build these things and ship them over on a boat at a competitive price. One indicator that quality is not an issue with manufacturers is that fact that, with all of the various sub-forums on this forum, not one addresses "Quality". Might be helpful to Heartland and the owners if there was one. Just 'sayin.
Just to let you know that the factory does not cut the holes for the latch(s). I had to replace one hatch door and they come from the supplier complete with the locking handles.
Before I tackle installing the clips, I'm going to have to get to the underside and clean out all the junk I've put in the space, and to do that I'm going to have to remove at least the top shelf under the sink, if not both. Is there an orderly way to do this, or just start tearing out screws? Also, when you folks supported the sink to work on it, did you put weight on the shelf? Because I put some relatively light items on the shelf and it collapsed.
Similar threads
- Replies
- 10
- Views
- 2K
- Replies
- 9
- Views
- 2K
- Replies
- 8
- Views
- 1K
- Replies
- 1
- Views
- 1K
- Replies
- 3
- Views
- 2K