Solar Install on a North Trail 23RBS

My wife and I are new to the Travel Trailer seen. We recently upgraded from a 2006 Fleetwood Niagara Tent Trailer to this wonderful 2017 North Trails Travel Trailer.

The reason for this Thread is to find out if anyone on this website has ever installed Solar. On this specific model and if so where would be the best place on the roof to bring the panels feed wires down.

Here are the specs:
4 x 100 watt panels
1 Controller
1 Internal Monitor
2 x 12v 200 amp Deep Cycle Batteries

Tom and Lisa Schneider
Orange, .CA.
2017 Heartland North Trails 23RBS
 

danemayer

Well-known member
Hi freddiekat812,

Welcome to the Heartland Owners Forum. There's lots of useful information here along with a great bunch of friendly and helpful people. I expect you'll get some help on the solar installation shortly.
 

Oregon_Camper

Well-known member
What is your goal with solar? Depends on your RV for bringing wiring down. Some come down back of refrigerator or vents. What is the configuration look like on top of your roof?


Here are the specs:
4 x 100 watt panels - Do you know the have volts and amps?
1 Controller - Which one? PWM or MPPT??
1 Internal Monitor - You mean a display inside RV? If so...which one?
2 x 12v 200 amp Deep Cycle Batteries - 200 amp hour each or 100 each and wired in parallel to get to 200 amp hours?

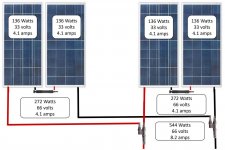
Here is my current layout which I currently have wired in both parallel and series. I also have a 120w GoPower portable solar kit, that is not shown. Here is a link to a YouTube video I did on that if you're interested.

Capture.jpg
 
Oregon_Camper,

If you look at the configuration of my trailer you will find out that the refrigeration unit is in the slideout section of that trailer. There is no way that I am able to run wiring down through it as it would cut off when the slide out was brought back in and close down.

As it stands today the only way I can see the success of this is to bring the cables all the way to the back end of the trailer and down through the pantry section then feed them back towards the front end of the trailer from beneath.

All other Cabinetry sections of my trailer are either in the two slide outs or in the front nose of the trailer, which there is no access to get to.

In answer to your last question I am providing the webpage of the site that I purchased the system from.

https://www.renogy.com/renogy-400-watt-12-volt-premium-solar-complete-kit/

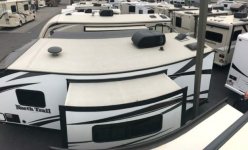
In regards to the layout, my solar panels are two by two going from the front of the trailer towards the back on each side of the air conditioning system.
 
At this point I am unable to upload pictures. I think the moderator needs to release once I make it through the probation period.

Sorry,

- - - Updated - - -

Nevermind, I just noticed that the thumbnail did attach even though there was no OK button to click.

Sorry for any confusion.
 

Attachments

  • Screenshot952018-03-07-10-54-20-1.jpg
    Screenshot952018-03-07-10-54-20-1.jpg
    29.3 KB · Views: 44

Oregon_Camper

Well-known member
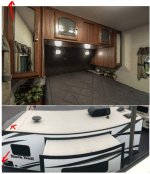
From what I can determine from online pictures you might be able to drill a hole from you drivers side closet (back left corner...and go up from inside vs down from roof) and then simply attach the wires to the closet frame.. You might have a few inches showing when the wires comes out of the closest to the night-stand. From there is looks like an easy drop to the pass-through storage, where I assume you will have your MPPT controller and inverter mounted.

Capture.jpg
 

Silverado23

Iowa Chapter Leaders
An alternate location may be running down next to the vent pipe near the AC. You could then run the cables under the RV to wherever you have your controller.

If you want to add a third battery. I found a storage box that works well for 3 batteries.

The box I used:
Homz Durabuilt 15 gallon camo storage tote.
I placed a 1/4" plywood bottom inside it and used a 2x10 cut to fit between the battery mounting rails on the tongue.
Holes cut as needed for wires to enter/exit
Screws were used to secure lid to container.

https://www.farmandfleet.com/products/866341-homz-durabilt-15-gallon-camo-storage-tote.html

866341.jpg


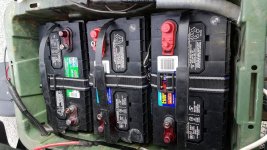
Here the batteries installed but not wired in yet.

These are group 29 batteries.
Two are Walmart Everstart MAXX RV batteries
Third battery is Interstate group 29 battery RV battery.
All same capacity and all within 6 months old of each other.

Batteriesinbox.jpg
 
I will look into running the wires down the vent pipe as you suggested.

Looks like a very nice box for a standard size set of batteries up to the three that you're showing and I assume it's on your rig.
Due to the fact that each of my batteries dimensions are 21.5 by 9.5 I have chosen to use a rail system and move the batteries to the inside storage compartment of the trailer just beneath the bed, but with easy access via the storage door outside the trailer.

This is what I purchased from Amazon:

[h=1]MORryde SP60-044 Sliding Battery Tray - 24.25" x 24.15" x 2.75"[/h]
https://www.amazon.com/gp/product/B007HRQCPQ/ref=oh_aui_detailpage_o02_s00?ie=UTF8&psc=1

The second reason that I purchased this system was due to the fact that we would be putting it into a indoor public storage facility and I wanted to make sure the batteries were secure.

Thanks again for your advice, much appreciated.
 

Oregon_Camper

Well-known member
I will look into running the wires down the vent pipe as you suggested.

Make sure you do the math on proper wire gauge and distance if you plan to go that route (wiring vent pipe...down...back to front of trailer)

Too long of of a run....bad (power loss)

Wire too small...really bad. (possible fire)
 

Silverado23

Iowa Chapter Leaders
Make sure you do the math on proper wire gauge and distance if you plan to go that route (wiring vent pipe...down...back to front of trailer)

Too long of of a run....bad (power loss)

Wire too small...really bad. (possible fire)

Excellent point.

Running panels in series for higher voltage allows longer runs with low loss. My system panel voltage is around 99volts and runs a max 7amps on the solar panel side. The output side of my mppt charge controller runs a max of about 16volts at 60 amps at fully capacity but typically runs at 14volts at 35 amps.

Another advantage to higher voltage is us the smaller cables are much easier to run than the thicker cables necessary to handle the higher current required at 12volts.


If using the vent pipe area you run the wires parallel to the vent pipe along the outside the pipe.
 

Oregon_Camper

Well-known member
Running panels in series for higher voltage allows longer runs with low loss. My system panel voltage is around 99volts and runs a max 7amps on the solar panel side. The output side of my mppt charge controller runs a max of about 16volts at 60 amps at fully capacity but typically runs at 14volts at 35 amps.

Which MPPT controller are you using? Seem VERY efficient.
 

Silverado23

Iowa Chapter Leaders
Which MPPT controller are you using? Seem VERY efficient.

Efficiency is close to 99%
I am using the Tristar MPPT 60 controller.
https://www.morningstarcorp.com/products/tristar-mppt/

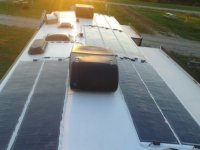
I have 9 panels 85 watts each setup as three strings of three panels so that each string typically has a voltage of around 96 volts. This does vary quite a bit depending on sun and temperature. Each string supplies approximately 7 amps and is combined immediately prior to the controller.

Morningstar corporation has webinars to help better understand its products and features and also has a very useful string calculator tool.
live webinars
https://www.morningstarcorp.com/live-webinars/

Recorded webinars
https://www.morningstarcorp.com/recorded-webinars/

String calculator
http://string-calculator.morningstarcorp.com/


Photo of roof panels.

myinstallsmall.jpg
 

Oregon_Camper

Well-known member
Efficiency is close to 99%
I am using the Tristar MPPT 60 controller.
https://www.morningstarcorp.com/products/tristar-mppt/

I have 9 panels 85 watts each setup as three strings of three panels so that each string typically has a voltage of around 96 volts. This does vary quite a bit depending on sun and temperature. Each string supplies approximately 7 amps and is combined immediately prior to the controller.

How are you getting 7amps?

From reversing your setup (must be in series) you have 3 panels at 32v and 85w each (combined for 96v and 255w). Isn't that only 2.65 amps per string?

finally...".....and is combined immediately prior to the controller."....is this also in series? So, you'd have 765w and 228v going into the controller?
 

Silverado23

Iowa Chapter Leaders
How are you getting 7amps?

From reversing your setup (must be in series) you have 3 panels at 32v and 85w each (combined for 96v and 255w). Isn't that only 2.65 amps per string?

finally...".....and is combined immediately prior to the controller."....is this also in series? So, you'd have 765w and 228v going into the controller?

Open-circuit voltage is 32.4 V per panel x 3 = 97.2v (per string) @ 77F cell temperature. Colder temperatures result in higher voltages, Higher temperatures result in lower Voc voltages.

Voltage at max power is 23.3 v per panel 69.9Vmp@77F
Current at max power is 3.6A per panel 3.6A per string @ 77F

Wattage Per panel max power is 23.3V x 3.6A = 83.88 rounded up to 85watt average.


Short circuit current is 4.4 amps per panel 4.4 amps per string

The 7 amp figure is a max limit on the panels circuits breaker.


Each string of three panels are connected in series.
Each string is fed into a combiner box with an independent circuit breaker protecting that string.
The three strings are combine in parallel after the circuit breaker within the combiner box and then the fed to the input on the controller.

Max input voltage of the controller is 150V. The strings never at any temperature should exceed this.


Full panel specs that I used:
http://www.solopower.com/wp-content/uploads/2013/03/solopower_solopanel_sp1_product_specs.pdf

Combiner box used for combining solar panel array.
Midnight solar MNPV3
Used a 7amp breaker per string of 3 panels
http://www.midnitesolar.com/pdfs/frontBack03.pdf

With high voltage and low current requirements on the panel strings I was able to use pretty small gauge wire and have pretty long runs at that.
Remember in DC wiring, the total length of both positive and negative wire in the circuit must be used in your calculations for wire size.

- - - Updated - - -

How are you getting 7amps?

From reversing your setup (must be in series) you have 3 panels at 32v and 85w each (combined for 96v and 255w). Isn't that only 2.65 amps per string?

finally...".....and is combined immediately prior to the controller."....is this also in series? So, you'd have 765w and 228v going into the controller?

Open-circuit voltage is 32.4 V per panel x 3 = 97.2v (per string) @ 77F cell temperature. Colder temperatures result in higher voltages, Higher temperatures result in lower Voc voltages.

Voltage at max power is 23.3 v per panel 69.9Vmp@77F
Current at max power is 3.6A per panel 3.6A per string @ 77F

Wattage Per panel max power is 23.3V x 3.6A = 83.88 rounded up to 85watt average.


Short circuit current is 4.4 amps per panel 4.4 amps per string

The 7 amp figure is a max limit on the panels circuits breaker.


Each string of three panels are connected in series.
Each string is fed into a combiner box with an independent circuit breaker protecting that string.
The three strings are combine in parallel after the circuit breaker within the combiner box and then the fed to the input on the controller.

Max input voltage of the controller is 150V. The strings never at any temperature should exceed this.


Full panel specs that I used:
http://www.solopower.com/wp-content/uploads/2013/03/solopower_solopanel_sp1_product_specs.pdf

Combiner box used for combining solar panel array.
Midnight solar MNPV3
Used a 7amp breaker per string of 3 panels
http://www.midnitesolar.com/pdfs/frontBack03.pdf

With high voltage and low current requirements on the panel strings I was able to use pretty small gauge wire and have pretty long runs at that.
Remember in DC wiring, the total length of both positive and negative wire in the circuit must be used in your calculations for wire size.
 

Silverado23

Iowa Chapter Leaders
Thanks for taking the time to give me that info. While I "think" I understand this, I love getting more information from folks like yourself. :cool:

Your welcome. I know it was getting a bit technical it helps to understand that there is more to consider when installing solar.
The links and info I provided were some that I studied for a while before I dove into my solar install.

Hopefully others find this info useful or interesting. I found the solar installation challenge fun and rewarding.
 
Top