My Landmark Shenandoah storage area floor was damaged by mold and fungus and required replacement. I reported the damage in an earlier post.
//heartlandowners.org/showthread.php/14326-Fungus-growing-under-coach?highlight=fungus
My last post ended with the desire to find a strand board replacement composite that would not be affected by moisture yet be strong enough for a floor. My search led me to SpaceAge Synthetics located in Fargo, ND.
http://www.spaceagesynthetics.com/products/thermolite.html
Their Thermo-Lite Board was exactly what I was looking for. It is a light weight reinforced composite material made of polyurethane and fiberglass that can be custom ordered in a variety of sizes. Their web site has product and contact information and they welcome your inquiries and questions. I found this material easy to work with wood working tools. Also, it is easy to edge glue with a polyurethane adhesive.
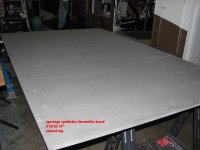
I ordered a single grey ¾” x 5’x8’ piece that would match the size of my storage compartment. I had them sand it on one side so the inside of the storage compartment would be smooth. It was shipped via FedEx freight mounted in a pallet. The Board weighed about 60lbs but the pallet weighed much more. I took delivery at a local FedEx distribution center and they loaded it onto my utility trailer with a fork lift truck. I ordered the single sheet because I wasn’t certain how to cut it in advance and I wanted to make sure the cut edges matched. (LDMKFloor1)
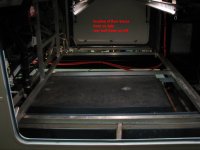
The storage compartment floor is supported by three aluminum square tubes located inward and lengthwise and other supports along the perimeter of the floor. The rear compartment wall and the side walls rest on top of the floor. (LDMKFloor2)
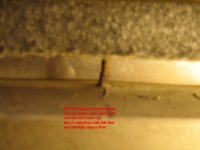
The sidewalls remained supported by screws that went through the original floor. Since it was not practical to try to remove the screws, the new board needed to be slotted to slip around the screws. (LDMKFloor3)
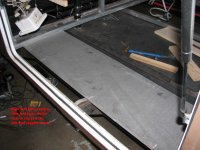
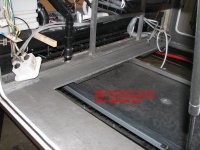
The board was too large to fit through the storage room doors and it was necessary to cut it into pieces to slip the edges under the sidewalls and rear wall support. I cut two pieces that fit the sides from the center of the inner aluminum supports to the outer edges under the sidewalls. The right side piece is shown below. Notice the slots to slip around the screws. They will be above the side frame support when in place. Some sanding was required along the outer edge to fit the piece since it was a bit too thick to fit into the sidewall gap and under the rear wall support. I used a metal bar and wood spacers to help lift the rear wall support while fitting the new floor underneath. (LDMKFloor4)
A third piece was cut to fit across the back of the storage area between the side pieces. The third piece was carefully measured so the final center piece would fit through one of the doors. Since there is no support for the rear and final pieces between the aluminum tubes, I fastened 3” steel plates to the front of the rear piece in the gaps between the frames. This will give support and also keep the two pieces level. (LDMKFloor5)
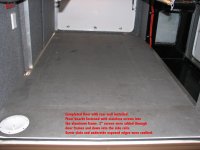
The fourth and final piece fit in the remaining gap to complete the floor. The floor was fastened with stainless steel screws. The screw heads were countersunk to keep the floor smooth. The next photo shows the completed floor with the rear wall reinstalled. The port was replaced in the floor since the board is moisture and fungus resistant. (LDMKFloor6)
The floor was caulked along the edges underneath where it is exposed to wheel spray. The port was sealed with caulking. The slots cut for the sidewall screws were filled with foam.
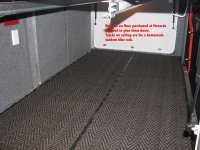
The completed floor is covered with a runner purchased from Menards. It overlaps slightly and didn’t need to be glued down. (LDMKFloor7)
I am confident that this floor will last and never rot again. This project was completed in August, 2010.
P.S. In case you noticed the garage door track on the storage ceiling, it is part of an overhead rack that I made to hold a tandem bicycle.
//heartlandowners.org/showthread.php/14326-Fungus-growing-under-coach?highlight=fungus
My last post ended with the desire to find a strand board replacement composite that would not be affected by moisture yet be strong enough for a floor. My search led me to SpaceAge Synthetics located in Fargo, ND.
http://www.spaceagesynthetics.com/products/thermolite.html
Their Thermo-Lite Board was exactly what I was looking for. It is a light weight reinforced composite material made of polyurethane and fiberglass that can be custom ordered in a variety of sizes. Their web site has product and contact information and they welcome your inquiries and questions. I found this material easy to work with wood working tools. Also, it is easy to edge glue with a polyurethane adhesive.
I ordered a single grey ¾” x 5’x8’ piece that would match the size of my storage compartment. I had them sand it on one side so the inside of the storage compartment would be smooth. It was shipped via FedEx freight mounted in a pallet. The Board weighed about 60lbs but the pallet weighed much more. I took delivery at a local FedEx distribution center and they loaded it onto my utility trailer with a fork lift truck. I ordered the single sheet because I wasn’t certain how to cut it in advance and I wanted to make sure the cut edges matched. (LDMKFloor1)
The storage compartment floor is supported by three aluminum square tubes located inward and lengthwise and other supports along the perimeter of the floor. The rear compartment wall and the side walls rest on top of the floor. (LDMKFloor2)
The sidewalls remained supported by screws that went through the original floor. Since it was not practical to try to remove the screws, the new board needed to be slotted to slip around the screws. (LDMKFloor3)
The board was too large to fit through the storage room doors and it was necessary to cut it into pieces to slip the edges under the sidewalls and rear wall support. I cut two pieces that fit the sides from the center of the inner aluminum supports to the outer edges under the sidewalls. The right side piece is shown below. Notice the slots to slip around the screws. They will be above the side frame support when in place. Some sanding was required along the outer edge to fit the piece since it was a bit too thick to fit into the sidewall gap and under the rear wall support. I used a metal bar and wood spacers to help lift the rear wall support while fitting the new floor underneath. (LDMKFloor4)
A third piece was cut to fit across the back of the storage area between the side pieces. The third piece was carefully measured so the final center piece would fit through one of the doors. Since there is no support for the rear and final pieces between the aluminum tubes, I fastened 3” steel plates to the front of the rear piece in the gaps between the frames. This will give support and also keep the two pieces level. (LDMKFloor5)
The fourth and final piece fit in the remaining gap to complete the floor. The floor was fastened with stainless steel screws. The screw heads were countersunk to keep the floor smooth. The next photo shows the completed floor with the rear wall reinstalled. The port was replaced in the floor since the board is moisture and fungus resistant. (LDMKFloor6)
The floor was caulked along the edges underneath where it is exposed to wheel spray. The port was sealed with caulking. The slots cut for the sidewall screws were filled with foam.
The completed floor is covered with a runner purchased from Menards. It overlaps slightly and didn’t need to be glued down. (LDMKFloor7)
I am confident that this floor will last and never rot again. This project was completed in August, 2010.
P.S. In case you noticed the garage door track on the storage ceiling, it is part of an overhead rack that I made to hold a tandem bicycle.