The Talleys 3950FB Mods

nander

Texas North Chapter Leaders-retired
Re: Main Bath Mods

We picked it up at Camping World. It is the "Fury" model in nickel. Link here.

We both like it a lot. Val mentions she likes it better than the plain Oxygenics shower head we had in the last trailer.

I just bought that one and Dave has installed it. Can't wait to try it.

Thanks for all the pics and explanations!! Valuable information!
 

VKTalley

Well-known member
Love to hear how this one works on low pressure compared to the Body Spa model.

Jim, it seems to work great with the low pressure that we have here at Ft. Toulouse campground. I can wash my long hair and feel like all the shampoo is getting washed out.

Nancy, you're welcome on all the pictures. I'd like to know your thought on the shower head too. I'm loving ours.
 

mmomega

AnyTimer
Re: Main Bath Mods

We picked it up at Camping World. It is the "Fury" model in nickel. Link here.

We both like it a lot. Val mentions she likes it better than the plain Oxygenics shower head we had in the last trailer.
I just picked up the same one 3 days ago. The original Oxygenics developed a small crack so I was about to purchase the same replacement model but picked up the Fury model instead. I think it's a better showerhead.
 

MCTalley

Well-known member
Half Bath Cabinet Shelving Mod

Yesterday we decided to tackle a "more storage" project in the tall cabinet in the half bath. This cabinet has three sections. The bottom and top sections have no shelves, the middle section is divided in half with one shelf. Since the middle section is nearly 40" tall, this makes each half of the cabinet about 20" tall. The top half is about 30" tall.

In our previous rig, we had a similar tall cabinet in the slide next to the recliners that we did a similar modification to. We knocked out the fixed shelf and added shelf rails on both sides of the cabinet. A 10" deep shelf board was cut to length and clips inserted in the rails to hold the shelves in place. We ended up with three shelves (four total including the bottom) in the middle cabinet and one in the top. We're going to add one or two more to the top one at some point (the store was out of shelves).
 

Attachments

  • 150415-02.JPG
    150415-02.JPG
    75.9 KB · Views: 161
  • 150415-03.JPG
    150415-03.JPG
    99.4 KB · Views: 163
  • 150415-04.JPG
    150415-04.JPG
    100.3 KB · Views: 169
  • 150415-01.JPG
    150415-01.JPG
    92.3 KB · Views: 167

MCTalley

Well-known member
Convection Microwave

Our rig was equipped almost exactly as we would have ordered it except for one thing - a convection microwave. We found the one we wanted online at Lowe's and ordered it to be picked up at the store here in Alabama. It took about a week and a half to arrive at the store and I went over after work to pick it up.

Our next door neighbor here at the campground came over and helped wrestle it in place. No pictures of the installation process, but here is a final. Fortunately, it fit exactly the same as the High Pointe Microwave that we removed, so we didn't have to remove the blinds over the window below the microwave like we did in the previous rig.
 

Attachments

  • 150415-05.JPG
    150415-05.JPG
    90.8 KB · Views: 163

kakampers

Past Heartland Ambassador
Re: Convection Microwave

Thanks Malcolm...loved your first mod...Ken wasn't too happy, meant work for him...LOVE it!
 

Attachments

  • IMAG0014.jpg
    IMAG0014.jpg
    306.3 KB · Views: 122
  • IMAG0015.jpg
    IMAG0015.jpg
    759.5 KB · Views: 116

jbeletti

Well-known member
Jim, it seems to work great with the low pressure that we have here at Ft. Toulouse campground. I can wash my long hair and feel like all the shampoo is getting washed out.

Nancy, you're welcome on all the pictures. I'd like to know your thought on the shower head too. I'm loving ours.

Okay - Dave Y was going to CW the other day here in Myrtle Beach and I asked him to pick me up the Fury. $63 total for the Nickle finish model. Report: We like it! I don't so much care for the flex hose inside a clear plastic hose, so I may swap it out for the more flexible one that came with the Moen I removed.
 

VKTalley

Well-known member
Okay - Dave Y was going to CW the other day here in Myrtle Beach and I asked him to pick me up the Fury. $63 total for the Nickle finish model. Report: We like it! I don't so much care for the flex hose inside a clear plastic hose, so I may swap it out for the more flexible one that came with the Moen I removed.

Yeah, the plastic flex hose is not my favorite either but the original shower head hose won't work with the wall mount (I think that's what Malcolm told me). Upside to the plastic hose....no metal rubbing on the shower wall.
 

MCTalley

Well-known member
Kitchen Backsplash

While shopping for items at Lowe's today in London, Kentucky (where we are visiting my brother and family), we actually found several packages of Smart Tile brand gel tiles on the shelf. They were also in the color and pattern we liked and never got around to installing in our last trailer. We picked up six packages of six tiles (ended up only needing four packages) at $45 a package. Seems expensive initially, but actual glass wall tile sheets are about $10 apiece. Add in the cost of grout, some method for cutting the tiles and a way to get them to stick to the wall and the gel tiles are actually a bargain.

We installed them in the kitchen as shown in the first few pictures. The last pictures shows one of two walls in the half bath covered in tile, as well. I'll be doing the second wall (with the outlets and switches) tomorrow after I finish relocating the light switches from over the sink to right inside the door (upcoming mod post).
 

Attachments

  • 150421-12.JPG
    150421-12.JPG
    117.4 KB · Views: 182
  • 150421-11.JPG
    150421-11.JPG
    101.2 KB · Views: 185
  • 150421-109.JPG
    150421-109.JPG
    118.6 KB · Views: 174
  • 150421-09.JPG
    150421-09.JPG
    112.8 KB · Views: 182

kakampers

Past Heartland Ambassador
Re: Kitchen Backsplash

Great job! That looks like the same smarttiles we used , but put ours in the bathroom and around the fireplace.
 

farside291

Well-known member
Re: Kitchen Backsplash

Great mods, I also have a 2015 3950FB and I am interested in some of your modifications, especially the mod to the king bed. Sure is tough making it up in the morning. It's just too close to the walls. I noticed in the pictures showing the added tiles for the walls in the kitchen that you have a matching cover for the stove. Mine didn't come with a cover. Do you know if this is an option for this model?
 

MCTalley

Well-known member
Re: Kitchen Backsplash

Great mods, I also have a 2015 3950FB and I am interested in some of your modifications, especially the mod to the king bed. Sure is tough making it up in the morning. It's just too close to the walls. I noticed in the pictures showing the added tiles for the walls in the kitchen that you have a matching cover for the stove. Mine didn't come with a cover. Do you know if this is an option for this model?

I'm not sure on the stove covers. Might post something in the "Ask the Factory" section. Could be that they were left out of your rig?
 

farside291

Well-known member
Re: Kitchen Backsplash

I'll do that, thanks. Looking forward to your next modification. i's eat to see some modifications and being able to see what they would look like on your own RV with the same interior and colors.
 

MCTalley

Well-known member
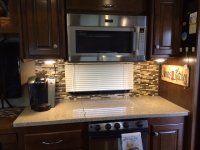
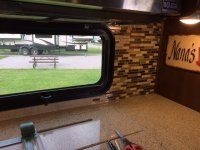
Half Bath Backsplash and Light Switch Move

The previous post showed half of the half bath backsplash complete. We didn't want to do the other wall until I finished another modification - moving the light switches from over the sink to just inside the doorway. This one ended up being a little involved and required a few extra tools, but it was generally pretty easy.

First, I pulled the light switch off the wall and pulled the mass of connections through the hole to sort out wires. I unhooked things until I had identified what I figured would be the incoming 12V pair, then climbed into the basement and into the underneath part of the rig. I had someone pull the wire and found it running down into the utility area.

Back inside, I taped two pair of wires (16 ga. lamp wire) to the incoming 12V line and, back underneath, pulled the two new wires down into the utility area. I pulled the majority of the wires (12 feet each) into the underneath, then taped the 12V line back to just one of the new lines and, back up top, pulled the 12V line back into the bathroom. With everything separated, I pulled the slack back underneath for the new line.

I determined the two wire pairs going to the bathroom lights and tied them to the new lines (essentially extending them down into the utility area). Now I had the light wires long enough to make it around the corner and up the wall just inside the doorway.

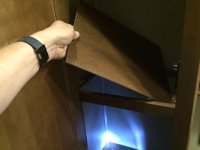
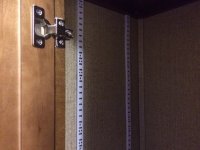
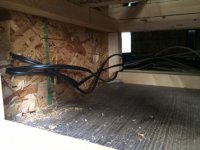
Next, I popped off the trim piece just inside the doorway that hides the junction of the two wall sections, then popped off the wallboard near the door so that I could see back behind the wall. Removing the intake vent on the front of the bottom step, I drilled a couple 1/2" holes through from the return air area into the bathroom wall. I ran the two new wires up to the position of the new light switch, then ran another new pair of wires back down and underneath into the utility area.

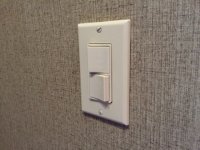
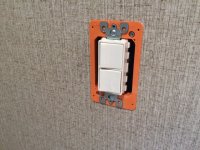
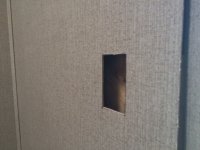
Back underneath, I took the last new pair and tapped into the 12V line running across the utility area between the fuse panel and the old back of the bathroom wall. I cut a hole into the wallboard, inserted the orange junction box insert, wired up the switch, screwed the switch into the junction box and covered it with a switch plate. A quick test (after replacing the 15A fuse I blew accidentally touching the 12V wires together at one point) showed the lights were working fine.

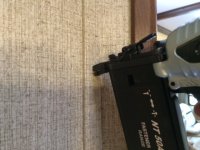
I used my air compressor and power nailer to tack the wallboard back to the stud, then tack the trim piece back in place. I had to be careful with the air pressure, ending up at about 65 PSI to keep the brads from going right through the wallboard and trim.

In the process of sorting wires, I lost track of which were which back behind the sink. I finally figured out all the fan wires but couldn't figure out the black tank monitor wiring. I decided that the black tank monitor could be placed most anywhere (with the rest of the switches and monitors makes more sense) and black tank monitors are notoriously inaccurate after getting crud build-up on the sensors, so I just tossed it in the closet for a future project.

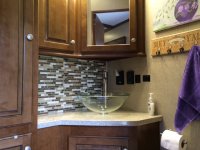
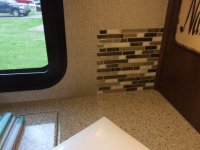
With all the wiring sorted out and tidied up, I mounted the rest of the smart tiles, covering the holes left by the light switches and the tank monitor.

Now you can just reach inside the door as you enter the half bath and turn on the lights (I was reaching there anyway before I even contemplated the modification).
 

Attachments

  • 150422-06.JPG
    150422-06.JPG
    107.9 KB · Views: 151
  • 150422-08.JPG
    150422-08.JPG
    109.2 KB · Views: 130
  • 150422-07.JPG
    150422-07.JPG
    84.9 KB · Views: 127
  • 150422-04.JPG
    150422-04.JPG
    124.8 KB · Views: 127
  • 150422-03.JPG
    150422-03.JPG
    143 KB · Views: 136
  • 150422-02.JPG
    150422-02.JPG
    88 KB · Views: 130
  • 150422-05.JPG
    150422-05.JPG
    106.4 KB · Views: 138
  • 150422-01.JPG
    150422-01.JPG
    79.1 KB · Views: 145

MCTalley

Well-known member
Theater Seat Power Outlet

Our rig has the theater seating option. One thing we've found is that there is a single 110V outlet in the middle of our slide at the area where the theater seat ends and the dining area begins. I had been pondering ideas on bringing 110V power to the other end of the theater seat unit (where I sit).

The last time we were packing up the trailer to move, our cat went into hiding behind the theater seats and we found her in the hollow center section by lifting the remote tray out of the unit. We started using that area for storage for "stuff" and it led to an idea for the mod described here.

150430-01.JPG150430-02.JPG150430-03.JPG

First, I marked the front of the console piece with the dimensions of the outlet box (fully enclosed box for safety), then cut the outer material in an X pattern so it could be wrapped around the opening later and look nice. I also cut the foam padding out.

150430-04.JPG150430-05.JPG

I then drilled holes through the solid wall of the console (1/2" chipboard) in each of the four corners, then cut the hole out with a keyhole saw. The box was mounted in the resulting hole and secured using the two wall clamping wings supplied on the box.

150430-06.JPG150430-07.JPG150430-08.JPG

We bought an electrical cord with a low profile plug on it and cut the end off. This was the shortest and cheapest cord they had at the store with the desired low profile plug (though there is room for a standard plug). I used my meter to verify the hot and neutral wires (since only the ground was encased in a colored sheath). We chose our particular outlet because it has two 110V outlets and two USB outlets for charging devices.

150430-09.JPG150430-10.JPG150430-11.JPG

I pulled the wires into the box from the back and wired them up to the outlet. The outlet was mounted and the plate attached.

150430-12.JPG150430-13.JPG150430-14.JPG

With everything put together, I plugged the plug into the 110V outlet behind the seating unit. No smoke or sparks came out, so that was a good sign. An even better sign was that my iPad started charging when I plugged it into one of the USB ports. I later tested the 110V outlets with the vacuum cleaner (cleaning up the sawdust) and subsequently my laptop power supply.

150430-15.JPG
 
Top