ATF: Landmark - Floor Rot

timdebs

Well-known member
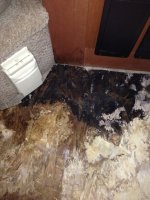
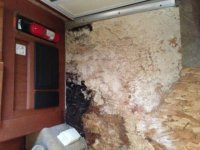
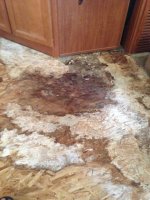
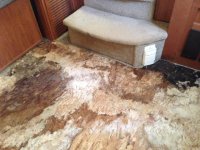
I have had a leak from under my shower for quite sometime apparently. Have finally found leak and fixed. Took vinyl up and found rotten flooring. Can I cut out rot and replace. Would also like to install vinyl laminate flooring. Thanks Tim
 

Attachments

  • Floor 2.jpg
    Floor 2.jpg
    63.5 KB · Views: 239
  • Floor 1.jpg
    Floor 1.jpg
    52.9 KB · Views: 208
  • Floor 3.jpg
    Floor 3.jpg
    64.9 KB · Views: 193
  • Floor 4.jpg
    Floor 4.jpg
    67 KB · Views: 185

cookie

Administrator
Staff member
I see no reason why you cannot replace the flooring. I know several people that have.
Check out post #6 in THIS THREAD.

Peace
Dave
 

timdebs

Well-known member
The leak (I assume) was the black valve behind the shower stall that keeps water from backwashing into your water lines from the tank wash water line. Not really quite sure this is correct but removed part and went to RV parts store, parts guy said it was your leak and to remove it all together, simple fix just joined 2 lines together. I have not noticed any more water. So I assume this was the leak. Valve 1.jpgValve 2.jpg
 

timdebs

Well-known member
I have been trying to remove rotten osb sub floor, trying to be careful not to remove styrofoam that floor is glued to, but impossible to do. I am using my oscillating saw cutting small cuts. Is there any easier way? Some styrofoam did pull up with wood. Planning on calling Heartland tomorrow to see if there is a diagram or picture of how floor is laid. I did find a wood joist, not sure how far apart they are.Floor6.jpgFloor5.jpgFloor7.jpg
 

Garypowell

Well-known member
I used a vibratory cutter and cut back to good wood. Found a floor joist type framework with foam insulation. Had to formulate some bracing so new plywood would be firm. Glued and screwed it in place.

Put out down new linoleum with similar pattern/color and most would not notice difference since surrounded by carpet and shower.

It it was a 2008 unit and my leak was from the bedroom slide.

Certainly a a fair amount of work since I did mine on the road but take your and you'll be surprised how well it can turn out.
 

recumbent615

Founding MA Chapter Leader-retired
The leak (I assume) was the black valve behind the shower stall that keeps water from backwashing into your water lines from the tank wash water line. Not really quite sure this is correct but removed part and went to RV parts store, parts guy said it was your leak and to remove it all together, simple fix just joined 2 lines together. I have not noticed any more water. So I assume this was the leak. View attachment 29981View attachment 29982

Thank you for posting this - this information has just confirmed that I will now "plum" that out of my system as well. I would not suggest as the RV store did that you simply tie the two lines together though. I would remove the pipes from the wall cavity ( they should start and finish in Basement ) I would cut them back so they no longer go into the wall and install a back-flow check valve in the pex run. you can get them at most homedepot stores as well as others. http://www.homedepot.com/p/SharkBite-1-2-in-Brass-Push-Fit-Check-Valve-U2008-0000LFA/202721919

Again thanks for this cautionary story - it will move me to do something about the potential leak in my rig before I see the same issues.

Kevin
 
Last edited:

Garypowell

Well-known member
I had to remove some foam to fashion corner braces where there was no stud. Once ready to button up I just refilled with insulation foam.
 

jbeletti

Well-known member
Kevin,

Your solution is what a lot of retail owners do. As an manufacturer building RVIA sealed coaches, we have to put that atmospheric vacuum breaker above the highest water using item (but apparently not the shower).
 

timdebs

Well-known member
Jim I understand as a manufacturer you have to do it, but as an owner do we need it? Thanks, Tim P.S. the reason it took so long to find the leak is because I assume (and yes I know what that spells, especially in this case) the only time it leaks is when I was washing out my black water tank, I don't usually do anything else when filling black tank with water except make sure I don't over flow tank.Thanks, Jim for responding.
 

Garypowell

Well-known member
Tim,

After I realized what it was in my first 5th wheel (1996 vintage) I have simply cut it out and coupled the lines together. On all my coaches, including the now 2013 3010RE, it is a totally isolated system from every other water source. So I have not bothered with a check valve.

Now that I have said that I do have a shut off valve in the UDC.....just a simple hose pet cock. So when I use it and am done I shut this little valve. I do this just to keep the little spillage out of the UDC. Not because it is "dirty" but because it is water.

I use quick disconnects throughout the UDC and on my water filtration system.
 

timdebs

Well-known member
I would like to thank all the Heartland Owners that so kindly responded to the question on my flooring issue. Everyone's input is much appreciated and helpful! I am thankful to have this forum!!! Thanks again Tim and Debbie.
 

timdebs

Well-known member
As a Heartland Landmark 2009 owner I would like to thank Heartland Customer Service Department. I called Heartland this morning and Customer Service transferred me to "Art". He answered all my questions and offered suggestions in a way that I could understand. Later, due to my post on "Ask the Factory" another representative "Mike" called me to offer additional help/suggestions with my issue. I can't begin to express how comforting it is to know that HEARTLAND has my back. In an added note our son and his wife have decided to get into the wonderful world of camping. After looking at a few different makes and models, they called to get our opinion. We immediately recommended Heartland where they quickly found what they hope to be their first camper! Thanks again, Tim and Debbie


1
 

porthole

Retired
Again thanks for this cautionary story - it will move me to do something about the potential leak in my rig before I see the same issues.

Kevin

Kevin - one of he first things I did. I found the lines behind the basement wall, cut at the basement floor level and spliced together. Don't remember which was which, but the line going up was a different color then the line coming down (red and blue).
 

aatauses

Well-known member
It seems several people have had problems with that back flow preventer when back flushing. This is what I do when back flushing, open the panel and with a flashlight look for leaks---since I only back flush for 10-15 minutes it is no big deal to watch. This prevented a major issue as once when watching, I found a junction that was dripping, cut out the fitting and replaced it.
al
currently in Deadwood, SD
 

wdk450

Well-known member
Tim:
You may want to read this link to the B&B Atmospheric valve, paying particular attention to item # 7. This implies to me that this valve NORMALLY can leak water, and RV manufacturers are supposed to take measures to mitigate this (catch basin?): http://www.bandbmolders.com/files/TankFlusherInstructions2.pdf

The leak (I assume) was the black valve behind the shower stall that keeps water from backwashing into your water lines from the tank wash water line. Not really quite sure this is correct but removed part and went to RV parts store, parts guy said it was your leak and to remove it all together, simple fix just joined 2 lines together. I have not noticed any more water. So I assume this was the leak. View attachment 29981View attachment 29982
 

timdebs

Well-known member
That is the first diagram I have seen of how to actually install it. Thank you very much!, Tim
 

Hunter11

Well-known member
Are all of these "check valves" mounted up behind the shower stall? If so how would I know which water lines to cut? I would like to take care of this issue before we even have a leak.
 

Garypowell

Well-known member
Hunter I think where they are located might carry from unit to unit but it seems they are mostly behind the shower access port.

Open the port in the shower and you should see them.

It is scary to know which pipe to cut but there is only a hot and cold pair and then the anti siphon pair. If you take the wall down by the UDC you can trace the beginning of the anti siphon line. Then you can normally trace out the hot and cold lines that leaves the other siphon line.

Just make make a clean cut and if you made a mistake you can then easily couple them back together.

You'll do fine!
 
Top