Inexpensive easy modifications

wyleyrabbit

Well-known member
John,

Gotta ask you about the rubber covers. I need to do this. I'm feeling very much like Bill Murray's character on Caddyshack.

Do you have other pictures? What kind of rubber? Any tips?

Thanks,
Chris
 

Lynne1

Member
Loved your ideas; especially the artificial greenery, and labels on the slide button switches.
We bought a 2011 Heartland Lakeside in the fall, and only spent one night in it. It will be fun decorating it in the spring.
Lynne1
 

JohnDar

Prolifically Gabby Member
Chris, this is the only other photo, which is basically the same only brighter. It was hard to get a good shot under there.

The rubber I used was from an old inner tube. I cut a square about 4" x 4", with a slit to the center from one side. Then cut a 1/2" diameter circle at the end of the notch in the center of the patch. I used self-tapping sheet metal screws in pilot holes to secure it, along with the Gorilla tape. The tape originally just held the patch in place while I drilled and ran the screws, but I left it on and added some to seal the edges a bit. Word of warning: have several metal drill bits on hand. Drilling into the frame or sheet metal around the holes is hard with small diameter bits and they tend to break. And drill the pilot holes slightly larger than you might normally in softer metal or the screws break, too.

On my rig, there are only 3 exposed hydraulic rams, so it wasn't an all day job.

I think the person that posted this idea originally may have purchased a sheet of rubber material to do theirs.
View attachment 12060

While we're on the subject of plugging frame holes, I taped a piece of plastic screen material (pet proof type) over the holes and then used the expanding spray foam over that. Seems to work and has held for two years. Didn't like the idea of trying to seal the holes by just dumping a ton of foam into them.
 

wyleyrabbit

Well-known member
John,

Thanks for the info and additional photo.

What other frame holes did you close with the pet-screen and spray foam?

I have personally spend at least a dozen hours trying to mouse-proof the trailer, but every other trip, we're treated to fresh droppings in our cupboards (just the ones near the stove), and on the floor. I've used a combination of metal mesh (purchased from Home Depot and apparently completely rodent proof) and spray foam, but must still be missing a point of entry or two, and like Bill Murray's character am starting to consider my sanity. ;-)

I think you're right about blocking those hydraulic slide holes, and I know I need to do that too.

Chris
 

JohnDar

Prolifically Gabby Member
Besides having the two four-legged mouse traps with us when we're at the trailer this past summer, I found some plug-in ultrasonic pest deflector devices (Woodstream PestChaser) at the hardware store. I put one under the counter, above their feeding area and another in the basement. Unobstructed, they're supposed to protect a 400 sq.ft. area. Between sealing the ram holes and the deflectors, that seemed to have ended their visits last summer.

Here at home, we had some getting into the attic over the garage, running across the porch and gnawing inside our bedroom wall. Put one of those devices near the overhead door and another up in the garage attic, where I had been trapping them, and that seems to have ended the problem. No more late night noises in the wall.

I tried the unscented Bounce sheets over the previous winter. The mice used them for toilet paper.
 

Bob Vaughn

Well-known member
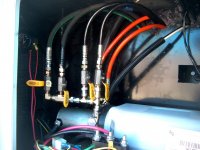
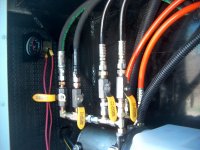
Big Country slide hydraulics have no selector valves, On the first trip we got in trouble needing to open the main slide to reach the television area to tie the television that was left onfastened properly for travel. I promissed myself I would not have to open 3 slides before getting to the side I wanted opened.
Added 2 hoses to the rear slides and four 3500PSI Hydraulic valves and voila individual slide controls. We use it all the time when traveling, they are 1/4 turn, and I can see witch slide will open and witch one will not.
This was the one thing that almost made me go to another brand.....we in 45 years of having rv's have been assigned camp sites which would not have allowed all the slides to be extended. I really wanted to be able to have some control on which ones went out and which ones did not....
 

Craneo

Member
Here in Texas we have wasps we call Mud Daubers that like to build nests in such places as behind the hot water grate and the frig vent as well as in the heater exhaust.

I took some left over aluminum screening that I cut up and either just loosely place like on the heater vent or I sort of tacked it down using caulk around the inside of the frig vents leaving a hole for the drain tube. Previous owner had already put the small 1/2 round metal strainers around the heater exhaust which is probably the best solution for that area.

My next mod is going to be an upgrade for the very dim lighting over the stove from the hood vent. Either my bulb is real weak or something, but it barely makes a dent in the lighting in that area. A bright LED would do the trick I think.

We did buy several night lights for around the inside of the camper to see at night. There, the one Walmart LED night light was pretty weak, I'm glad I bought a two pack of the "regular" ones which are much brighter. So the bathroom got the weaker LED (in the smaller area) and the kitchen and main room got the other ones.
 

Bob Vaughn

Well-known member
I bought a pair of Nite Owl night lights to place above the steps up into the Bath/ Bedroom they are battery powered and motion activated led's. The go off after 5 seconds of no motion......
 

ChopperBill

Well-known member
Just did one today. My shower faucet has those "tea cup" knobs. Always seem to hit one changing the water temp. This morning after darn near scalding myself I tried to find new knobs to no avail. Took off the tea cup knobs and cut 'em off with a hack saw. Looks like a turd in a punch bowl now but no one ever sees 'em and I dont have to worry about getting boiled in the shower.
 

Bob Vaughn

Well-known member
We had a mouse get in our last camper and I could never figure out how he got in but I did not look at the rams....
 

caissiel

Senior Member
I bought 4 Black and Decker ultrasonic units at wally world last winter while in florida and so far have not had any rodents at all in our unit. We have one in the middle of the kitchen and one in the storage.
Before using them we were using traps and had to have them all over set all the time.

I use the other 2 units in my garage at home and got ride of squirrels that moved in to the neighbours garage. So he had to get some units to also get rid of them.
 

57chevyconvt

Well-known member
Big Country slide hydraulics have no selector valves, On the first trip we got in trouble needing to open the main slide to reach the television area to tie the television that was left onfastened properly for travel. I promissed myself I would not have to open 3 slides before getting to the side I wanted opened.
Added 2 hoses to the rear slides and four 3500PSI Hydraulic valves and voila individual slide controls. We use it all the time when traveling, they are 1/4 turn, and I can see witch slide will open and witch one will not.

Where did you purchase the 3500 psi 1/4 turn hydraulic valve for slide isolation? I need to make a similiar modification to my brother-in-law's Tahoe.
Can you provide a picture of the valve manifold installation?
 

Boca_Shuffles

Well-known member
I change my own fuel filters on my Duramax. The owners manual states that you should drop the front wheel well to get to the filter. This is a longer process since I installed the mud flaps.

My solution was to cut a 4-5 inch square in the wheel well near the filter (the opening has to be large enough to get you hand through while you are holding a filter). I then cut a replacement cover out of a rubberized dust pan (or mud flap) to cover the hole. After drilling 4 holes through the cover and the wheel well, I installed four body clips to the wheel well. I used four stainless steel bolts to secure the cover to the wheel well.

I can now access the filter easily.

If I was to do it again, I would probably use plastic expansion fasteners rather than the bolts and clips.
 

hillsonwheels

Well-known member
My two pennies.........
.....added a screen door opener
.....added a shoe catcher behind entry steps
.....added lexan panels to screen door
.....added shelves in "coat" closet so could be used as pantry
.....created wooden clasps to bridge knobs on double cabinet doors
.....created a magazine type rack for sink top storage
.....currently creating shelve to go under desk top
.....installed oak stair treads
.....remounted sink drop leaf so it's level with counter top
.....installed kiddie corner foam protectors on corners in kitchen/dining area
.....created coffee pot surround on desk top
.....added sticky back tile under mattress so slides easier
.....added whole house water filtration system
.....removed chase on driver's side basement door for head room
.....replaced running lights with led fixtures (want to add mid ship turn signals)

As can see, a never ending process, if you're gonna make it yours and live in it. I'm not that adept at taking pictures and loading them on to the forum. Sorry!

Be glad to show you any/all whenever our paths cross.

Wish you happy camping!

Dick
 
Last edited:

caissiel

Senior Member
I went to the Princess Auto store in my area and found these 3500PSI hydraulic valves and had one 20ft, and one 10ft hose made with the 4AN JIC fittings on each end. They also had the hydraulic fittings in stock.

They are 3/8" Hy-spec A105 valves. heres the pick of the assembly.
Correction they are 3000Lbs medium pressure valves
 

Attachments

  • HPIM7657.jpg
    HPIM7657.jpg
    298.9 KB · Views: 86
  • HPIM7658.jpg
    HPIM7658.jpg
    295.8 KB · Views: 72
Last edited:

ihsolutions

Well-known member
Just did one today. My shower faucet has those "tea cup" knobs. Always seem to hit one changing the water temp. This morning after darn near scalding myself I tried to find new knobs to no avail. Took off the tea cup knobs and cut 'em off with a hack saw. Looks like a turd in a punch bowl now but no one ever sees 'em and I dont have to worry about getting boiled in the shower.

LOL. I've been there, done that. What also happens to me is I'll be in the shower, drying off, with the water turned off, and just as I get dry I'll bump the hot or cold water "tea cup" levers as you call them. Instantly getting soaked with either hot or cold water. Not sure which is worse!
 

ihsolutions

Well-known member
I change my own fuel filters on my Duramax. The owners manual states that you should drop the front wheel well to get to the filter. This is a longer process since I installed the mud flaps.

My solution was to cut a 4-5 inch square in the wheel well near the filter (the opening has to be large enough to get you hand through while you are holding a filter). I then cut a replacement cover out of a rubberized dust pan (or mud flap) to cover the hole. After drilling 4 holes through the cover and the wheel well, I installed four body clips to the wheel well. I used four stainless steel bolts to secure the cover to the wheel well.

I can now access the filter easily.

If I was to do it again, I would probably use plastic expansion fasteners rather than the bolts and clips.

Is there any chance you could post a picture of the type of fastener you are talking about? I'm due for a fuel filter change and DREAD the process. Last time, I paid the dealer to do it (GASP!). I am told there is a special GM tool to get the water drain thing on the bottom loose, so you don't have to remove the wheel well. Maybe that's the better route to go?
 
Top