PEX plumbing question

Bones

Well-known member
I am planning on redoing the plumbing in my camper because I want to be able to zone some parts of my unit so that I can camp in colder climates when I would like to camp and open a zone or flush a zone out. I looked at the plumbing done in the camper it it would appear to be PEX-B which uses the clamps. Has anyone used the PEX-A in their plumbing or what have you done that I should consider doing or do you think the PEX-B is just fine and I should just stay with that and do what I want with home runs. I am specifically looking to zone out my camp kitchen to prevent it from freezing if it gets too cold on a November night.
 

JohnD

Moved on to the next thing...
I would like to be able to put a shutoff valve on the outdoor shower as we never really use it, plus would like to have it cleared for our winter activities in the freeze zone!
 

danemayer

Well-known member
These valves are pretty easy to install using Sharkbite's push-on approach (no crimp tool needed). Probably a good idea to have the Sharkbite removal tool in case you have to take it off.
 

brianharrison

Well-known member
I would stay with PEX B; they all meet the same requirements and B is less costly than A, and there is some "concern" over A having some chemical leaching in domestic water applications (but it is still approved for domestic use).

In my research the A, B, & C are indicative of the manufacturing process which results in different tubing characteristics (Flexibility, etc) but all meet the same requirements - pressure and temp requirements, wall thickness, ID/OD dimensions, etc.

Here is a link to some information to assist in your research, if not already known to yourself.

Hope this helps,
Brian
 

Bones

Well-known member
I would stay with PEX B; they all meet the same requirements and B is less costly than A, and there is some "concern" over A having some chemical leaching in domestic water applications (but it is still approved for domestic use).

In my research the A, B, & C are indicative of the manufacturing process which results in different tubing characteristics (Flexibility, etc) but all meet the same requirements - pressure and temp requirements, wall thickness, ID/OD dimensions, etc.

Here is a link to some information to assist in your research, if not already known to yourself.

Hope this helps,
Brian
Thanks. I was thinking B due to cost and ease to get parts. I like the properties of A being able to be stretched then it would shrink back on the fitting. I was also thinking flexibility too but then again the whole RV already has B in it now. Thanks again. :)

- - - Updated - - -

These valves are pretty easy to install using Sharkbite's push-on approach (no crimp tool needed). Probably a good idea to have the Sharkbite removal tool in case you have to take it off.
Thanks Dan. I love the ease of use with the sharkbite but they will end up costing a lot when the project is completed.
 

jbeletti

Well-known member
Dave - to zone it may require you to home-run several runs to water using items. You may end up buying or making your own manifold. Be sure to place the manifold in an area that "stays warm". I've heard of manifolds splitting and freezing. For that reason alone, personally, I'd consider using the shut-off valve approach as the valve won't hold any water. Still may requires extending some runs.

LOVE the Sharkbites to and I use them. But yeah - $$ doing what you're doing :0
 

Bones

Well-known member
Dave - to zone it may require you to home-run several runs to water using items. You may end up buying or making your own manifold. Be sure to place the manifold in an area that "stays warm". I've heard of manifolds splitting and freezing. For that reason alone, personally, I'd consider using the shut-off valve approach as the valve won't hold any water. Still may requires extending some runs.

LOVE the Sharkbites to and I use them. But yeah - $$ doing what you're doing :0
One of the things I was thinking of doing is making a manifold with three way valve used in reverse. This way I can actually turn the valve to the other position and it will still be inline with the area I want to winterize and I can either pump in air or antifreeze to keep that area from freezing. I also plan on getting some cheep pipe insulation to wrap around all of the pex in the underbelly. Definitely not a small project because I may end up just dropping all of the chloroplast just to make things easier while I work and slide around on a creeper. I will keep the manifold in the storage compartment like you suggest behind the one wall and make an access area to get to it when needed. I think that would work.
 

RoadJunkie

Well-known member
Some of the other manufactures install a water manifold as part of the build process. I have really admired the feature and hope Heartland considers it. Designing and installation during the build is the way to go.
 

jbeletti

Well-known member
Len - I agree - the manifolds are real nice to have. Had one in 2005 with my first Landmark. I believe the cost of the manifold and attendant parts plus labor/space is prohibitive at the RV price point Heartland aims for. I wouldn't preclude it coming back at some point on some brands but that's a call each GM will make based on retail and dealer feedback and what the competition is doing.

Dave - Good call on dropping the entire underbelly to do the work and insulate the lines. Easy and cheap to slip on the pipe insulation. You may even want to hang a few remote temp sensors and cut access flaps (then tape them) so you can monitor the temps under there while cold weather camping. Maybe want to insulate your gate valves or even heat them :)
 

danemayer

Well-known member
I also plan on getting some cheep pipe insulation to wrap around all of the pex in the underbelly. Definitely not a small project because I may end up just dropping all of the chloroplast just to make things easier while I work and slide around on a creeper.

For less than $200 you can put heat tape and insulation on ALL the water lines. The hard part of the job is the coroplast. Mine are all taped and insulated, except to the washing machine - and I just added cutoff valves for those lines. I mounted all the heat tape controllers to the ceiling over the water pump, put in a dedicated 20 amp outlet on that ceiling to provide power to the controllers, drop lights, and water hose heat. The controllers are plugged into a GFI power strip.

I've also added gate valve heat tape, which was a pain because I had to put together the control box and get power from the fuse box. The heat tape doesn't really do much good. I've had the gate valves freeze a couple of times and the gate valve heat didn't thaw the valves. They have a 15 minute limit and don't do the job in really cold weather. Had to thaw them with a hair dryer.

I recommend using zippered Trap Flaps to provide coroplast access to the gate valves and anything else. But I'd also suggest adding duct tape and pop rivets to make sure they don't peel away from the coroplast.
 

ICamel

Active Member
And don't forget the brass connector's(T's) between pipe runs. They are the most likely to fail due to freezing before the Pex will. Our Elkridge does not have an enclosed underbelly and the first year of use I did have some water pipes freeze while camping when the outside temp was in the lower twenties, but nothing cracked or broke. The second year I put the foam insulation on the pipes and cut to foam pieces to size for any brass fittings that were still exposed and have not had any frozen pipes while cold weather camping even where the outside temp reached 22 degrees.
 

Bones

Well-known member
Jim,
Thanks for that idea on the temp sensors and access panels. Since I will have the under belly out I can work on the flap placement. I didn't even think about my gate valves. The ones I would possibly have an issue with would be the rear gray tank and black tank as those valves are exposed.

Dan,
Thanks for the link to the trap flaps. That would make access at different times for inspection much easier. I can place them in areas the would most likely need access. That mend tape is expensive stuff. I used tyvek tape and gorilla tape the last time I cut the chloroplast. I have thought about the heat tape but I have been around a couple jobs and we have had bad experiences with the heat tape strips over heating at a point and melting so I am Leary of using the heat tape. I was thinking the insulation would work well at this point and let me camp for three seasons instead of two. I don't have a plan to camp when their is snow on the ground at this time. I'm kind of figuring I can camp up to the point of consistent low temperatures during the day and night. I figure with three season camping the low temps will likely happen during the night.

Icamel
Thanks. I was figuring I could go over the tee's or angles with the insulation then use duct tape to seal the insulation shut and that should work.


I am figuring this work may be too late for this season but I can get a jump start on the project after the winter breaks and have the job done for next seasons camping. That will give me a good part of the winter to get all of my parts to do the job. Has anyone taken off the underbelly and left it off during storage and worked on it? Do you think that would create any issues with the camper? I could do this after our November trip and start the job and work on it on good weather days over the fall and winter months.
 

Jesstruckn/Jesstalkn

Well-known member
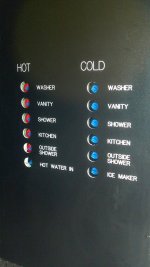
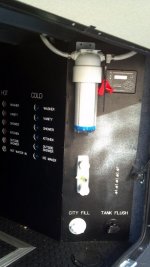
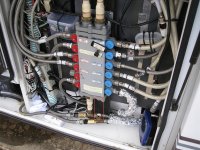
Look into finding the manifold from Dynamax. When we were looking at the Dynamax Trilogy I noticed it had this system in it. You might be able to perches one from them and build off of it.
water-manifold-closeup.jpg water-manifold-area-of-3850-d3.jpg
 

RoadJunkie

Well-known member
Looks inexpensive to me...NOT! I can see technical support going crazy trying to explain how to use this sucker to owners. Especially on how to winterize.

image.jpeg
 

TravelTiger

Founding Texas-West Chapter Leaders-Retired
We used Ultraheat pipe heaters and tank heater, http://ultraheat.com
and have been very pleased. Made for RVs, come in AC or DC configurations. We went with DC version since we didn't have any extra breaker spots available on our panel.

We put these on the long run to the kitchen sink, the and the fresh water tank line to the pump. Then wrapped pipes with pipe insulation. Have used all last winter in TX with low temps in 20s periodically, as well as 5-6 winter trips to the mountains to go skiing.

We


Sent from my iPhone using Tapatalk
 
Top