Project BH 3160EL -- Mostly plagiarism....

Jesstruckn/Jesstalkn

Well-known member
Looking forward to seeing you put your twist on some of the Mods.
Jim B. And this forum has created such an inspirational and educational avenue to empower all of use to tackle projects that we might not of attempted on our own.
Keep up the good work see you in Oregon 2017

Sent from my XT1254 using Tapatalk
 
Last edited:

Aandaar

Well-known member
Thanks Jim. Could not have got started on this without all the helpful posts by you.

I'm staying old school on the entrance lock as we don't full-time... so not much of an inconvenience. However, for security I am switching everything over to a single global link key for baggage and compartments too. Hard to beat the bang for only 75 bucks.

Wife saw me looking at the pictures and my Honey Do List just got a whole lot bigger. In regards to baggage and compartment locks can you provide a link to what your are talking about?

Thanks and great job on the Mods!
 

kdubinwa

Well-known member
That's the website I used. I swapped out 4 slam baggage locks and two front compartment locks to higher quality locks that match my entrance key for $74 including shipping.
 

kdubinwa

Well-known member
More minor mischief...

I was annoyed that I could only turn on the twin lights in the pass-through storage side from a single switch mounted near the Level-Up control panel on the "door" side.

I decided to add a second switch to the off-door side of the storage compartment, replace the SPST on-off switch at the Level Up panel, and wire the switches for standard 3-way switching to allow the twin lights to be switched on and off from either side.

The ingredients are:

2 parts STDP on-on switch
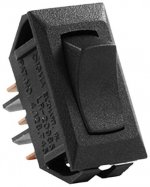
switch.jpg
http://pdxrv.com/catalog/i4089.html


1 part switch plate or 1 part switch mounting panel (your choice)
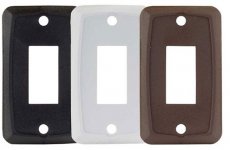
single_switch_plate.jpg
http://pdxrv.com/catalog/i4083.html

or this
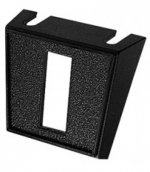
hella-rocker-switch-mounting-panel-single-4431.jpg

3 parts 16-gauge stranded primary wire 3 lengths of 9' each

6 parts 1/4" tab female wire connecters

1 part can of beer

Recipe:

Remove the existing SPST on-off light switch by the Level Up control panel. Disconnect both the 12v+ constant wire and the 12v switched wire running to the lights from the SPST switch. Get ready to replace the SPST switch with an SPDT switch.

Run three wires across the ceiling of the storage compartment to the other side. Mount the other new SPDT switch n a convenient location near the door. I hid the 3 wires behind a ceiling trim plate already provided by the factory.

Connect the two new SPDT switches as shown below.
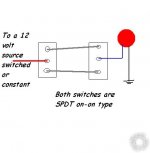
2_way_switch.gif.jpg
Test by turning lights on and off from either side.

Drink the beer.


Worked for me.
 

TXBobcat

Fulltime
Nice work.. You need a quick disconnect on the down water hose to connect to the source water. No need to keep screwing it in every time...

RV water filter store has the best brass ones..

BC
 

kdubinwa

Well-known member
OK, I didn't plagiarize this one....

IMG_2243.jpg

IMG_2244.jpg

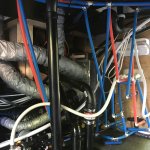
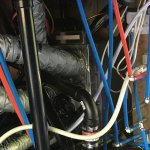
Just these two post-install pictures (my bad), but what you are looking at is my brand new CheapHeat add-on electric furnace system.

It is wonderful to have 5000w of electric heat delivered right through the existing floor registers. The heat is instant on with no 2 minute pre-ignition cycle having to blow cold air first. Heat is evenly delivered to the whole trailer. My 3160EL uses 5 ducts so I have an extra full-sized duct delivering heat to the basement as well. One more convenience.... I won't miss lugging around the propane tanks to refill them nearly as often.

The CheapHeat add-on system required about 6 inches of clearance behind the existing Suburban furnace. To make room I had to move the water pump back 18 inches and I also re-routed a black ABS drain pipe coming from the bathroom shower/sink. To power the controller I ran a new hot L1/L2 using 10/3 w ground romex from a newly installed dual 30 amp breaker in my existing panel (thank you Heartland for leaving me exactly two available consecutive breaker slots!). Neutral is not used.

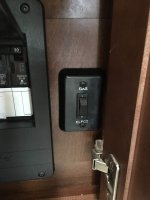
The system uses the existing dometic wall thermostat and just intercepts the call for heat and routes it back to the either the propane furnace or the CheapHeat controller depending on the setting of the switch shown below.

IMG_2253.jpg

You also tap the furnace fan 12+ as the same fan is used by the CheapHeat controller as well.

A very slick system for my needs and wants. Neither my dealer nor Heartland offered this so a mod it had to be.

Kurt
 

kdubinwa

Well-known member
If you don't count moving the water pump and ABS sewer pipe about 5 hours.

I had everything ready for the install and had reviewed the EXCELLENT illustrated installation instructions before starting. Probably the best install manual I have run across for anything RV related. I also hit Larry up with a few questions up front to confirm my understanding and he responded quickly.

You do need to know basic electrical wiring and safety, but the install is very straight forward.

Everything is wire, plug and play, except you do need to add some sheet metal to cover the unused top vents if your SF42 is installed vertically like mine. All of the new vents exit through the rear of the CheapHeat plenum after the air passes through the add-on heater coil.

You can also call Larry and he will also work to track down an installer in your area.


It appears that he does not endorse this as a DIY project. How many hours did it take you to install it?
 

danemayer

Well-known member
It appears that he does not endorse this as a DIY project. How many hours did it take you to install it?

You have to be comfortable with high amperage electric because the power for the heating element comes off the shore power wiring or the input side of the transfer switch if you have one. And a cutoff box has to be installed. Also possible on some rigs you may have to disconnect the propane connection to the furnace. Not everyone is comfortable with these things, which limits the DIY aspect.
 

TravelTiger

Founding Texas-West Chapter Leaders-Retired
You have to be comfortable with high amperage electric because the power for the heating element comes off the shore power wiring or the input side of the transfer switch if you have one. And a cutoff box has to be installed. Also possible on some rigs you may have to disconnect the propane connection to the furnace. Not everyone is comfortable with these things, which limits the DIY aspect.

I have emailed them for installers in Texas, I'll post what I find out.

Here is the response:

I have attached the names of all of the RV Service Centers that have shown interest in installing our product in TX. That being said any dealer that can install a RooF Top AC or Generator (mobile service included) can install our product, Just send us their name and phone number and we'll call them and set them up with everything they need to give you and estimate and install our system in your RV.
We also sell our product factory direct through our "BUY NOW" page online for qualified self installers. I have also attached a form we send the Service Centers to help them select the correct Hybrid Kit.

Thanks

> Larry McGaugh
> RV Comfort System LLC.
> PO Box 1554
> Bothell, WA 98041
> Ph# 1-425-408-3140
> Fax# 1-800-453-8961
> www.rvcomfortsystems.com <http://www.rvcomfortsystems.com/>

The list was too long to put here, but that was a fast response. Email him for installers in your area.
 
Last edited:

kdubinwa

Well-known member
You have to be comfortable with high amperage electric because the power for the heating element comes off the shore power wiring or the input side of the transfer switch if you have one. And a cutoff box has to be installed. Also possible on some rigs you may have to disconnect the propane connection to the furnace. Not everyone is comfortable with these things, which limits the DIY aspect.

All true. Fortunately my install did not require messing with a disconnect or transfer switch. The new breakers in the panel met code and serve as the disconnect. The run from the panel to the controller and from the controller to the coil were well under the 10ft rule and 10 gauge was required for amps. Did not need to disconnect propane either. All these factors influenced my decision to tackle the install.
 
Top