Project LM 365

Jesstruckn/Jesstalkn

Well-known member
I like it !!!! Thanks Jim

My USB plugs are hot all the time right now "I believe" the switch I have inside is for the 110 plug below the sign. Or did I miss a switch somewhere ?
That USB out let does have 2 ports so if I could access it and separate them I could get the wires into the panel some how, that would be the perfect answer and work like a charm.
Thanks for the idea.

Sent from my XT1254 using Tapatalk
Jim I just reread your post I understand what you said and that is a great idea and a lot easier then what I was thinking

Sent from my XT1254 using Tapatalk
 

jbeletti

Well-known member
I like it !!!! Thanks Jim

My USB plugs are hot all the time right now "I believe" the switch I have inside is for the 110 plug below the sign. Or did I miss a switch somewhere ?
That USB out let does have 2 ports so if I could access it and separate them I could get the wires into the panel some how, that would be the perfect answer and work like a charm.
Thanks for the idea.

Sent from my XT1254 using Tapatalk

Last I knew, the USB port is NOT switched. I have added switches indoors for a couple of friends.

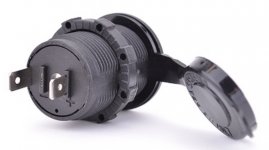
I don't believe the power to the 2 jacks can be separated. Here's what it looks like in back:
Google ChromeScreenSnapz021.jpg

On edit: Another thought... Buy regular Marine-type USB jack to replace the one on your coach. Then hack the end so you can use 3 of the conductors (ground, power 1 and power 2). Then rewire at the light to grab P1 and P2 to feed to your 2 different colored LEDs. Do the switching inside the coach.
 

jbeletti

Well-known member
While we're on the subject of the LED Sign, I was thinking today that it would be nice to have a way to easily secure the sign to the coach "just in case" you traveled with it on the coach. I sort of fear this.

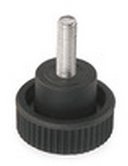
Since the sign hangs on the coach nicely from the top, maybe a single fastener through the front panel in the center (L-R) a 1/4" up from the bottom. Some sort of machine-threaded fastener with a tiny knurled end or star knob. Then on the coach, a recessed nut of some sort. Paint the fastener gloss-black to match the black powder coat and it would be almost invisible.
Google ChromeScreenSnapz022.jpg

You can do this Jerrod!
 

Jesstruckn/Jesstalkn

Well-known member
While we're on the subject of the LED Sign, I was thinking today that it would be nice to have a way to easily secure the sign to the coach "just in case" you traveled with it on the coach. I sort of fear this.

Since the sign hangs on the coach nicely from the top, maybe a single fastener through the front panel in the center (L-R) a 1/4" up from the bottom. Some sort of machine-threaded fastener with a tiny knurled end or star knob. Then on the coach, a recessed nut of some sort. Paint the fastener gloss-black to match the black powder coat and it would be almost invisible.
View attachment 39462

You can do this Jerrod!
All good ideas Jim I do worry about forgetting to remove the sign before we hit the road. With the switch in the side of it you could just mount it on permanently. It might not last as long that way, so your bolt idea would be a better way to go.


Sent from my XT1254 using Tapatalk
 

Jesstruckn/Jesstalkn

Well-known member
Another one of my top 10 Mods...
I have posted this on another thread a while back but wanted to add it to this one.
I removed the shelf and pedestal on the closet side of the bed. I then removed the the front face trim prices and reversed them bottom to top then remounted them back to the face of the slide out. I don't have a good before picture of my unit so I'm using one from the net.
Now it is so much easier to get in an out of bed and alot easier to make the bed.
f1679881d027e8da20c74e12dcb0845f.jpg


a3a497368b568dbac5825c7100b189bf.jpg


04420a838b93906fccbd91f32787bfa9.jpg


0b10cb1d888437e720ebc667c5b84373.jpg


Sent from my XT1254 using Tapatalk
 
Last edited:

2psnapod2

Texas-South Chapter Leaders-Retired
Look on the thread where Jim added them to his RV. The part number I believe is on that post.
 

Jesstruckn/Jesstalkn

Well-known member
Edit: 5/24/16
Update on Wilson cell phone booster.
I've had a challenging week with this booster. I had it working good for a few days with the RG6 coax running straight from the outdoor antenna in through the window to the booster. Then I decided try running it through the factory coax in the coach. I tried this and tried that nothing was working. So I gave up and ran it back through the window like it was. Still nothing.... "Panic set in" We are here 4 more days... our business runs from my phone !!!
I called Wilson from phone on my pickup booster. Patric from Wilson customer service was awesome. Although we can't fix my We-boost booster He is sending me a new booster, a new Outside antenna, and 50' of RG11 cable, all for free. I'm not sure if it's still under warranty or not. He didn't even ask how long I've had it.
Thanks Wilson Antenna's
Well to survive the rest of the week here and get some sleep at night (With our business my phone runs 24 hours a day 7 days a week) and the Trucks start about 1:00 am in the morning and some days that's when my calls start and some days go smooth and with no call all morning, You never know. Bottom line I have to have a phone signal.

I ended up removing the 3G booster out of my pickup and draping it from my pin-box to the basement then into my window of the bed room. Not my best installation job. LOL But Its working !!!!

Edit: 5/22/16
I was not able to get a signal with the darn thing on the roof. It kept red lighting I think it was because the indoor antenna was in between the out side antenna and the cell tower. I finally removed the outside antenna from the roof and put it in a tree on the opposite side of our trailer and now it's working 100%. :) I went from 0% to 100% It has been a frustrating struggle but all is well again, just wish this was easier.


Edit on this Mod 5/20/2016
I'm still having trouble getting this to work properly running through the factory OTA TV antenna coax. (When I'm in a area with very poor cell tower reception). If I run a coax cable directly from booster antenna to the booster it works fine. So I guess I'm loosing to much signal running through the 2 diplexers and the antenna / cable switch. "Red light on or off"
My next test will be to bypass the that Cable/TV antenna switch and see if I can get some better results. I'll keep you posted

Another Mod.
With our trucking business we run 7 days a week 365 days a year and it's all ran through my cel phone. So a cel signal is a must, and we have to plan our trips to places I can get Cel service. I have several different Wilson Cel boosters in all of my vehicles and some work better then ethers. I have a portable 27db unit that gets me buy and a 50db 3G unit in my pickup that works very well... Then I bought a 50db 4G union for my jeep and it just did ok. They say the jeeps are hard to get a barrier between the inner and outer antennas.
So back to the Mod... I bought a 60db 4G home unit and modified and mounted the outdoor antenna to my crank up TV antenna. This booster antenna is directional so you need to find the tower (with an app on my phone) and point it that direction. So the crank up antenna works perfect for that. This unit also uses coaxial cable so I just used the cable already in the unit. I still need to get the splitters so I can run the TV and the booster through the 1 cable. I then mounted the indoor booster and desk tower in the entertainment center. And we are in business..
3c4f65aab3aa795f6e0cc27912012b1d.jpg
90c8ec522eaa5c2f95c3bba35d144eb8.jpg
12d2ffe2c0e419f362b7944c99c2ab0a.jpg
2005cfeafde9721a68a263fae633eddf.jpg
40d5fa48711116fe378731e22b2f94c4.jpg
143e3c136945bd08523ceffb083ce717.jpg


Sent from my XT1254 using Tapatalk
 
Last edited:

Jesstruckn/Jesstalkn

Well-known member
Next Mod.
Out door TV..
Our coach did not have the outdoor TV. which was a good thing, because I installed my own and a long pull out arm 24" I think, and a Bluetooth sound bar. So I now can play my Pandora inside and outside. I also put down a felt pad on the bottom of the compartment to save the remotes from ware and tare. So now I'm able to turn the TV anywhere it want to sit and be able to see the game from the BBQ. WHO COULD ASK FOR MORE.?
0ca79ad9fe68ddf6306607d697c1c343.jpg
1e28c3dea5493433d89d28da8a0f5507.jpg
5a3befcb4fb1582a6c457d7484beb00e.jpg
1f01726c3fa1befb36a8bc50d2ae0fe2.jpg


Sent from my XT1254 using Tapatalk
 
Last edited:

Jesstruckn/Jesstalkn

Well-known member
A convenient Mod.
I have 1 satellite dish and one DVD player and with the "IOGEAR" Wireless HDMI boxes I can play Sat, DVD, or 3 more components into the main box and send them wirelessly to the ether TV's and with the exterior eyes you can run the inside components from outside to change channels or play and pause the DVD. It works fairly well but sometimes it can be a bit frustrating trying to make it all work. I must me getting old.
74f6137faa7ad5f544d2558f86eee255.jpg
597349a1b01c5fbca1fe0d71276fa90e.jpg
6766fa017ee066e6b88f1973f47ebdea.jpg


Sent from my XT1254 using Tapatalk
 

Jesstruckn/Jesstalkn

Well-known member
Also had to go with the Harmony remote to make life easier inside. It will turn on the TV, dish box, IOGEAR box, and the sound bar all with 1 button and 1 button to turn them all off.
60c6fb5193d6d6a30277e0e00e11c30f.jpg


Sent from my XT1254 using Tapatalk
 

clayhud

Well-known member
Next Mod.
Out door TV..
Our coach did not have the outdoor TV. which was a good thing, because I installed my own and a long pull out arm 24" I think, and a Bluetooth sound bar. So I now can play my Pandora inside and outside. I also put down a felt pad on the bottom of the compartment to save the remotes from ware and tare. So now I'm able to turn the TV anywhere it want to sit and be able to see the game from the BBQ. WHO COULD ASK FOR MORE.?
0ca79ad9fe68ddf6306607d697c1c343.jpg
1e28c3dea5493433d89d28da8a0f5507.jpg
5a3befcb4fb1582a6c457d7484beb00e.jpg
1f01726c3fa1befb36a8bc50d2ae0fe2.jpg


Sent from my XT1254 using Tapatalk
Jess,

what at tv mount is that make and model. I want to mount one in the basement of my Bighorn, also did you do anything special on the mounting bracket or just screwed into the back panel? Was not sure about the weight of TV.

thanks
 

Jesstruckn/Jesstalkn

Well-known member
Simple Mod...
I found a battery operated motion sensor LED light strip for inside of the system control panel. Works like a charm..
c739262f0b2fac73ccf69ca65aec91ec.jpg
100f4ce0a77250e725707ce521b88e69.jpg


Sent from my XT1254 using Tapatalk
 

Jesstruckn/Jesstalkn

Well-known member
Update 8/13/16

A Update on my solar system with the residential fridge.
I took my Rig to the dealer to replace 4 of the slide seals. (The inner seals had paint all over them from when we painted my slides)
I dropped it off Wednesday morning and turned on the small Invertor. They pulled it around to the shady side of the building and that's where it sat for 2 days with the fridge running on invertor power, from the 4-12V batteries.
I went over Thursday morning to check on it at about 10am and the batteries were at 100%, then today I went to pick it up at 7:45am it was at 67%
smile.png

Really happy with my set up.....


I finally found the time to finish my battery project. I redid the box and all of the cables. Also redid the main ground to the chassis. Heartland had a self tapping screw and a star washer onto a fully pained surface..

This is Heartlands ground connection from the batteries to the frame. "That's It"
ce195056b82eaa04ab9738321496361a.jpg


Jerrod's ground


f2e53ff4a9885cacb1b63124c3d14d76.jpg


Before (my first in a hurry version)

933205de527240c76046b36a257ad89e.jpg


My do it right version

e174a41b36cad4f73cac819e3d62e67f.jpg

59da93799f5b7fb96c420ab44636d53f.jpg


My $33.00 from Amazon 16ton crimping tool.

f1c0b01eb645347bf057a7cfb9da4810.jpg


Done

a6237eb8a14ca52d047e93c28b7b7a9d.jpg


I had to slightly modify the box to squeeze it in there

9943e488cc3ae0060a54c17b9f53206f.jpg


I still have about 5" to 6" behind the box, hoping the disc brake control unit will fit back there. I could trim the front of the box and get another inch out of it.

c20a42f5be8c3a8ee6c77dc7ec7a8d09.jpg


Sent from my XT1254 using Tapatalk
 
Last edited:

Bones

Well-known member
I finally found the time to finish my battery project. I redid the box and all of the cables. Also redid the main ground to the chassis. Heartland had a self tapping screw and a star washer onto a fully pained surface..
Heartlands ground
ce195056b82eaa04ab9738321496361a.jpg

Jerrod's ground
f2e53ff4a9885cacb1b63124c3d14d76.jpg

Before (my first in a hurry version)
933205de527240c76046b36a257ad89e.jpg

My do it right version
b6adda9f13bcf99f4a1fa4d9343e8986.jpg
59da93799f5b7fb96c420ab44636d53f.jpg

My $33.00 from Amazon 16ton crimping tool.
f1c0b01eb645347bf057a7cfb9da4810.jpg

Done
a6237eb8a14ca52d047e93c28b7b7a9d.jpg

I had to slightly modify the box to squeeze it in there
9943e488cc3ae0060a54c17b9f53206f.jpg

I still have about 5" to 6" behind the box, hoping the disc brake control unit will fit back there. I could trim the front of the box and get another inch out of it.
c20a42f5be8c3a8ee6c77dc7ec7a8d09.jpg


Sent from my XT1254 using Tapatalk
That is some Craftsmanship. I really like the crimper and 33 bucks to boot. Nice. Did you use a buss bar to put all of the extra cables in the were in one of your prior photos before you cleaned them up?
 
Top