Jim.Allison
Well-known member
I like it........Thanks for the idea.......
How hard was the drilling thru the frame rail? I am looking at a similar setup but will use 6" PVC piping and mount with a bolts, fender washers, loc washers and nuts thru the pie into the frame rail. Just curious how hard the drilling was.
I like it........Thanks for the idea.......
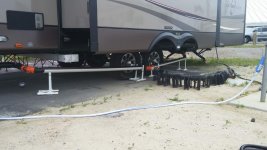
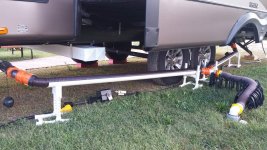
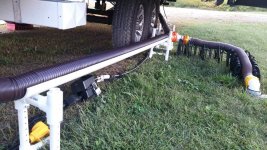
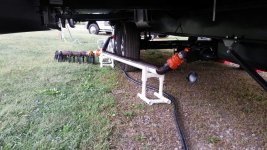
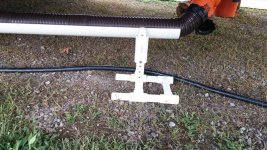
I thought I would circle back with the last of the upgrades on my sewer run. I finally like How I have it configured and I did drill the holes in my pipe and glued them together. I found a sewer connector termination at the down pipe that I liked and would allow me the ability to use shorter length hoses and longer hoses depending on the run type to the last connection. Here are pictures.
ThanksSharp...great job.
Thanks. The PVC made it easier but boy does that stuff make a mess when you cut it and then it's like static clingBones - nice job, and the evolution of an idea is neat to watch as well. Ain't PVC fun to imagine with?
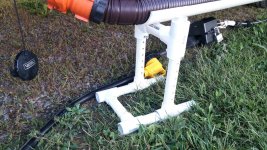
Sure I write up what and how I did it. I did use two different size pipes but I also sleeve the cross bar that adjust to keep it stable on the uprights and you cant see that in the pictures.Bones it would be a big help if you could please explain what you used for the project. We would also like to have a set of these but a little bit confused on the sizes of the PVC used. Also how were you able to get the uprights stable in the cross section at the top where your able to adjust the height.
If you have list of parts, sizes and how assembled I'm sure we wouldn't be the only ones who want to make a set or 2.
Thanks
Yes it does. This trip out I had to use my extension cord. Good thing I bought it. Eventually I am going to hard wire a surge protector inside and then mak myself a completly new power cord that is longer.You know what bugs me is that no matter how we get setup at just about any campground we go to, the water hose, sewer hose and the electrical plug all crisscross!
You'd think that these should all be kept away from each other . . .
But that would be too easy in the design process, of course.
Yes it does. This trip out I had to use my extension cord. Good thing I bought it. Eventually I am going to hard wire a surge protector inside and then mak myself a completly new power cord that is longer.


Our power cord comes out of the back wall just above the rear bumper, where the water and sewer connections are near the front next to the basement door.
View attachment 40586 View attachment 40587
You can see the power cord in the first shot (smaller black square to the left of center over bumper), and water and sewer connections in second shot.
I'm going to stop at storage tomorrow so I can take close up pictures and show a little more detail. They are very easy to make. I spent some time on the drill press to make sure I got all the holes fairly close.Thanks Bones for making up a list of sizes. We do see the sleeve in the uprights and very curious about how to get the same results. We've been to HD and Lowe's trying to figure it out with no luck. We want to make them before we go to Florida in December. Dawn will be there for a month by herself and these will help keep all the plumbing off the ground and secure.