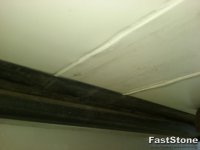
I've noticed on the underneath of my bedroom slide the covering is wrinkled/buckled that has also produced a crack in one of the wrinkles where the center roller is on the bottom. It doesn't appears the roller turns very well even after spraying some lubricant in it. Also there are indented spots where he rollers sit when the slide is pulled in. Has anyone else experienced this on a BigHorn and if so how was it corrected?
- Home
- Forums
- HEARTLAND RVs GENERAL AREA
- Exterior Components - For all Heartland brands
- Slide Rooms, Slide Toppers & Awnings
You are using an out of date browser. It may not display this or other websites correctly.
You should upgrade or use an alternative browser.
You should upgrade or use an alternative browser.
Underside of Big Horn bedroom slide
- Thread starter mgarvin4
- Start date
Roller4tan
Well-known member
I check mine everytime I dump. It's still in pretty good shape, but I've been thinking of adding some aluminum panels for the rollers to ride on, sorta like the kick panels on the bottom of doors. Lift the slide just enough to slide it in and secure with a few stainless screws and caulk.
I was checking further and I think I have a bigger problem. The base of the bottom of the slide underneath the white covering seems to be deteriorating close to the outside wall where the indentions of the rollers set when the slide is closed. I had the unit at the Heartland facility a couple years ago because I had a frame flex issue and also there was a problem with the side wall on the bedroom slide that they had to rebuild because there was a bow in it that wasn't letting the outside seal do it's job. They did a GREAT JOB and covered it at no charge, I just had to deliver the unit to their repair facility. I'm wondering if this issue started prior to the wall being fixed.
I'm thinking what Heartland saved me last time is really going to cost me this time. I'm guessing the slide will have to be removed and rebuilt or I would think from a labor point of view it would be easier to put a new slide in and transfer my bed and cabinets to the new slide shell. There are other things I question about this unit but I won't discuss on this post.
This is very upsetting as I am very anal about maintenance and re-caulking. My unit is a 2013 3585RL and I know other people that have units that they never caulk,wash, or wax and seem to have no issues....very lucky I guess. It is just very disheartening to think that with all I do and this is the payoff. I am going to call Heartland and se if they can give me an estimate on what this is going to cost me. I really love this camper but it may force me to look for another new one.
JohnDar
Prolifically Gabby Member
When I was dealing with putting aluminum trim on the edges of the slides where the plywood was exposed, I also contacted Parkland Plastics for their repair kit which consisted of thick black plastic strips with PSA tape in it and some tubes of #105 sealant/adhesive. Not quite what I expected for the high price, but that's all it was. I put the strips on the bottoms of the three slides with black exposed edges where it looked like there was contact and used the remainder to cover the marks that the bedroom slide rollers were making on the white underside. Seems to have helped. There are small indentations where the rollers contact it while retracted, but I couldn't cover those spots because the large steel bolt heads (or whatever they are) were in the way.
So, if you put some kind of plastic or metal plate over those grooves, it should help prevent further wear. For a while, I think HL started putting some trim on the plywood floor edges, but then started using that black plastic tarp stuff. My neighbor at the CG with a newer Sundance has that on his slides and the bedroom floor is turning to mush. He's not happy.
So, if you put some kind of plastic or metal plate over those grooves, it should help prevent further wear. For a while, I think HL started putting some trim on the plywood floor edges, but then started using that black plastic tarp stuff. My neighbor at the CG with a newer Sundance has that on his slides and the bedroom floor is turning to mush. He's not happy.
Apparently Heartland has learned nothing about this slide problem since 2011. My 2011 Greystone had this same problem. I took it to the factory repair center in Elkhorn this spring and was told I needed a new bedroom slide out floor to the tune of $1500. I declined the repair job, went home and fixed it myself for under $100 and I did NOT need a new floor. Not only is it fixed, it is better than new since I reattached the defective rollers which were causing the damage and added a set of properly installed (and far better designed) new rollers just inside the factory set. I did not need to remove the slide and needed only a few hours of time to facilitate the repair. My biggest problem was finding and ordering a set of rollers with identical clearance to the factory rollers.
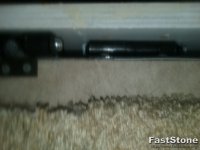
This cause of the damage to the floor: The factory installed rollers are attached to the bottom of the slide out opening but the roller itself is positioned just inside the slide out opening. Downward pressure from repeated use of the slide pushes the roller down and literally rips out the mounting screws. Then the ends of the roller frame tilt upward causing the damage to the underside of the slide. Attached is a photo of the damage.
This cause of the damage to the floor: The factory installed rollers are attached to the bottom of the slide out opening but the roller itself is positioned just inside the slide out opening. Downward pressure from repeated use of the slide pushes the roller down and literally rips out the mounting screws. Then the ends of the roller frame tilt upward causing the damage to the underside of the slide. Attached is a photo of the damage.
Attachments
Would love to see your after repair pics. And the source of the new roller purchase.
Peace
Dave
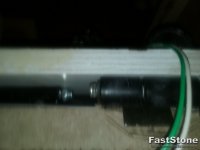
The new rollers were the exact height required for my unit. They are designed to sit on top of the slide opening so the slide presses down on them and does not torque to the inside as did the original rollers. They were purchased at: https://www.etrailer.com/Accessories-and-Parts/Global-Link/295-000027.html
Here is what the new installation looked like before buttoning up the bed interior. Took a bit of ingenuity to get the old rollers out, remount them slightly offset from their original position and then mount the two new rollers just to the inside of the originals. Used a T-stand made of 2x10s under the slide floor. Then lowered the campers front jacks a bit to take the weight off the rollers and provide some room to work. Drilled 3/8 holes through the slideout floor EXACTLY above where each screw needed to be placed. Secured all four rollers with self tapping screws, then placed a strip of 1/4 inch wood between the rollers and the floor and let the slideout down covering the bottom of the holes. Mixed up a batch of rock hard water putty laced with a healthy dose of wood glue and mixed in the drill shavings from drilling the holes. Filled the holes and let the mix cure overnight. Then removed the wood strips and my slide problem is not only fixed but is better than new and I still have my $1500.
Attachments
I check mine everytime I dump. It's still in pretty good shape, but I've been thinking of adding some aluminum panels for the rollers to ride on, sorta like the kick panels on the bottom of doors. Lift the slide just enough to slide it in and secure with a few stainless screws and caulk.
How did that work out? My roller is scraping the bottom. Everything seems ok so I figure a thin plate should be a easy ok fix.
Roller4tan
Well-known member
How did that work out? My roller is scraping the bottom. Everything seems ok so I figure a thin plate should be a easy ok fix.
Still on my todo list. One of these days.....
 Brake assemblies next project, just finished the Morryde wet bolt/shackle conversion.


Still on my todo list. One of these days.....
I placed a thin piece of sheet metal that spanned from the outside edge to the first support beam. Seems to be holding up but I would suggest a little heaver gauge plate. No sure why the factory didn't have the roller inward about 4 more inches so it would have been aligned with that beam. I Only need Very slight pressure to lift the slide 1/4 inch off the rolled to install the plate.
Similar threads
- Replies
- 7
- Views
- 976
- Replies
- 1
- Views
- 543
- Replies
- 20
- Views
- 2K
- Replies
- 5
- Views
- 2K
- Replies
- 3
- Views
- 1K