What did you do to your camper today?

Miltp920

Well-known member
Swapped the position of the sliding glass doors. Now the fixed door is next to couch. DW thinks this is the better set up for the kitchen. It will make it easier for me to have a table by the couch to put my drink and remote on. Looks like everyone is going to like this change. I was encouraged to try this, having read that others had made this swap. I love reading about everyone's modifications and then seeing what I can do on mine. IT was really humid here in Michigan today, and I had the A/C cranked up to make it comfortable in the RV to work. I had water dripping out of the ceiling A/C unit onto the kitchen counter/floor. The sponge filter was a bit dirty, so I cleaned it. I need to read up on this condition. I adjusted the cool to temperature up to 78 and it seemed to stop.
 

JohnD

Moved on to the next thing...
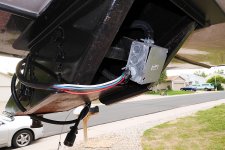
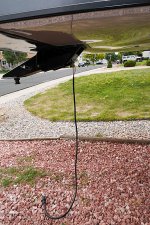
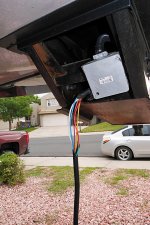
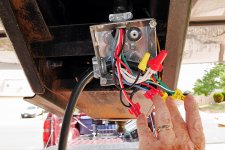
Not today, but last Thursday I rewired the pigtail back into the Prowler . . . which got caught on the receiver hitch of the truck while backing the trailer into the yard after our trip to the mountains last week and pulled out of the junction box under the kingpin.

It was a pretty tight turn, and the pigtail drooped low enough that when I straightened out . . . poof!

Also blew several fuses in the truck.

I started a topic thread about this . . . and with the help of a bunch of Heartlanders here . . . I (we) got it done, although the pigtail is about 10 inches shorter!

That topic thread turned into a pretty big chat, but now if anyone ever needs to rewire their pigtail . . . there now is a good document and diagram of the wiring!

ProwlerPigtail-P1000474.jpg ProwlerPigtail-P1000462.jpg ProwlerPigtailDamage-P1000734.jpg ProwlerPigtailDamage-P1000736.jpg ProwlerPigtailDamage-P1000739.jpg ProwlerPigtailJuctBox-P1000746.jpg

First two shots are the pigtail before this happened, 3 thru 5 damaged pigtail, last shot after it was all wired up.
 

dlw930

Well-known member
I've been wanting to do this mod for months and finally found the time to install sliding doors for access to the plumbing, etc. behind the basement wall. I used aluminum channel strips made for 1/2" plywood for the upper and lower tracks, a 1x1 aluminum angle as a stiffener for the upper panel and something rigid to fasten the upper tracks to. I fastened the lower tracks to a pine 2x2 screwed to the basement floor. I used 3/8 plywood for the doors instead of the OSB in the original wall since the OSB has more of a tendency to swell around the edges moreso than plywood. I wrapped the doors in the original felt used on the wall panel. With one thickness of the felt stapled to the 3/8" doors, the doors were nice an snug in the tracks, but not so tight that I couldn't slide them easily.

I also installed a screen door handle I got on sale at CW the other day. Did I mention that it was 100 degrees today? The pool felt nice after the laboring on Labor Day was over!

Sent from my iPhone using Tapatalk
c4ed550b1660f7dcd25f1cc171ed0d52.jpg
c5e638aef680ce7f9f2c559bc9750832.jpg
a75344651297b9ddb0144f327c1b1fd5.jpg
fe3bcc6d0dfc1223afcecba97164682e.jpg
d6a6146db7ae32bd94f7d026f883b97e.jpg
95eed820eac58f2f4ad22ced3783a999.jpg
 

dlw930

Well-known member
Thanks. I'm debating whether to add knobs or handles to the doors, which would limit movement somewhat. Leaning toward not since accessing the underbelly isn't that frequent.


Sent from my iPhone using Tapatalk
 

pegmikef

Well-known member
Not today, but Labor Day weekend. Replaced my fried High Pointe microwave/covection oven combo (the victim of my loose neutral wire problem in Creede, CO) with a new GE model. Fortunately, there is a nice recycle center here in Carthage, so I was able to get rid of the carcas. The swap was easy as I followed Fred's instructions from when he replaced his with a Samsung.
 

traveler44

Well-known member
I got up on the roof and started washing it and there were a lot of yellow jackets came out of the roof air conditioner cover. I killed about two dozen of them and washed the front half of the roof. I need to remove the cover and get rid of the wasp nest tomorrow and finish washing the roof. Then wash and wax the bighorn.

- - - Updated - - -

Not today, but last Thursday I rewired the pigtail back into the Prowler . . . which got caught on the receiver hitch of the truck while backing the trailer into the yard after our trip to the mountains last week and pulled out of the junction box under the kingpin.

It was a pretty tight turn, and the pigtail drooped low enough that when I straightened out . . . poof!

Also blew several fuses in the truck.

I started a topic thread about this . . . and with the help of a bunch of Heartlanders here . . . I (we) got it done, although the pigtail is about 10 inches shorter!

That topic thread turned into a pretty big chat, but now if anyone ever needs to rewire their pigtail . . . there now is a good document and diagram of the wiring!

View attachment 39874 View attachment 39875 View attachment 39870 View attachment 39871 View attachment 39872 View attachment 39873

First two shots are the pigtail before this happened, 3 thru 5 damaged pigtail, last shot after it was all wired up.
I've never pulled the pigtail but I did pull the safety brake pin while backing into a real nice site in Houston I started skidding the bighorn into the site until the neighbors told me that my trailer brakes were locked up. I repositioned my safety brake cable after that.
 

MCTalley

Well-known member
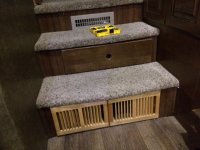
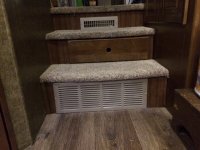
The intake for the furnace is on the face of the bottom step in our rig. The factory put a metal intake cover on the unit. Val had occasionally complained about the fins being a bit sharp. She often sits on the steps to put her shoes and socks on. I took her complaints under advisement (i.e. yeah, I'll look at it sometime in the future).

The other day our (nearly) three-year-old granddaughter came down the steps barefoot and gashed her heel wide open on the metal vent. I quickly started looking for some type of non-metal replacement. We ended up with two 10" x 6" wood registers from Amazon. I removed the plastic venting on the back of the units (they are closable) since they wouldn't fit within the opening in the step. Since the opening is framed (to make sure the step has strength), I couldn't really enlarge the hole to fit the back of the vents.

I screwed both covers on side-by-side. They perfectly cover the hole. We have stain that matches the woodwork in our trailer. I'm eventually going to sand off the current gloss coat and stain them to match better. For now, though, little feet are a little safer now.
 

Attachments

  • 150909-02.JPG
    150909-02.JPG
    122.3 KB · Views: 101
  • 150909-01.JPG
    150909-01.JPG
    114.8 KB · Views: 105
Looked at what I could do to haul chairs tables etc in the toy hauler to hold them in place. When I put the golf cart in doesn't leave any room to lay the items down and I don't want them to slide around. Thought about constructing a rack made of pvc pipe or aluminum conduit Any ideas?
 

JohnD

Moved on to the next thing...
Washed my truck and the front of the Prowler . . . then opened up the basement to try and track down some things.

Located the water pump in there and finger tightened every water connection I could get my hands on, then I tried to reach the heating ducts as we are not getting any heat in the kitchen and living room, but couldn't reach all of the duct work from there.

Then I vacuumed all of the sawdust, tiny little pieces of metal and left over wire from behind that basement wall . . . what a mess in there!

Next I tracked down the cable lines, and my stepson has a RF meter thingy he uses for work and we tried to see why the cable TV line-in is not working.

Basically, we discovered that whomever wired this thing at the factory probably should be working at 7-11 instead of an RV production plant.

I guess I should consider myself lucky that at least the roof antenna wire seems to be hooked up right.

Funny thing was that the antenna/cable outlet in the basement for an outside TV, while hooked up backwards, was getting cable signal, even though it shouldn't have been considering the way it was hooked up.

Doesn't make any sense . . .

I'm going to leave this job for warranty repair . . . if the dealer ever calls me back, that is!

Been trying for two weeks to get them to look at the trailer so we can get the parts ordered that need to be replaced under warranty.

Guess I'll try them yet again tomorrow . . .
 

avvidclif

Well-known member
One thing to watch for is the splitters in the Sat lines. The first one in behind the UDC was labeled "china" "900 MHz" which means it's good for cable only, Satellite is around 2000 MHz. It takes a different splitter good for up to 2300 MHz. There is another one I'm still trying to find, someday. The Sat feed to the Ent center went right by the UDC so it was cut and hooked up to the Sat In in the UDC. That works fine. Someday I'll figure out the rest of it.
 

JohnD

Moved on to the next thing...
One thing to watch for is the splitters in the Sat lines. The first one in behind the UDC was labeled "china" "900 MHz" which means it's good for cable only, Satellite is around 2000 MHz. It takes a different splitter good for up to 2300 MHz. There is another one I'm still trying to find, someday. The Sat feed to the Ent center went right by the UDC so it was cut and hooked up to the Sat In in the UDC. That works fine. Someday I'll figure out the rest of it.

What I discovered is that black coax comes off of the back of the outside cable inlet, and then it runs back behind the water pump, then up through the floor somewhere.

The splitter I found on the other side of the basement has two white coax cables coming out of the floor and into the two outputs of the splitter, then the wire from the cable outlet plate in the basement goes to the input of the splitter, which is why it doesn't make any sense that we got RF signal there as that is supposed to be a TV hookup.

But here is the kicker . . . the wall plate in the living room was labeled backwards, and I've been getting antenna from the roof top from the satellite output, and not the cable output.

However, when I removed that plate today, the black coax (remember that black came from the cable inlet on the outside of the trailer), was hooked up to the cable output, which is not where I'm getting antenna signal from, and white coax to the Sat output, which is where I'm getting the antenna signal from.

And when we tried to get the cable at the last camp ground we were at, we got a little signal through . . . but not watchable, and I did try running it through the satellite side as well and got nothing.

Weird . . .
 

avvidclif

Well-known member
FWIW I have 3 different wiring diagrams for my Cyclone. None of them match what I have. The kicker is 2 of them have exactly the same drawing number but are different. I haven't figured that one out yet. I asked the factory and didn't get a response...

On mine the white cables are for Satellite and labeled 3 GHz. The black are Cable and OTA stuff. The Ent center has a black and white, as does the bedroom, and the storage compartment. The Sat in at the UDC is black and and has the wrong splitter, finding the transition point is my project. An probably another wrong splitter.
 

ziggy

Retired Oregon HOC
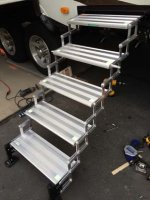
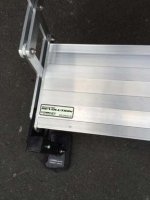
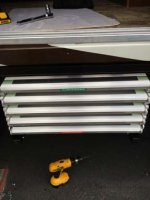
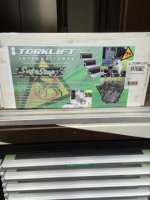
Mark decided to replace the recalled steps on our LM365 Keywest with these. This is the first set the company has made to fit big coaches like ours. These are the same width as the Lippert steps but with 5 steps instead of 4. They are stainless and aluminum instead of painted steel or painted steel/aluminum like the new style Lippert has started making. We will be testing them out this weekend. They are not supposed to bounce when you step on them which will be nice. Torklift Glowstep Revolution is the name of this model. You can check the out at Torklift.com.

The old steps box and all come out and these on their own frame go in the same place. The steps lock in for travel. They pull down and out for use. The bottom step has feet that serve to level the step and stop the bouncing. They came with the fabric that hides the back stair opening so the dogs don't get scared looking through the steps as a special offer. He wants to buy the hand rail attachment at some point. The bracket for that goes from the bottom step to the side of the trailer with a brace to make it steady. The glowstep label comes from the glow in the dark strips that are on the side of each step so you can see them in the dark. Price depends on the model of RV you have since they have to have measurements to determine the number of steps etc. This model isn't even listed online yet, but you can call Amanda at Torklift if you want. No, we are not getting anything from them for posting this. lol


web IMG_2749.jpgweb IMG_2750.jpgweb IMG_2751.jpgweb IMG_2752.jpg
 

TravelTiger

Founding Texas-West Chapter Leaders-Retired
Mark decided to replace the recalled steps on our LM365 Keywest with these. This is the first set the company has made to fit big coaches like ours. These are the same width as the Lippert steps but with 5 steps instead of 4. They are stainless and aluminum instead of painted steel or painted steel/aluminum like the new style Lippert has started making. We will be testing them out this weekend. They are not supposed to bounce when you step on them which will be nice. Torklift Glowstep Revolution is the name of this model. You can check the out at Torklift.com.

The old steps box and all come out and these on their own frame go in the same place. The steps lock in for travel. They pull down and out for use. The bottom step has feet that serve to level the step and stop the bouncing. They came with the fabric that hides the back stair opening so the dogs don't get scared looking through the steps as a special offer. He wants to buy the hand rail attachment at some point. The bracket for that goes from the bottom step to the side of the trailer with a brace to make it steady. The glowstep label comes from the glow in the dark strips that are on the side of each step so you can see them in the dark. Price depends on the model of RV you have since they have to have measurements to determine the number of steps etc. This model isn't even listed online yet, but you can call Amanda at Torklift if you want. No, we are not getting anything from them for posting this. lol


View attachment 40025View attachment 40026View attachment 40027View attachment 40028

Very nice! I've been eyeing those myself!


Sent from my iPhone using Tapatalk
 

dlw930

Well-known member
In process of getting a new TV for our Living Room. 2 year old 46" Samsung shot craps. ESP says they'll pay for a new one. Leaving on trip Wed. a.m. so racing the clock working with tech to get new one in. While waiting, I made 2x10x10 blocks to put under the level up feet as needed to keep legs from going out of stroke on unlevel sites.


Sent from my iPhone using Tapatalk
 

Roller4tan

Well-known member
My Samsung blacked out and wouldn't turn back on. It was getting power as the red light was blinking.Did spme googling and basically found out that the capcitors in the power supply were probably shot. So resigned myself to replacing the TV. Disconnected everything and dismounted it from the mount. I decided to try it one more time, but had the same results. Out of frustration I pushed in the power button and unplugged it while holding the power button. When I plugged it back in the power button was no longer blinking. I pushed the power button and the **** thing turned on. Hooked it all back up and 2 weeks later it still working. Still waiting for the ax to fall....
 
Top