What did you do to your camper today?

travelin2

Pennsylvania Chapter Leaders-retired
Put a couple blue LED light strips under the step box. Wired them up to the wires going to the yellow welcome light and left the yellow light unwired. Stuck the strips under the top section of the I-beam facing down.

QUOTE]

Cool...did the same last year
193cb2625036e5b5ba1efa18a2751b55.jpg


Sent from my iPhone using Tapatalk
 

boatto5er

Founding VA Chap Ldr (Ret)
Not today, but last week replaced the burned out electric heater element in my Suburban Hot Water Heater. Whoever designed that system so that you have to disassemble the gas flue to replace the element needs a class in Human Engineering basics.
 

Nbomar

Well-known member
I cleaned and repacked all 3 axles bearing and drum brake assemblies.


Sent from my iPhone using Tapatalk
 

AAdams

Well-known member
Deb and I took apart the tri-door shower door because the rollers were all loose or falling out. Put the one back on and tightened the rest of them since they were all loose. We reassembled the door and it seems to be working well now. Used loc-tite to on all the screws ( the type that can be removed at a latter date ) to help them hold better.
 

mlpeloquin

Well-known member
Deb and I took apart the tri-door shower door because the rollers were all loose or falling out. Put the one back on and tightened the rest of them since they were all loose. We reassembled the door and it seems to be working well now. Used loc-tite to on all the screws ( the type that can be removed at a latter date ) to help them hold better.


Did the same to mine six months ago. Had one fall off while on a trip. Not a fun job doing by myself. My wife is disabled and cannot help lift heavy items.
 

mlpeloquin

Well-known member
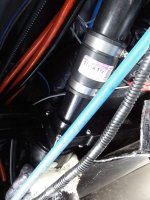
I had upgraded my water filter to two home filters in parallel. This increased the water flow to give a much better shower, but the shower drain could not keep up. Cleaned the drain and found nothing in it so I remove the trap in the service bay. The trap was clear, but the slope of the drain pipe was 1/16" per foot at best. I cut one and a half inches from the drain pipe coming out of the shower drain. This increased the slope to 7/8" per foot. An entire bucket of water drains very fast. Another problem solved.
 

crors7

Active Member
0c07403a3b4255d9c02343e5a442a6e9.jpg

Added 70+' off rgbw led underglow, added control panel for it in my control cabinet with manual control and Bluetooth! While the cargo bay was opened up for wiring the lights I cleaned up the factory disaster, I have a little OCD so that mess was not going to cut it!
 

JohnD

Moved on to the next thing...
We're just down the street from you in Commerce ****** (Reunion area).

We are near 120th. & Colorado Blvd.

Think about joining the Heartland Owner's Club.

There are a bunch of us here in the Denver area and the whole state of Colorado and the rallies are a blast!
 

Bones

Well-known member
I had upgraded my water filter to two home filters in parallel. This increased the water flow to give a much better shower, but the shower drain could not keep up. Cleaned the drain and found nothing in it so I remove the trap in the service bay. The trap was clear, but the slope of the drain pipe was 1/16" per foot at best. I cut one and a half inches from the drain pipe coming out of the shower drain. This increased the slope to 7/8" per foot. An entire bucket of water drains very fast. Another problem solved.
Good job

- - - Updated - - -

0c07403a3b4255d9c02343e5a442a6e9.jpg

Added 70+' off rgbw led underglow, added control panel for it in my control cabinet with manual control and Bluetooth! While the cargo bay was opened up for wiring the lights I cleaned up the factory disaster, I have a little OCD so that mess was not going to cut it!
Looks nice. I just got a second set of those lights to add to my first. I had to re-solder the connections though.
 

mlpeloquin

Well-known member
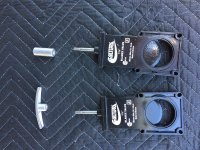
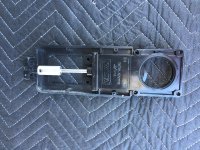
Replaced a gray water valve. Seems that the non replaceable "O" ring shaft seal is the problem. Tried to lube it, but it would stiffen up after five or so minuets. Some seem to think that you have to replace the entire valve and cable assembly, but the cable assembly is just a holder for a standard valve. Just unscrew everything including the set screw that holds the cable in and unscrew the handle from the shaft and along with the cable clamping end. Swap over and re assemble.
IMG_1070.jpg IMG_1072.jpg

I cut the 1 1/2" pipe and purchased a 1 1/2" pipe sleeve. This makes reassembly easy. Otherwise the valve must be force snapped together and the seals can pop out of alignment.

2016-06-12 10.46.17.jpg
 

Bones

Well-known member
Replaced a gray water valve. Seems that the non replaceable "O" ring shaft seal is the problem. Tried to lube it, but it would stiffen up after five or so minuets. Some seem to think that you have to replace the entire valve and cable assembly, but the cable assembly is just a holder for a standard valve. Just unscrew everything including the set screw that holds the cable in and unscrew the handle from the shaft and along with the cable clamping end. Swap over and re assemble.
View attachment 46361 View attachment 46362

I cut the 1 1/2" pipe and purchased a 1 1/2" pipe sleeve. This makes reassembly easy. Otherwise the valve must be force snapped together and the seals can pop out of alignment.

View attachment 46363
Really nice work there.:cool:
 

AAdams

Well-known member
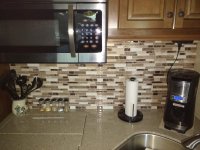
Deb put Smart-tiles on the kitchen back splash. I think she did a better job than I would have. For those that are wanting to do the same thing it took 15 tiles.
Smart_Tile.jpg
 
Last edited:

pegmikef

Well-known member
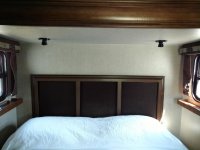
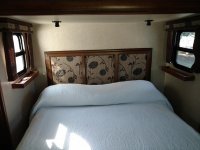
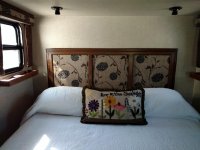
Actually yesterday, my wife found a use for the pillow cases that come with the big pillows provided in new rigs that most folks stuff under the bed or store in an attic or garage. We used them to change out the so-called headboard so it now matches the valances. The fabric is also dog hair resistant.


Attachments

  • oldhb.jpg
    oldhb.jpg
    54.7 KB · Views: 96
  • newhb.jpg
    newhb.jpg
    69.8 KB · Views: 98
  • withpillow.jpg
    withpillow.jpg
    73.5 KB · Views: 113

Chippendale

Well-known member
Actually yesterday, my wife found a use for the pillow cases that come with the big pillows provided in new rigs that most folks stuff under the bed or store in an attic or garage. We used them to change out the so-called headboard so it now matches the valances. The fabric is also dog hair resistant.


Peg, that looks nice, a great idea. Maybe some of the RV designers will contact you for other ideas.
 

Storm1972

Member
Replaced the cheap heartland awning lights, and moved into our new seasonal site overlooking the lake :)

0adba7bba597ba335ec8d4bd0fe4e05e.jpg

a06ef5e1a393f700a1d9ec43add3d4cc.jpg

6f23b4d817009307b5a026406bca6879.jpg

5aeb8f54ac4b953ee27b707cdbbc7f62.jpg


Sent from my iPhone using Tapatalk
 

travelin2

Pennsylvania Chapter Leaders-retired
Actually yesterday, my wife found a use for the pillow cases that come with the big pillows provided in new rigs that most folks stuff under the bed or store in an attic or garage. We used them to change out the so-called headboard so it now matches the valances. The fabric is also dog hair resistant.


Really nice. DW says what a difference for the better!!


Sent from my iPhone using Tapatalk
 
Top