You are using an out of date browser. It may not display this or other websites correctly.
You should upgrade or use an alternative browser.
You should upgrade or use an alternative browser.
What did you do to your camper today?
- Thread starter MagnoliaTom
- Start date
avvidclif
Well-known member
I added curtains to the rear patio opening. Bought some blackout/thermal drapes 95" long and an 8' curtain rod to hang them on. 2 regular curtain rod mounting brackets with some Velcro tiebacks and at night we don't have to close the ramp/patio for privacy. Just close the curtains.
mlpeloquin
Well-known member
When washing the trailer today I found the stained glass door window coming apart, hope there is a way to repair it for Patti, she really likes her bears. I replaced it with one of her humming bird windows, she really likes her bears.
A 100W soldering iron with a large flat tip, solder, and flux should allow you to fix it. You may get away without using flux since the solder has flux in it. Place it on a good flat surface, flux it - don't be stingy with it, use some solder while moving the hot iron tip over the copper adding solder as you go. Do both sides and a good cleaning with acetone followed with 100 percent Isopropyl Alcohol. The alcohol can be purchased on line. You may have to gently press it flat and then solder it.
https://www.amazon.com/s/ref=nb_sb_...keywords=60/40+solder&rh=i:aps,k:60/40+solder
https://www.amazon.com/s/ref=nb_sb_...defined,aps,398&rh=i:aps,k:solder+flux+liquid
https://www.amazon.com/s/?ie=UTF8&k...vqmt=e&hvbmt=e&hvdev=c&ref=pd_sl_6x64fq7938_e
If a complete rebuild is necessary, take a picture and purchase copper lined foil at:
http://www.delphiglass.com/stained-...ent=431135044&utm_term=stained+glass+supplies
Your wife will be very nice to you for fixing her favorite window. It is not hard to do. If you never did this before, rebuilding it completely should not take longer than a day. Fixing it should not take more than a couple of hours.
RVFun4Us
Well-known member
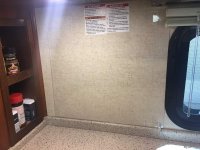
With our new 3270 Bighorn, we wanted to protect the area around the gas stove from grease splatters when cooking. Nice wallboard directly to the right and on the left back wall. We do use a splatter screen but wanted to make doubly sure no greasy gunk got out to stain the walls. We purchased plexiglass at Lowes, had them cut the plexiglass to size, then installed with velcro command strips. Everything made it in one piece after a 300 miles trip. Here are a couple of photos.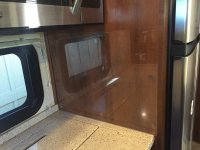


mlpeloquin
Well-known member
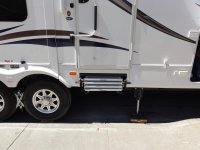
Added a Torklift International a couple of months ago. Had seen that several Heartland owners did the same, but were unsure about the GlowGlide hand rail. So was I do to the fact that the side support has to attach to the slide side of our fifth wheels. Well I installed one to day and as long as the steps are no greater than four the GlowGlide hand rail installs easy. It does not take much time to install either. Here are some pictures.
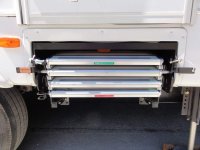
Here is the GlowStep installed Closeup showing the optional lock installed on the left
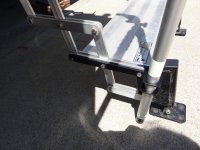
Installed the Bottom Support. It required removing the three bolts on the side of the step. There are two fiber washers for each and I had to use a dental pick to
align them so the bolts would go through. They provide a dry slip surface allowing the steps to fold up and down. This took about 20 minuets.
The top support was next. The mount has double stick tape to hold it in place. Drilled out the holes, added silicone to water proof, and ran the screws in.
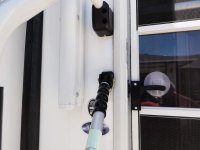
Installed the side support on the front of the slide. Same as the top support.
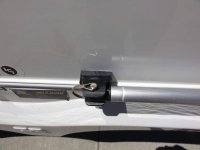
This shows the clearance between the side support and the slide edge.
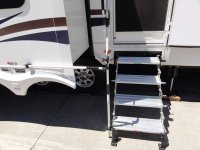
Finished the installation. All support legs adjust, and there is plenty of adjustment. The PolyGlide hand rail gives firm support. My wife is an amputee with a
prosthetic leg and finds the stairs secure and the hand rail a must have for her. The only thing you have to remember is to release the side support before
closing the slide. Pull one pin on the side support and one for the top support and the bottom leg lifts out. I store it in the storage bay. It installs quickly.
The hand rail comes with a brush that can be used to wash your rig. Straighten the hand rail, remove the side support leg, pull the end cap off the bottom leg,
and screw the brush on the end. I have a spare adjustable painters roller pole that I will use though.
Here is the GlowStep installed Closeup showing the optional lock installed on the left


Installed the Bottom Support. It required removing the three bolts on the side of the step. There are two fiber washers for each and I had to use a dental pick to
align them so the bolts would go through. They provide a dry slip surface allowing the steps to fold up and down. This took about 20 minuets.

The top support was next. The mount has double stick tape to hold it in place. Drilled out the holes, added silicone to water proof, and ran the screws in.

Installed the side support on the front of the slide. Same as the top support.

This shows the clearance between the side support and the slide edge.

Finished the installation. All support legs adjust, and there is plenty of adjustment. The PolyGlide hand rail gives firm support. My wife is an amputee with a
prosthetic leg and finds the stairs secure and the hand rail a must have for her. The only thing you have to remember is to release the side support before
closing the slide. Pull one pin on the side support and one for the top support and the bottom leg lifts out. I store it in the storage bay. It installs quickly.
The hand rail comes with a brush that can be used to wash your rig. Straighten the hand rail, remove the side support leg, pull the end cap off the bottom leg,
and screw the brush on the end. I have a spare adjustable painters roller pole that I will use though.

Attachments
TravelTiger
Founding Texas-West Chapter Leaders-Retired
Added a Torklift International a couple of months ago. Had seen that several Heartland owners did the same, but were unsure about the GlowGlide hand rail. So was I do to the fact that the side support has to attach to the slide side of our fifth wheels. Well I installed one to day and as long as the steps are no greater than four the GlowGlide hand rail installs easy. It does not take much time to install either. Here are some pictures.
Here is the GlowStep installed Closeup showing the optional lock installed on the left
View attachment 46523 View attachment 46516
Installed the Bottom Support. It required removing the three bolts on the side of the step. There are two fiber washers for each and I had to use a dental pick to
align them so the bolts would go through. They provide a dry slip surface allowing the steps to fold up and down. This took about 20 minuets.
View attachment 46517
The top support was next. The mount has double stick tape to hold it in place. Drilled out the holes, added silicone to water proof, and ran the screws in.
View attachment 46518
Installed the side support on the front of the slide. Same as the top support.
View attachment 46519
This shows the clearance between the side support and the slide edge.
View attachment 46520
Finished the installation. All support legs adjust, and there is plenty of adjustment. The PolyGlide hand rail gives firm support. My wife is an amputee with a
prosthetic leg and finds the stairs secure and the hand rail a must have for her. The only thing you have to remember is to release the side support before
closing the slide. Pull one pin on the side support and one for the top support and the bottom leg lifts out. I store it in the storage bay. It installs quickly.
The hand rail comes with a brush that can be used to wash your rig. Straighten the hand rail, remove the side support leg, pull the end cap off the bottom leg,
and screw the brush on the end. I have a spare adjustable painters roller pole that I will use though.
View attachment 46522
Thanks for the pics! Been contemplating the handrail, nice to see one installed.
Sent from my iPhone using Tapatalk
mlpeloquin
Well-known member
The hand rail is very sturdy. The kit comes with all the hardware necessary and them some. A really easy install. My wife always wants a hand rail and cannot blame her. If you are unsteady at all, the hand rail will adapt to almost any step so long as the side support can be mounted. Not much weight added and a great safety feature.
Roller4tan
Well-known member
Replaced anode rod in Suburban water heater, decided to pull heating element and check it. Found it full of scale and wondering how it even heated water. I'd bought a spare with the last anode rod purchase, so I installed the new element. Now I have to figure out if the scaled element can be saved. CLR won't break down the scale.
farside291
Well-known member
Installed an Ispring brand 6 stage Reverse Osmosis filtration system under the sink. Amazing, I have never seen a completly clear ice cube before. Taste better than bottled water and for only $200.00 it should pay for itself in no time at all.
Chippendale
Well-known member
Installed an Ispring brand 6 stage Reverse Osmosis filtration system under the sink. Amazing, I have never seen a completly clear ice cube before. Taste better than bottled water and for only $200.00 it should pay for itself in no time at all.
I have been thinking about doing the same thing, but was wondering if there would be enough water pressure and also room for the tank under the sink. I haven't really looked into it. You mention clear ice, are you sending the RO water to the automatic ice maker in your residential refrigerator?
Rollin_Free
Well-known member
Replaced anode rod in Suburban water heater, decided to pull heating element and check it. Found it full of scale and wondering how it even heated water. I'd bought a spare with the last anode rod purchase, so I installed the new element. Now I have to figure out if the scaled element can be saved. CLR won't break down the scale.
Throw it away and purchase a new replacement. It's worth the price to replace it. If it's covered as you said the corrosion has probably starting eating through the electrical protection. If it does succeed breaking through it could shock you.
I was working on a friends mobile home and when I touched the front or back doors I'd get a tingle but didn't connect it to a water heater issue. We discovered the water heater element had shorted and made the entire trailer electrically hot to the touch. Glad I was wearing tennis shoes at the time.
mlpeloquin
Well-known member
Marc,
What is the reason you decided to put a lock on the steps?
BTW...I like the hand rail. I may have to add it to my steps.
Steve
Storage. Aluminum is easy to recycle for money. Also I don't want anyone pulling the locking pin at a rest stop. If you miss it, well I still think the steps would stay, but... My friend had his locking pins pulled on his hitch in the bed of his truck when he stopped for lunch. He never looks into the bed of his truck and just happened to give it a glance. You know what would have happened if he did not catch that. He was stuck for three days. I have two locking pins and two standard pins on my hitch and carry the two spare pins in the truck just in case. Cannot account for evil people or kids thinking something like that would be funny.
jrdelung
Active Member
We have now owned our 2013 Heartland 3010RE for about 6 weeks and the last 4 weeks were out on the road. I have done so many modifications to our 5er, the list would eat up this blog.
After a month of HATING the 3 glass-panel shower doors, I removed the entire frame and glass. The water leaked into and under the bottom of the frame & water collected in the tracks (yuck). The nasty film existed on the glass even with consistent use of the squeegee. We never could properly clean the parts of the glass that overlapped either. I filled the screw holes with matching tub silicone. Next, I will install an Extend-A-Shower rod and shower curtain to match our colors/decor. Be sure to cut the curtain to width and enough length to drape into shower with rod extended.
The curtain will be a better use of space. By the way, the glass doors saved me a ridiculous amount of weight! Now we can load more Fireball to take to our first HOC rally!

Doublegranch
Mountain Region Director-Retired
Dr. Jim!!!!
Well I am so excited you have your "Priorities" set " Fireball"....You have made a friend for life with JohnD...
When you heading back to AZ?
Well I am so excited you have your "Priorities" set " Fireball"....You have made a friend for life with JohnD...
When you heading back to AZ?
jrdelung
Active Member
We home now... Not happy in this heat!Dr. Jim!!!!
Well I am so excited you have your "Priorities" set " Fireball"....You have made a friend for life with JohnD...
When you heading back to AZ?
jrdelung
Active Member
Update:We have now owned our 2013 Heartland 3010RE for about 6 weeks and the last 4 weeks were out on the road. I have done so many modifications to our 5er, the list would eat up this blog.
After a month of HATING the 3 glass-panel shower doors, I removed the entire frame and glass. The water leaked into and under the bottom of the frame & water collected in the tracks (yuck). The nasty film existed on the glass even with consistent use of the squeegee. We never could properly clean the parts of the glass that overlapped either. I filled the screw holes with matching tub silicone. Next, I will install an Extend-A-Shower rod and shower curtain to match our colors/decor. Be sure to cut the curtain to width and enough length to drape into shower with rod extended.
The curtain will be a better use of space. By the way, the glass doors saved me a ridiculous amount of weight! Now we can load more Fireball to take to our first HOC rally!

I decided NOT to do the Extend-A-Shower, because it sticks out into the bathroom too far while a second person may be trying to use the vanity. I placed the shower bar above the shower component to provide appropriate length for the curtain. I will put magnets facing each other on the bottom of the curtain for weight. The magnets can be removed so the curtain can be washed in a machine.
I purchased a single waterproof curtain with brighter colors to maintain bright lighting and perception of larger room size. It's old barn wood print!


Last edited:
Doublegranch
Mountain Region Director-Retired
Jim:
Looks really good....You have an eye for decorating or a super wife or both!!!
Looks really good....You have an eye for decorating or a super wife or both!!!
Similar threads
- Replies
- 4
- Views
- 425
- Replies
- 11
- Views
- 553
- Replies
- 7
- Views
- 895

