Yes sir. Will be a few weeks though.JB, next time you are up on the roof can you snap a pic of the SAT dish installation?
You are using an out of date browser. It may not display this or other websites correctly.
You should upgrade or use an alternative browser.
You should upgrade or use an alternative browser.
jbeletti's 2018 Landmark 365 Newport
- Thread starter jbeletti
- Start date
Good tip. I will have to read my manual when I get back to the RV - thanks....One thing that we recommend in my line of business is that you flush your tankless heater once a year with a conditioner solution it helps the scale and helps against corrosion
Friends of ours have an Atwood version in a new motorcoach. They are not impressed. Ok when at a full service site but when dry camping not only do they "waste" 2+ quarts getting hot water if the water pump isn't drawing water from the FW tank fast enough the burner shuts down. May be appropriate for some applications but not all.
I agree. There is an amount of unheated water in the lines that needs to be purged when you call for hot water. I can see that as being a waste. For us, we do not boondock, so it should work out well for us.
porthole
Retired
I agree. There is an amount of unheated water in the lines that needs to be purged when you call for hot water. I can see that as being a waste. For us, we do not boondock, so it should work out well for us.
Is there some difference in the amount of water wasted to come from the water heater before it is hot?
12' of 1/2" PEX is 1/8 of a quart whether it travels from an on demand or storage type water heater. So the real value of wasted water is the amount needed to actually heat the water, how much more could that be?
Not that I am considering an on demand type heater, but the "purge" amount is really not part of the equation, as you have to purge the non heated water with either system.
Looking forward to your long term review. Especially interested in your findings when there is little water being drawn. For instance, brushing your teeth where you might have the water just a bit warmer then cold, opposed to just running hot water.
- - - Updated - - -
Yes sir. Will be a few weeks though.
And a few more weeks on top of that before it might affect us
dykesj11
Well-known member
On Sunday following the Goshen rally, a vendor moved into the DH area where we were along with Finnegans and Ballards. He had what was essentially a cold/hot water sensor and recirc which returns cold water to FW tank until hot water arrives. I can't remember the name but I saw both store-bought and DIY versions online.
Sent from my iPhone using Tapatalk Pro
Sent from my iPhone using Tapatalk Pro
Bones
Well-known member
You can get a special re-circulation pump that connects to the hot and cold lines. it pumps from the hot line into the cold line until it gets hot water than stops so you have hot water right away.I have something similar to that in our house for the washing machine. The hot water line is probably 80'+ from the water heater to the machine. All that did for us was make the cold water line warm.
porthole
Retired
You can get a special re-circulation pump that connects to the hot and cold lines. it pumps from the hot line into the cold line until it gets hot water than stops so you have hot water right away.
Dave, that is what Is said?
Problem is you also now have hot water in the cold line.
Bones
Well-known member
It is only suppose to push cold water into the cold line. Water that has cooled in the hot line. Is something not working rightDave, that is what Is said?
Problem is you also now have hot water in the cold line.
dykesj11
Well-known member
There is a thermostat in the valve. Something like 90-100 degrees. That is when it shuts off.
I don't know if these recircs can/do work this way but an alternative might be to recirc water to heater supply line until hot temp is reached. That would avoid hot water in cold water supply.
Sent from my iPhone using Tapatalk Pro
MOD: Shortened RV Ladder
I've been meaning to shorten my ladder a couple of inches as I bent it earlier in the year. Well, yesterday when backing into the driveway of a friend, I doinked the ladder good and snapped it clean, just below the bottom rung.
Today, using a tubing cutter, a hack saw and an ice scraper / snow brush, Paul A and I managed to shorten my ladder by 3" and repair it good as new.
Since the recent installation of the LCI Flex Air pinbox on the coach, I am trailering a bit nose-high. This certainly contributed to the ladder-doinking. When I get to Florida, I plan to enlist the help of some pals to raise the pinbox 1 level to see if that gets me level as the new hitch (B&W) is already at its lowest setting.
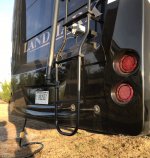
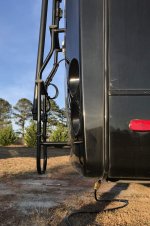
Oh - the ice scraper / snow brush... Paul cut the ends off and we used the inner sleeve of the telescopic tube as an inner sleeve for the ladder vertical sections. Good idea Paul!
I've been meaning to shorten my ladder a couple of inches as I bent it earlier in the year. Well, yesterday when backing into the driveway of a friend, I doinked the ladder good and snapped it clean, just below the bottom rung.
Today, using a tubing cutter, a hack saw and an ice scraper / snow brush, Paul A and I managed to shorten my ladder by 3" and repair it good as new.
Since the recent installation of the LCI Flex Air pinbox on the coach, I am trailering a bit nose-high. This certainly contributed to the ladder-doinking. When I get to Florida, I plan to enlist the help of some pals to raise the pinbox 1 level to see if that gets me level as the new hitch (B&W) is already at its lowest setting.


Oh - the ice scraper / snow brush... Paul cut the ends off and we used the inner sleeve of the telescopic tube as an inner sleeve for the ladder vertical sections. Good idea Paul!
Jesstruckn/Jesstalkn
Well-known member
Looks good Jim
Sent from my SM-N950U using Tapatalk
Sent from my SM-N950U using Tapatalk
You can't even tell but we know now haLoL
Looks good Jim
Thanks guys - not my first rodeo on step shortening. Interesting fact though, the last one I shortened, the lower rung/loop was inner sleeved with another aluminum tube, and was then bent into the bottom loop. On the current ladder, the lower loop was inner sleeved but not with a continuous piece. It just had sleeves in the 2 vertical legs. IMO, the previous fully-sleeved loop would have had more strength in the bottom for that first step.
For anyone contemplating some ladder work, here's the tools I use:
- Phillips screwdriver
- Assorted drill bits
- Tape measure
- Tubing cutter
Nabo
Southeast Region Director-Retired
We have been contemplating adding a folding tray on the back of our LM but the ladder length has been the problem. Like what you have done so will have to go back and re-address shorting the ladder so we can extend the frame to add the folding tray. LCI sells the tray that we like. Thanks Jim.
MOD: Kitchen Island Light - Repower
Today, Paul A planned to do a mod on his Newport that I also planned to do on mine someday. Someday ended up being today
The lighting over the 2018 Landmark 365 Newport kitchen island consists of 3 round, flush LED lights, same as all the other ceiling lights in the coach. Then there's a rectangular light box attached to the ceiling over the lights.
In the Landmarks with the KIB multiplex lighting system, these 3 lights are wired together and are activated by the "Edge" lighting circuit. Also on this circuit are the lights in the edge of the countertops and the light behind the counter backsplash.
Many of us don't care for the kitchen island lighting to come on when all we want on is the edge lighting. So today, Paul and I tackled this in his and my coaches.
Goal
Repower kitchen island overhead lighting from primary kitchen overhead lighting circuit
Process Summary
Locate, disconnect and terminate power feed to kitchen island lights (3 flush LED fixtures)
Feed power from nearby primary kitchen overhead light to kitchen island lights
Process Details
We did Paul's first, then mine as follows:
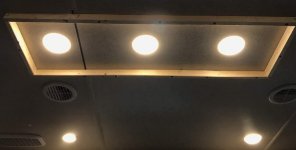
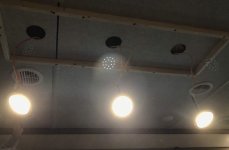
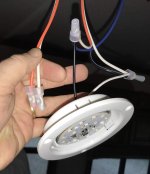
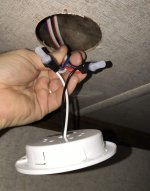
- Removed 6 long screws from the perimeter of the light box over the kitchen island lights in order to remove that box and set it aside
. - On all 3 lights, pulled off the lenses, removed the retaining screws and pulled the light fixtures down
. - Determined how the light wiring was daisy chained and which light had the power feed
. - Disconnected the power feed and capped it off
. - Removed an adjacent light from the ceiling (from the primary 4-fixture, kitchen ceiling lighting) and pulled down its wiring
. - Pushed a 12 gauge wire pair (new power feed) from one of the 3 kitchen island lights over to the now removed light from step 5
. - Wired new power feed into kitchen island light and reinstalled light fixture and light box
. - Wired new power feed into circuit for the primary kitchen lighting and reinstalled light fixture


We have been contemplating adding a folding tray on the back of our LM but the ladder length has been the problem. Like what you have done so will have to go back and re-address shorting the ladder so we can extend the frame to add the folding tray. LCI sells the tray that we like. Thanks Jim.
Awesome. It's super easy to shorten the ladder. Hope it works out for you. If I see you, I'd be happy to help or do it for you.
MOD: Kitchen Island Light - Repower
Today, Paul A planned to do a mod on his Newport that I also planned to do on mine someday. Someday ended up being today
The lighting over the 2018 Landmark 365 Newport kitchen island consists of 3 round, flush LED lights, same as all the other ceiling lights in the coach. Then there's a rectangular light box attached to the ceiling over the lights.
In the Landmarks with the KIB multiplex lighting system, these 3 lights are wired together and are activated by the "Edge" lighting circuit. Also on this circuit are the lights in the edge of the countertops and the light behind the counter backsplash.
Many of us don't care for the kitchen island lighting to come on when all we want on is the edge lighting. So today, Paul and I tackled this in his and my coaches.
Goal
Repower kitchen island overhead lighting from primary kitchen overhead lighting circuit
Process Summary
Locate, disconnect and terminate power feed to kitchen island lights (3 flush LED fixtures)
Feed power from nearby primary kitchen overhead light to kitchen island lights
Process Details
We did Paul's first, then mine as follows:
- Removed 6 long screws from the perimeter of the light box over the kitchen island lights in order to remove that box and set it aside
.- On all 3 lights, pulled off the lenses, removed the retaining screws and pulled the light fixtures down
.- Determined how the light wiring was daisy chained and which light had the power feed
.- Disconnected the power feed and capped it off
.- Removed an adjacent light from the ceiling (from the primary 4-fixture, kitchen ceiling lighting) and pulled down its wiring
.- Pushed a 12 gauge wire pair (new power feed) from one of the 3 kitchen island lights over to the now removed light from step 5
.- Wired new power feed into kitchen island light and reinstalled light fixture and light box
.- Wired new power feed into circuit for the primary kitchen lighting and reinstalled light fixture
View attachment 55955 View attachment 55956 View attachment 55954 View attachment 55952
Did my 2018 Oshkosh today. Thanks for the motivation (it was cold outside)
Sent from my iPad using Tapatalk
Similar threads
- Replies
- 168
- Views
- 39K
- Replies
- 4
- Views
- 2K
- Replies
- 4
- Views
- 12K
- Locked
- Poll
- Replies
- 1K
- Views
- 144K
