Bed improvements

danemayer

Well-known member
We tiled the wood under the mattress today to make it easier to slide the mattress, which we have to do to change the sheets. One box of stick-on tile did the job - about $20.

Also added inclined support at the head to help on nights where we're having stomach acid and reflux. Got a wire shelf from Home Depot, and had them cut it to 66 inches. Put end caps on so it wouldn't scratch the walls if it touches. Then I used 4 wood screws and fender washers to secure it to a 2x4 giving 3 1/2" of lift to the head of the mattress. Also put some clear duct tape on the leading edge of the shelf so the mattress would slide over it more easily.

The hardest part of the job was moving the mattress to the living room and back again.
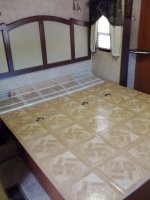
RV Bed Tile and lift.jpg
 

JohnDar

Prolifically Gabby Member
Good job, Dan. When I did ours, getting it off and into the hall was easy. Getting it back on the platform was not.
 

smildrum

Member
Nice job. Looking forward to adding flooring tiles to ours too. Smart idea with the head incline. Never would have thought of using the wire shelves. Let us know how it works out.
Susan
 

TravelTiger

Founding Texas-West Chapter Leaders-Retired
Great job, Dan! Love the incline idea.

IMG_7202.jpgIMG_7203.jpg

We added vinyl tiles and an opening for Sleep Number Bed hoses to come through. We have a very large compartment under the bed, so that is where the Sleep Number Bed pump resides. We cut holes so that the hoses can follow a more direct route to the head of the mattress. We cut a hole in the bed base as well to route the cord to the wall plug. All of the holes are oversized, and then protected with plastic cord wrap material to prevent abrasion. I'll try to take more pics of the install this weekend.

Erika
 

Porkchop

Well-known member
That's awesome! It is so hard to move the bed! What's the size of the bed again so I can get some tiles :)
 

danemayer

Well-known member
It is so hard to move the bed! What's the size of the bed again so I can get some tiles
We have a king-size - the wood platform underneath is 68" wide by 80" long. We bought one box from Home Depot (which I think had 45 tiles) plus 4 loose tiles. Ended up with 6 or 7 unused tiles, so one box would have been enough.

It's hard to tell from the picture, but we left a small gap in the tiles where the wood is hinged so there wouldn't be any buckling when lifting the toe of the bed to get to storage underneath.
 

Porkchop

Well-known member
Great! I have a queen, but I'm glad to hear that one box is enough.

I have to do that and the backspash, and the extra power outlets, and the ..... list goes on right? :)

Irene
 

TravelTiger

Founding Texas-West Chapter Leaders-Retired
Check the box and do the math to calculate the square footage. ;) We have a queen, and I thought one box would be enough. Somehow, we were 5 short. (I think the box had 35?) To cut them, score with a box cutter type knife and snap the tile. Works best with a sharp knife.

For the "gap" Dan mentioned, we removed screws on one side of the hinges, laid tile up to the edge, re-screwed, then removed the other hinge-side screws and repeat. This made sure the screws, hinges, and gap-in-sections are all in the same place as before.

Now Ive been searching for an edge trim to use, to cover the splintery waferboard edge. Somehow my shins find that edge every time!
 

danemayer

Well-known member
A good straight-edge, a smooth (expendable) cutting surface, and a ruler will prove handy.

Before laying the tiles, I put cut outs in the tiles to fit around the hinges. Didn't remove the hinges.

Cut 9/16" strips from leftover pieces to use on the edges. Also used clear tape to help hold the strips in place.

Home Depot sells single tiles - placed just above the boxes of tiles.
 

danemayer

Well-known member
I do not fully understand how you used the tape to hold the strips in place.

We used clear shipping tape about 2" wide. After sticking the tile strips to the edge of the particle board, we ran the tape lengthwise along the top surface of the board and then wrapped it down over the strip and to the underside of the board. Hope that's clear.
 

JohnDar

Prolifically Gabby Member
To cover the edges on mine, I used a faux wood corner trim from Lowe's (mighta been Home Depot, too). To stick it to the tile, I cut strips of double-sided carpet tape to fit the inside dimension on one side of the trim and stuck it to the tile. Unless you really try, it's not coming off.
 

danpam

Member
We completed laying the tiles this morning. We should have waited for cooler weather. Now we can work on the trim. It was an easy job. Thanks for the information.
 
Top