You are using an out of date browser. It may not display this or other websites correctly.
You should upgrade or use an alternative browser.
You should upgrade or use an alternative browser.
R4Tech suspension system ordered...
- Thread starter mmomega
- Start date
porthole
Retired
JD - if you are looking for better pictures or need a different view, look at this site
Click on the picture, it will take you to another page, click on the picture again and it will be full size.
http://www.motortopia.com/dieselwor...ewest-air-suspension-for-serious-towing-2425/
Click on the picture, it will take you to another page, click on the picture again and it will be full size.
http://www.motortopia.com/dieselwor...ewest-air-suspension-for-serious-towing-2425/
mmomega
AnyTimer
Well it is on and what a dramatic difference there is. I just had to go driving around every bump road where I used to think my fillings were going to fall out on.
We did have some problems along the way but the system works as advertised. I'll work on getting some pics and a more detailed review later.
Boy am I sore today.
We did have some problems along the way but the system works as advertised. I'll work on getting some pics and a more detailed review later.
Boy am I sore today.
porthole
Retired
I got half way done yesterday. This is really not a job to tackle solo, which is how am doing it. I contemplated building a spreader bar and pulling the bed at my buddies shop. That would have been a wise move.
Besides those front hanger bolts, the Titan tank is a little in the way, but nothing a flat prybar won't handle.
I have MOR/ride rear spring hangers, so they had to be disassembled in order to get the springs out.
I also have two 2/0 welding cables run down the frame to the rear bumper (12 volts), they were in the way of the height control valves.
And to top it off, the wind really stirred the polen up and my allergies were in full swing.
Boy, those factory springs must weigh 200 pounds!
My front plates only had two bolts holding them together, instructions said 3 for long bed. What about yours?
Im working today and the weather is supposed to be horrendous tomorrow............
mmomega
AnyTimer
Oh I would not want to do this thing solo the first time, now if I had to do it again I would definitely do things differently.
Do you mean the front plates that the leaf and j spring connect to? Connecting the 2 pieces together I only had 2 bolts.
To be honest I did not care for those instructions at all, you'll be on a step saying to install a HCV and the picture next to it is of them removing the factory springs.
I actually started backwards a little and fully connected the compressor and tank wired up to make sure it worked before tearing apart the truck.
My dump valve switch did not work either after I had the entire truck together. I had to disassemble it and put it back together and it is working great now. No matter which way I flipped the switch it would not dump the air, if you held the switch in the middle it would release air through the switch which is not what should happen.
If you run in to any problems or have questions shoot me this way, hopefully it flows together today and the pollen stays down.
porthole
Retired
Do you mean the front plates that the leaf and j spring connect to? Connecting the 2 pieces together I only had 2 bolts.
Yes, instructions say long bed gets 3.
One step I will change on th right side is setting the spring first then the air bag mounting bracket. Trying to snake the spring back in behind the hose had either the plate getting knocked over or the spring flipping.
My fender heights (measured) were about an inch off side to side.
Did you set the ride height to the same level?
I plan on setting it about 1" lower to level the truck.
I'm looking forward to the dump valve feature, dumping the air will be a benefit getting out of my driveway.
Did either of you guys take any seismometer readings over a course prior to install?
I'd love to see the change on a chart")
I downloaded the Measures app by skypa for my iPhone. I plan to take some measurements sitting in the current truck over a course, both from the back and front seats. Then do the same from the new truck and compare the results.
Here's a picture of a graph it produced while I held the phone in my hand and bumped it around. I had X, Y and Z axis' all on for this test.

Here's a sample of the actual data points it produces in a CSV formatted file:

I'd love to see the change on a chart
I downloaded the Measures app by skypa for my iPhone. I plan to take some measurements sitting in the current truck over a course, both from the back and front seats. Then do the same from the new truck and compare the results.
Here's a picture of a graph it produced while I held the phone in my hand and bumped it around. I had X, Y and Z axis' all on for this test.
Here's a sample of the actual data points it produces in a CSV formatted file:
jnbhobe
Well-known member
Only you
Have a link for that app? I did a search a came up with a goose egg.
Love it Jim ! Only You as Duane said. LOL
mmomega
AnyTimer
I had downloaded one and all it did was show a graph and beeped every time you hit a bump, which was all the time but it would not record any I info. So I did think of doing it a while ago.
Duane, my height is off by almost 1/4" side to side. I made a measurement before removing everything from the ground to fender opening. 41" is what I set it to. the truck sat basically level anyway but with the adjustments it was either going to be a 1/4" high or low. I chose the 1/4" high.
I don't want saggy bottoms.
Yeah I put the leafs on first before the bag mounts too
Last edited:
Hear ya go: http://phobos.apple.com/WebObjects/MZStore.woa/wa/viewSoftware?id=354112909&mt=8
Sorry. It was Skypaw.
Sorry. It was Skypaw.
porthole
Retired
So Jim, I guess I am not as impressed as you are.
I followed your lead on the dump valve and when I installed it I used washers to space it out to insure that the roll pin was captured by the nut.
You do need a decent amount of air in the tank to have the dump switch operate.
It appears that by activating it you are just sending pressure to the "dump valve on the height control valve (HVC).
I would guess that for your solenoid idea to work correctly it will have to be some form of reversing unit.
When I set the height I had a bit of a time keeping the sides even. Haven't figured out if it is best to bring the truck up to height or overload and bring it down.
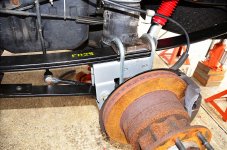
Either way, my one link was 5" and the other 4".
When I let the rear axle hang, limited to either the shock or the bag's internal cable, the link pulled and bent the HVC arm.
I was really hoping to be able to actually lower the truck to level. Looks like that is not going to happen. After going for a ride to my buddies shop I found the height to be up over what I set it at.
I also head the compressor coming on several times during my riding around.
At the shop I lengthened the link a bit and the ride is almost like stock.
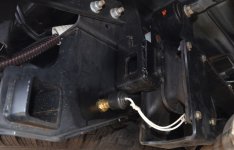
I mounted the compressor to the right side forward spring mount, the tank just in front of it.
The compressor is inadequate in my opinion.
I followed your lead on the dump valve and when I installed it I used washers to space it out to insure that the roll pin was captured by the nut.
You do need a decent amount of air in the tank to have the dump switch operate.
It appears that by activating it you are just sending pressure to the "dump valve on the height control valve (HVC).
I would guess that for your solenoid idea to work correctly it will have to be some form of reversing unit.
When I set the height I had a bit of a time keeping the sides even. Haven't figured out if it is best to bring the truck up to height or overload and bring it down.
Either way, my one link was 5" and the other 4".
When I let the rear axle hang, limited to either the shock or the bag's internal cable, the link pulled and bent the HVC arm.
I was really hoping to be able to actually lower the truck to level. Looks like that is not going to happen. After going for a ride to my buddies shop I found the height to be up over what I set it at.
I also head the compressor coming on several times during my riding around.
At the shop I lengthened the link a bit and the ride is almost like stock.
I mounted the compressor to the right side forward spring mount, the tank just in front of it.
The compressor is inadequate in my opinion.
Last edited:
mmomega
AnyTimer
When I went to level mine, I had completely reassembled the truck with the jack still supporting the axle. I jacked the truck from under the axle and removed the jack stands and lowered everything down.
I then manually aired the bags on each side back to the measured mark I had made on the fender.
Measured the distance from the HCV arm to the lower air bag mounting point and cut the links. I believe the passenger side was either a 1/4 or 1/8" longer.
Installed the links and then let the compressor fill the tank. I dumped the bags, which is when I found out about the pin and the dump switch.
Once it was fixed it aired the bags up and I measured again each side and the passenger side was about 1/4" higher. I may go check again to see if anything has changed since Saturday.
The truck is sitting almost perfectly level front to back, from measuring the body line above the front fender and rear fender. When I flip the dump switch it drops the rear about 2-3".
I agree that the compressor is definitely not what I was hoping for but the only time mine comes on is after I've dumped the bags one time, occasionally twice.
I'm sure you may have checked but my drain valve on the tank was slowly leaking air right after install and I thought it was tight enough. Apparently not.
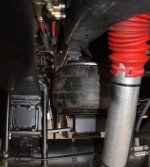
My compressor is mounted almost directly under the passenger front door with the tank sitting about 2ft behind it. I mounted the relay on the firewall passenger side and ran the compressor filter up to the engine bay as well. Then the key-on power wire over to the engine fuse box, added a direct wire fuse and used the back up camera fuse.
I then manually aired the bags on each side back to the measured mark I had made on the fender.
Measured the distance from the HCV arm to the lower air bag mounting point and cut the links. I believe the passenger side was either a 1/4 or 1/8" longer.
Installed the links and then let the compressor fill the tank. I dumped the bags, which is when I found out about the pin and the dump switch.
Once it was fixed it aired the bags up and I measured again each side and the passenger side was about 1/4" higher. I may go check again to see if anything has changed since Saturday.
The truck is sitting almost perfectly level front to back, from measuring the body line above the front fender and rear fender. When I flip the dump switch it drops the rear about 2-3".
I agree that the compressor is definitely not what I was hoping for but the only time mine comes on is after I've dumped the bags one time, occasionally twice.
I'm sure you may have checked but my drain valve on the tank was slowly leaking air right after install and I thought it was tight enough. Apparently not.
My compressor is mounted almost directly under the passenger front door with the tank sitting about 2ft behind it. I mounted the relay on the firewall passenger side and ran the compressor filter up to the engine bay as well. Then the key-on power wire over to the engine fuse box, added a direct wire fuse and used the back up camera fuse.
porthole
Retired
I agree that the compressor is definitely not what I was hoping for but the only time mine comes on is after I've dumped the bags one time, occasionally twice.
I'm sure you may have checked but my drain valve on the tank was slowly leaking air right after install and I thought it was tight enough. Apparently not.
My compressor is mounted almost directly under the passenger front door with the tank sitting about 2ft behind it. I mounted the relay on the firewall passenger side and ran the compressor filter up to the engine bay as well. Then the key-on power wire over to the engine fuse box, added a direct wire fuse and used the back up camera fuse.
My drain valve had to be opened and closed a few times to get the seat "seated".
Since I knew I will be air supply changes I just wired up the compressor to the my bed power supply (have a 10 gauge in the tool box coming from the battery). Right now it is hot all the time with a switch in the toolbox that I can shut it off for extended parking.
No leaks, the compressor has yet to come on sitting in the driveway. Drove it for a couple hours last night and the compressor comes on occasionally while driving. I guess the "fill" delay is not long enough.
Since the compressor is mounted on the spring hanger I was able to one the air filter hose through the rear body grommet. The filter is behind the seat just above the jack.
The main thing I am disappointed with is I was really hoping to be able to level my truck, about 2" lower then stock.
If you think about it, even with 3000+ pounds sitting in the bed the truck really doesn't need to sit at the stock unloaded height.
Just watch if you put the truck on a hoist or jack by the trailer hitch. The link on the left side of mine pulled and bent the HCV arm.
We will be leaving a bit for our first camp trip, so the road test is coming today.
I contacted Tony at Sanluis and he forwarded to Firestone tech.
Next week I will look at remounting the HCV's to a different angle, raising the arm in neutral position up higher. This would allow a longer link.
Either that or making the arm longer or moving the whole valve forward.
Since it is not a vertical hook up, as the axle drops it pulls the valve forward, twisting it.
The dump worked great for getting out of my driveway yesterday. Gave me just enough room to not drag my rear jacks.
porthole
Retired
Did a trip with the trailer this weekend. I'll guess about 3K of pin weight.
Truck handled it good and the ride was comfortable. Still not as smooth as glass, but a major improvement especially across the bridge expansion joints.
Still have the drive away shudder that we thought was the drive line angle issue.
I still have issue with the height control and am waiting on a call back from tech support.
porthole
Retired
Posted some pics over at the FTE forum.
Near the end of this thread:
http://www.ford-trucks.com/forums/1...ech-hybrid-air-over-leaf-rear-suspension.html
Near the end of this thread:
http://www.ford-trucks.com/forums/1...ech-hybrid-air-over-leaf-rear-suspension.html
porthole
Retired
I came across a member from a Super Duty forum (who does great vids btw) and noticed where he located his aux connection and was just thinking of copying him.
Right at the 3:15 mark is where he installs his.
I put my air connector on the trailer hitch, just had to make the hole bigger. I used a 1/4" internal thread bulkhead connector. They are a standard part in the fuel section at West Marine.
I also replaced the compressor with an Air Zenith 200 psi, 100% duty cycle unit.
It is not finished yet but is using two pressure switch. I have a switch in the tool box to switch between 150 and 200 psi ( it will eventually be 175). I added a manifold since the tank only has two fittings. Also have a 200 psi blow valve.
The air zenith is quieter then the Firestone pump and it fills from empty faster.
1000 engine rpm Firestone = 0 to 150 4:52
1000 engine rpm Air Zenith = 0 to 150 3:15
I'll add the other pics on the FTE forum.
http://www.ford-trucks.com/forums/1...ech-hybrid-air-over-leaf-rear-suspension.html
Attachments
porthole
Retired
Well after a month of no tech support replies I am updating my thoughts.
I would not recommend this kit for a DRW 6.7 Ford.
There are mulltiple issues and if you want an air ride - get a true air ride, not a hybrid.
Between upgrading the compressor and tank and now having to replace the included shocks, I will only be $500 away from the cost of a Kelderman air ride kit.
I would not recommend this kit for a DRW 6.7 Ford.
There are mulltiple issues and if you want an air ride - get a true air ride, not a hybrid.
Between upgrading the compressor and tank and now having to replace the included shocks, I will only be $500 away from the cost of a Kelderman air ride kit.
Similar threads
- Replies
- 2
- Views
- 441
- Replies
- 0
- Views
- 358
- Replies
- 4
- Views
- 644
- Replies
- 6
- Views
- 823