What did you do to your camper today?

MTPockets

Well-known member
Installed new Moen single lever, sprayer head faucet and soap dispenser. Easy to install, but had to do three, 20 mile trips to 1) buy faucet 2) get adapter to connect water lines 3) hole saw to enlarge hole in counter top. Very nice piece nice to use.
 
Last edited by a moderator:

JanAndBill

Well-known member
John, Malcolm (MCTalley) and I are in Nashville, TN, right now while he is working. Heading to the panhandle of Florida in less than a week to spend Thanksgiving with our son at his AF base. 23 degrees here this morning with a high of 38 degrees forecasted for today.

We waved at you from I-24 as we passed through Nashville. We left out of Cape Girardeau, Mo early this morning 18 degrees, in route to Alabama. Had thought about making it a two day trip and stopping off around Nashville, but we were so tired of COLD WEATHER, we just pushed it on home. Made it in time to get it under cover, and winterized.
 

azbigfoot

Well-known member
Installed a new Super-Slider adjustable Super-tube. The old one wouldn't accommodate my new rhino hose. Also, installed the extension cable for the VALOR TPMS system. Two more things checked off the list (which is still pretty long).
 

gebills

Well-known member
Woke up at 0530AM to 12-degrees outside. Went in to use the bathroom; no water. Before DW climbed out of bed and startedscreaming about having to take a shower and be gone by 0800, I run outside (it's still 12-degrees out here) andhook up the water hose to put the coach on “city water” supply, leaving it on a drip so as to not freeze up. During the day, was successful in getting thefeed and return line to the fresh water tank thawed and operable. Went down to the local RV store and bought aCamco heated water supply hose and foam pipe insulation and installed the insulated/heatedhose on the RV. Soooooo, I wonder what projectstomorrow will bring here in SW Iowa. Wecan’t get outta here fast enough…….
 

d_fergie

Well-known member
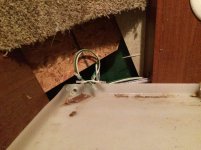
Replaced my lavatory faucet yesterday, pics ... today, might grab a cold one out of the fridge this afternoon.
 

GWRam

Well-known member
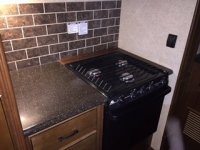
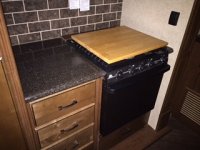
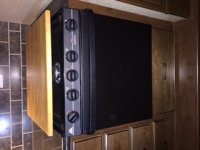
Covered the stove top that we haven't used yet in a year. Do all our cooking outside so far. Now we will have that much more counter space over our breadbox (oven)

ImageUploadedByTapatalkHD1416068740.444808.jpg
ImageUploadedByTapatalkHD1416068758.554546.jpgImageUploadedByTapatalkHD1416068769.971215.jpg

Sent from my iPad using Tapatalk HD
 

porthole

Retired
I ran the furnace, the front heat strip and a Pelonis ceramic heater for 2 hours.

I blew out all the lines 2 weeks ago, no antifreeze yet in case we got to go for another trip.

Never expected we would get 20 degree temps and 30 plus winds for two days.

After 2 hours of running the heaters I was able to stop blowing fuses for the water pump and run my antifreeze through everything.
 

danemayer

Well-known member
Yesterday I used silicone spray on the gray #2 valve plunger and added a zippered "Trap Flap" to the coroplast for easy access to the gray #2 and black gate valves. Had previously installed zippered access to gray #1.

(Sorry Erika - no pics)
 

TravelTiger

Founding Texas-West Chapter Leaders-Retired
Yesterday I used silicone spray on the gray #2 valve plunger and added a zippered "Trap Flap" to the coroplast for easy access to the gray #2 and black gate valves. Had previously installed zippered access to gray #1.

(Sorry Erika - no pics)

Dan, you're killin' me! You know better!


Sent from my iPhone using Tapatalk
 

HornedToad

Well-known member
Yesterday I used silicone spray on the gray #2 valve plunger...

Last week I ran a box of Calgon through all my tanks and worked the valves as it drained, it seemed to make all of them work better, except the one I was trying to fix that is sticking

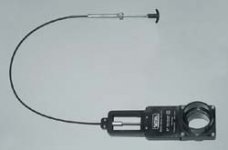
Do I need to lubricate the cable? If so can I just get behind the UDC and spray it or do I need to work from underneath?
 

danemayer

Well-known member
Last week I ran a box of Calgon through all my tanks and worked the valves as it drained, it seemed to make all of them work better, except the one I was trying to fix that is sticking

Do I need to lubricate the cable? If so can I just get behind the UDC and spray it or do I need to work from underneath?

On another thread, JanandBill reported great success by getting underneath and using silicone spray on the plunger that goes into the valve assembly. After reading that post, I did the same on Gray #1 and Black valves with excellent results. Yesterday was on Gray #2. It's better, but not as good as the other 2.
 

JohnD

Moved on to the next thing...
On another thread, JanandBill reported great success by getting underneath and using silicone spray on the plunger that goes into the valve assembly. After reading that post, I did the same on Gray #1 and Black valves with excellent results. Yesterday was on Gray #2. It's better, but not as good as the other 2.

I don't know how loose you want to make those plungers.

Mine were real smooth the first summer we had our trailer.

And the black tank plunger jiggled a little bit while traveling, only to give me a nice little present when I removed the cap at the dump station!

After that, I always push on the plungers before I remove the caps so I can be ready with a pail.
 

danemayer

Well-known member
I don't know how loose you want to make those plungers.

Mine were real smooth the first summer we had our trailer.

And the black tank plunger jiggled a little bit while traveling, only to give me a nice little present when I removed the cap at the dump station!

I'm looking for something in-between "jiggled a little bit while traveling", and takes 20 lbs of pull to open it.
 

JohnDar

Prolifically Gabby Member
Rather than travel with the twist-on valve hanging on the sewer connection, I replaced the cap with one that has a small hose outlet on it. I screwed on a hose valve and put a cap on it. When I need to connect, I put a small container under that valve and open it. Then remove the big cap and make my connections. So far, all I get is a dribble of whatever residual liquid remained in the piping after closing all valves and putting the cap on.
 

JanAndBill

Well-known member
Last week I ran a box of Calgon through all my tanks and worked the valves as it drained, it seemed to make all of them work better, except the one I was trying to fix that is sticking

Do I need to lubricate the cable? If so can I just get behind the UDC and spray it or do I need to work from underneath?

Getting the valves to work smoothly is a combination of things. My black tank got so bad that it caused the outer housing to pull out of where it was crimped. When I replaced the cable, I pulled the new one out enough that I was able to spray silicone into the housing until it ran out the other end then worked the cable a few times. When I re-installed the cable I MADE SURE that it was in a nice arch and didn't have any sharp bends (my old one was wrapped around everything). In reading the instructions on installing valves by Valterra, I noticed the instructions that said not to over tighten the 4 bolts that hold it together. When I checked mine they were really tight, so I backed them off and readjusted them to snug. I then had to cut off some of the outer housing to get the setting right on cable length. (the valve is now fully closed about 1/2" before the handle hits the housing). The valve worked better, but it was still difficult. That's when I sprayed the actuator shaft on the valve with silicone. The difference was night and day. I can now open and close the valve with one finger. I'd like to take credit for the idea, but I actually got the idea from one of the electric valve manufacturers instructions that said to lubricate the actuator yearly with silicone. Since I now have an access hatch in the corplast this will be a yearly maintenance item for me. For now the gray tanks are working ok. I think the cable is shorter and not as kinked as the other one was, but when it warms up some, I'll spray them as well.
 

HornedToad

Well-known member
Bill,

Thanks for the detailed write up...

I have a visual on this actuator shaft and now I know specifically what issues to look for with the cable.

I need to get from forcing the handle so hard I can hear the UDC housing crack to "open and close the valve with one finger"
 

Attachments

  • waste valve.jpg
    waste valve.jpg
    5.2 KB · Views: 129

vakthund

Well-known member
Arrived at campsite for Thanksgiving week and had less than a good start to the vacation. The level-up is throwing "low voltage" errors. Connected to shore power and all ran well. Connected city water but was quickly reminded that the water pump was disconnected. Hot water heater then decided to throw error on both electric and propane. Cleaned all the connectors and it fires up on both. Spent yesterday fixing a leaking washer/dryer drain. Thank you Heartland for using a screw-on P-trap but gluing the sink side so it is impossible to empty the trap and impossible to get it out through the completely useless access panel. Also noticed that the factory installed washer/dryer has a drain pan with a drain that loops above the drain pan making the drain pan rather useless also.
Promised DW to put all the "wood" back once we get home and I have access to my tools.
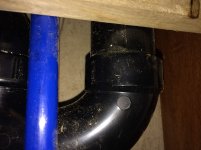
IMG_0412.jpgIMG_0408.jpg
Repairs went well, no more leaks and the carpet remains dry.
Installed EMS-HW50C (finally).
Battery check, water heater check, and some carpentry work added to the HDL.
 
Top