jbeletti's 2015 Landmark 365 Ashland

Bones

Well-known member
That was the chop saw the miter was under the bench.
Making a swing out brake away cable bar to mount to my tool box.
I'll post it when it's done
4e92c77b4cebe94562e4c06e28a2d3f8.jpg


Sent from my XT1254 using Tapatalk
There are many times I wish I had a small welder.
 

jbeletti

Well-known member
Wireless Backup Camera project equipment update

I have an equipment update to my Wireless Backup Camera project. See details in this post > LINK
 

Jesstruckn/Jesstalkn

Well-known member
When you get it dialed in let me know what I need to buy.
I do need a bigger screen though. So I can see what I hit.

Sent from my XT1254 using Tapatalk
 

jbeletti

Well-known member
When you get it dialed in let me know what I need to buy.
I do need a bigger screen though. So I can see what I hit.

Sent from my XT1254 using Tapatalk

Lots of other LCD screens to choose from. You can start now at figuring out what size you need, where you can place it and how you will mount it.

Note too that Voyager also has a monitor with the wireless receiver built into it. Drawback to it is it's "single-purpose" use. If I install a screen in the truck, I want to be able to use it for multiple video sources. This is why I went with the wireless receiver with A/V output to route into the monitor of my choice.
 

Bones

Well-known member
Lots of other LCD screens to choose from. You can start now at figuring out what size you need, where you can place it and how you will mount it.

Note too that Voyager also has a monitor with the wireless receiver built into it. Drawback to it is it's "single-purpose" use. If I install a screen in the truck, I want to be able to use it for multiple video sources. This is why I went with the wireless receiver with A/V output to route into the monitor of my choice.
Can you do wired and put it together. I put a fifth wheel camera together for 40 bucks. It works well for what I use it for.
 

davebennington

Senior Member
I installed a backup camera that we purchased from Tadi Brothers, (they are at most RV shows) it does not works as well as they demo it at the shows. After the install I found that it would blink in and out while driving. I called and asked if they could help the response was "you can purchase a cable that runs from the camera to the front of the coach" where the antenna would be placed. This cuts the distance between the antenna and the monitor down to about 10 to 15 feet.
This has worked so far, is it as good as the hard wired system we had on our old coach NO but it does the job.


dave
 

jbeletti

Well-known member
Dual 2" Receiver Hitch for Bike Rack

26-Sep-2015 Update
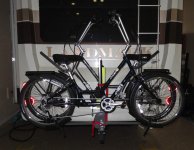
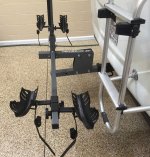
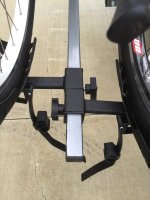
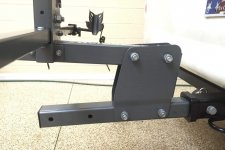
The dual 2" receiver hitch project for my Landmark is complete. It took about $175 in parts and about the same in labor. My guy also did some mods on my bike hitch to make it work out better for me and to keep it as close to the RV as we could and still provide some space for "flop".

Bikes on Rack on Hitch on RV - 01.jpg IMG_4434.jpg IMG_4431.jpg IMG_4435.jpg


23-Sep-2015 Update

Today, my neighbor, a very good welder/fabricator began making a dual 2" receiver hitch for my Landmark in order for me to slip in a Swagman Dispatch 2 Bicycle Rack.

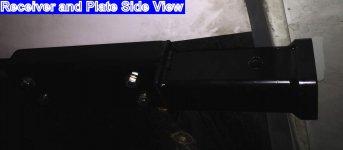
The design of the hitch calls for a 1/4" thick 3" wide L-shaped steel plate to be bolted to the bottom of my I-beam on both sides of the coach. Two bolts on each side of the web, bolt this plate on.

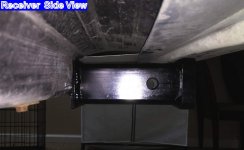
The back of the L was boxed in with a flat piece of 1/4" steel and a 2" receiver was welded to the flat.

The design keeps the receiver and by extension, the bike rack, as high as possible without adding a stacked receiver tube.

Today, two end receivers/plates were completed, painted and bolted to the coach. Tomorrow, a square tube will be added along with the 2" receiver at the center for the bike rack.

This design, if successful, will allow me to move it from coach to coach fairly easily.

Here's a link to all the pictures and below are a few from today's work.

Receiver - Uninstalled.jpg Receiver and Plate - Side View.jpg Receiver - Installed - Side View.jpg
 
Last edited:

Bones

Well-known member
Re: Dual 2" Receiver Hitch for Bike Rack

23-Sep-2015 Update
Today, my neighbor, a very good welder/fabricator began making a dual 2" receiver hitch for my Landmark in order for me to slip in a Swagman Dispatch 2 Bicycle Rack.

The design of the hitch calls for a 1/4" thick 3" wide L-shaped steel plate to be bolted to the bottom of my I-beam on both sides of the coach. Two bolts on each side of the web, bolt this plate on.

The back of the L was boxed in with a flat piece of 1/4" steel and a 2" receiver was welded to the flat.

The design keeps the receiver and by extension, the bike rack, as high as possible without adding a stacked receiver tube.

Today, two end receivers/plates were completed, painted and bolted to the coach. Tomorrow, a square tube will be added along with the 2" receiver at the center for the bike rack.

This design, if successful, will allow me to move it from coach to coach fairly easily.

Here's a link to all the pictures and below are a few from today's work.

View attachment 40343 View attachment 40341 View attachment 40342
Looks good. Do you plan on adding a cross bar between the two receivers to keep them parallel to each other?
 

jbeletti

Well-known member
Re: Dual 2" Receiver Hitch for Bike Rack

Looks good. Do you plan on adding a cross bar between the two receivers to keep them parallel to each other?

Because the receiver tubes are very short in the design, probably no need for an additional cross bar in the back.

There will be a cross bar from receiver to receiver. It will be a square C shape with the top and bottom sides of the C being really short.
 

jbeletti

Well-known member
Backup Camera Project - Done!

The Backup Camera project was "mostly" completed today. It's ALIVE! It actually works as I planned it to. Love it when that happens. Now I can see my bikes and I will have a nice visual aid when backing.

See details an pics in the project post - link
 

jbeletti

Well-known member
Project Complete: Dual 2" Receiver for Bike Rack

This project has been completed. An update and final pics can be seen here > link
 

Nabo

Southeast Region Director-Retired
Re: Project Complete: Dual 2" Receiver for Bike Rack

Jim - did you install the 360 Siphon yet? We got one at the NAHOC rally this past June but haven't put our on yet. Somewhere I read that you were going to do it in the next couple of weekends with instructions.
B--
 

jbeletti

Well-known member
360 Siphon Installation

Today at the Indiana Chapter Rally in Shipshewana, we had a guest speaker at breakfast - Greg Cravens from 360 Products. Greg talked about the 360 Siphon product. A few lucky attendees got free 360 Siphons too!

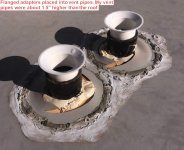
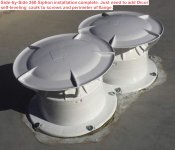
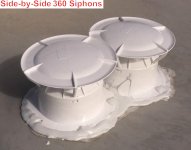
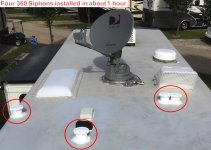
I received 4 OEM-style (tall) 360 Siphons from Lippert (a marketing partner with 360 Products) a few weeks back. Today, after Greg's talk, I went up on the roof and installed them. Jim Pavlinik assisted me on the first two. They were side-by-side vents and my first ones, so we took our time. I did the last 2 myself in about 15 minutes each.

Materials Used:
  • 4 ea, 360 OEM-style (tall) Siphons
  • 4 ea, flanged adapters
  • Butyl tape (1/2" x about 4 feet)
  • 1 tube Dicor Lap Sealant
Tools Used:
  • Screw gun
  • #2 square drive screw bit
  • Wide (4") thin metal putty/taping knife
  • Caulking gun
  • Emory cloth (I had to sand the inside of 1 vent pipe to fit the flanged adapter)
Process:
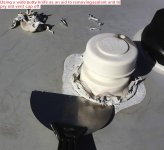
  1. Using the putty knife, I removed the existing Dicor Lap Sealant from the roof up to the edge of the existing vent
  2. Using the putty knife, I removed the existing Dicor Lap Sealant from the screw heads
  3. Using the screw gun and the #2 square drive screw bit, I removed all screws from the existing vent
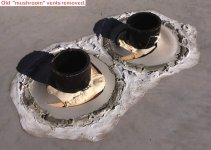
  4. Using the putty knife as a pry tool, I removed the existing vent
  5. Using my fingers and the putty knife, I removed some additional sealant from the area under the old vent
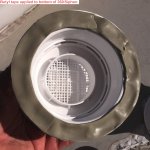
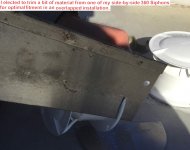
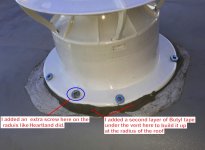
  6. I applied a single thickness of Butyl tape to the bottom of the 360 Siphon. Exceptions are where I had to overlap the bottom flange of two 360 Siphons that were mounted side-by-side. I did some double-layering in some places on the 360 Sipon that was on top. I also did some double-layering on side of another 360 Sipon that replaced an old vent at the radius of the roof/wall edge
  7. I added the supplied flanged adapter to the existing vent pipe and pressed the 360 Siphon over it and onto the roof
  8. Reusing the old screws, I screwed the 360 Sipon in place
  9. Using Dicor Lap Sealant, I sealed all screw heads and the perimeter of the 360 Siphon base where it meets the RV roof, overlapping up into the vent base and the roof
Here's the pictures I took of the installation:
360 Siphon Install - 01.jpg 360 Siphon Install - 07.jpg 360 Siphon Install - 02.jpg 360 Siphon Install - 03.jpg 360 Siphon Install - 04.jpg 360 Siphon Install - 05.jpg 360 Siphon Install - 06.jpg 360 Siphon Install - 08.jpg 360 Siphon Install - 09.jpg 360 Siphon Install - 10.jpg
 

Bones

Well-known member
Re: 360 Siphon Installation

Looks good but what was wrong with the older style vents?
 
Top