jbeletti's 2018 Landmark 365 Newport

jbeletti

Well-known member
REPAIR: Black Tank Valve for Half Bath

Symptom
It was observed that contents of black tank were not flowing out when tank valve handle as pulled.

Observation
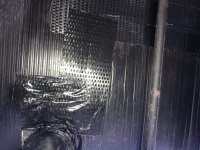
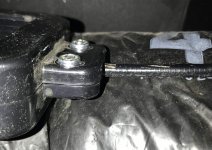
Exposed tank valve for half bath black tank. Observed the cable jacket had pull free from valve frame.

Repair
Disconnected wire from valve actuator, shortened by 1/2"
Removed screws from end of valve body frame
Reconnected wire to valve actuator
Placed wire jacket inside end of valve body frame and replaced screws
Tested operation. Looking good!
Taped coroplast back into place

Pictures
2018 Landmark Newport - Half Bath Black Tank Valve Repair - Valve Cable Jacket Separation - 01.jpg IMG_9887.jpg IMG_9890.jpg

More pictures > LINK
 

Bones

Well-known member
REPAIR: Black Tank Valve for Half Bath

Symptom
It was observed that contents of black tank were not flowing out when tank valve handle as pulled.

Observation
Exposed tank valve for half bath black tank. Observed the cable jacket had pull free from valve frame.

Repair
Disconnected wire from valve actuator, shortened by 1/2"
Removed screws from end of valve body frame
Reconnected wire to valve actuator
Placed wire jacket inside end of valve body frame and replaced screws
Tested operation. Looking good!
Taped coroplast back into place

Pictures
View attachment 59618 View attachment 59619 View attachment 59620

More pictures > LINK

great pictures Jim. I had trouble with mine the last trip. Maybe I should get under mine again and inspect the cable and line to see how they look tonight before we leave again tomorrow.

- - - Updated - - -

What tape are you using to secure the coroplast?


Sent from my iPhone using Tapatalk


It should be this. well worth the investment. Amazon
 

JohnDar

Prolifically Gabby Member
John - Dave has it right. I use this from Amazon: Surface Shields BP4180 4" x 180' Scrim Shield Repair Tape

Thanks, I saw that and ordered a roll. The Grizzly I used a while back is giving up the ghost.


Sent from my iPhone using Tapatalk
 

jbeletti

Well-known member
Thanks, I saw that and ordered a roll. The Grizzly I used a while back is giving up the ghost.

John, be sure to clean the surface the tape will go on before using it. I used a general purpose cleaner, Windex or whatever I have handy. Some have taken a second step and wiped with isopropyl alcohol after initial cleaning. Not a bad idea but I never think of doing it.

This stuff is pretty much a "get it right the first time" tape. No pulling it off and straightening it out etc.

My tips for use:
  • Dirty dusty fingers work better than clean moist fingers for peeling the backing off
  • Peeling the tape off the backing versus the backing off the tape works best for me
  • Peel only a half inch of backing off at first, place that exposed tape over the area to be mended, smooth it out, then peel more backing off while applying more tape. This is an especially good process for tape lengths over 6 inches
 

jbeletti

Well-known member
REPAIR/UPGRADE: DC Power System and Monitoring

ABSTRACT
I’ve been having issues with my DC power system of late. The primary symptom is the hydraulic system isn’t working well. When it runs, something in the hydraulic area (motor, pump or ?) really grind - loudly! I believe the problem to be DC power related as I also lose DC power inside the coach during these hydraulic system issues. I have recently replaced both of my OEM batteries and while they were in need of replacement, by themselves, they were not the cure.

GOALS
  1. Improve DC power system by upgrading conductor sizes and replacing some circuit breakers
  2. Install a DC power monitoring system
BILL OF MATERIALS
PROJECT COST
~$600

PROGRESS
Project is 75% complete - time spent thus far is about 5 hours
4-6-Oct-2018
  • Replaced OEM batteries with 2 NAPA Group 27 12 Volt Deep Cycle Batteries (did this a week prior while in California)
  • Mounted red and black, 4 position power distribution bus bars (red will be used an an auxiliary positive bus)
  • Replaced OEM 2 AWG negative battery interconnection cable with better 2 AWG cable with better crafted terminals
  • Replaced OEM 2 AWG positive battery interconnection cables with two better 4 AWG cables with better crafted terminals (see to do list)
  • Replaced OEM 2 AWG negative and positive battery cables from battery to pass-through post of battery case lid with better 2 AWG cables with better crafted terminals
  • Mounted shunt for Victron BMV-712 battery monitor
  • Connected supplied small gauge red leads from Victron shunt to positive terminals of both batteries
  • Installed black 2 AWG cable from Victron shunt to negative bus bar
  • Installed black 2 AWG cable from Victron shunt to negative pass-through post of battery case lid
  • Installed positive leads to positive pass-through post of battery case lid for inverter, generator and positive bus bar*
  • There was a 50 amp Short Stop circuit breaker between the battery and the 12 volt disconnect. I replaced it with a large form factor 80 amp Bussman circuit breaker
  • Replaced hydraulic system 50 amp Short Stop circuit breaker with large form factor 80 amp Bussman circuit breaker
  • Replaced hydraulic system positive lead from breaker from 4 AWG to 2 AWG (plan to replace ground cable as well)
  • Installed 2 AWG cable from positive bus bar to new 80 amp circuit breaker for hydraulic system
  • In place of removed 50 amp Short Stop breaker for hydraulics, I installed a new 50 amp Short Stop breaker. I then removed the fuse holders of my two water pumps and placed those 2 pumps on this new breaker
  • Placed 1/4” split loom over Victron monitor cable
  • Pulled Victron monitor cable from battery bay to storage bay. Connected cable to shunt.
TO DO LIST
  • Order and install 36” black 2 AWG cable for hydraulic system negative lead from frame (replaces 4 AWG cable)
  • Order and install 24” red 2 AWG cable for battery interconnection (replaces doubled up 4 AWG cables)
  • Cut hole in switch panel for Victron battery monitor
  • Fish Victron monitor cable up wire chase and pull out hole
  • Connect cable to monitor and install monitor in hole
PICTURES
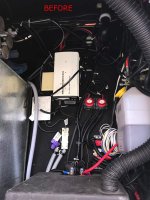
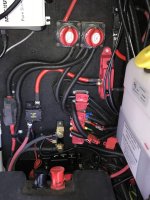
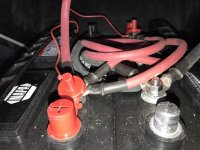
Before.jpg Upgraded Cables, Breakers and Battery Monitoring Shunt.jpg New Batteries and 2 AWG Cables.jpg

Victron BMV-712 Battery Monitor - Screen.jpg Victron BMV-712 Battery Monitor - Loosely Installed.jpg

LINK to more pictures.
 
Last edited:

jbeletti

Well-known member
Nice work Jim. Your hydraulic system should work flawlessly now.

Hoping so Jerrod. And so far, so good. Jacks are all running up and down fast with no issues at all. We hit the road on Monday for a 3-day drive to the AZ rally with the inverter on. We shall see :)
 

jbeletti

Well-known member
[/LIST]


Does your Newport already use a shunt?
Have you looked into the use of two shunts in line? Can it be done? EG, two different brands etc.

No shunt installed from factory. Haven’t considered 2 shunts.

It turned brr cold here yesterday afternoon. I’m talking - a switch was flipped and the wind picked up and temps dropped a lot! High temp today of about 50. Hope to get out there to complete the wire pulling for the battery monitor and install the monitor.

Based on reviews, I’m not expecting BT range to reach inside the truck cab. I may source or build a 3m RJ-12 jumper and install the monitor in the ODS propane cabinet in order to get the BT signal in the truck cab. I really would like to know, from the cab, the battery condition on long travel days.


Sent from my iPhone using Tapatalk
 

Dawnnira

New Jersey Chapter Leaders-Retired
Jim,
Does that mean you will have three batteries on board with the residential fridge? Can you tell me why and how going up to a 80amp breaker helps in this application? You mentioned auto reset, how will you know it tripped? Bare in mind I'm electrically challenged

Ira

Sent from my SM-G930V using Tapatalk
 

jbeletti

Well-known member
Jim,
Does that mean you will have three batteries on board with the residential fridge? Can you tell me why and how going up to a 80amp breaker helps in this application? You mentioned auto reset, how will you know it tripped? Bare in mind I'm electrically challenged

Ira

Sent from my SM-G930V using Tapatalk

Only 2 batteries. I replaced the 2 originals.

Current draw when running the hydraulics is very high. Some would say its outside the capacity of a 50 amp Short Stop breaker.

By increasing my wire gauge and breaker size, I should be able to get more power to my hydraulic system.

In terms of knowing when it trips, same as with the breaker that was there - power to hydraulics will stop flowing, breaker resets and you can try that slide or jacks again.

Spend some time with Duane at the next rally you see him at. He’s well versed in this sort of stuff and can educate you more on it.


Sent from my iPhone using Tapatalk
 

porthole

Retired
Current draw when running the hydraulics is very high. Some would say its outside the capacity of a 50 amp Short Stop breaker.

By increasing my wire gauge and breaker size, I should be able to get more power to my hydraulic system.


I solved all the hydraulic issues in the Cyclone by replacing all the cables with marine grade 2 AWG. Battery cables were 4/0, because I had that available.
Marine grade because I get it for a discount but also because it is similar to welding cable (high, fine strand count making for flexible wire)

- - - Updated - - -

No shunt installed from factory. Haven’t considered 2 shunts.

It turned brr cold here yesterday afternoon. I’m talking - a switch was flipped and the wind picked up and temps dropped a lot! High temp today of about 50. Hope to get out there to complete the wire pulling for the battery monitor and install the monitor.

Based on reviews, I’m not expecting BT range to reach inside the truck cab. I may source or build a 3m RJ-12 jumper and install the monitor in the ODS propane cabinet in order to get the BT signal in the truck cab. I really would like to know, from the cab, the battery condition on long travel days.


Sent from my iPhone using Tapatalk


Lyle M (Travelin2) is using the bluetooth monitor, he seems very pleased with it.

- - - Updated - - -

And of course you know, you can make that network capable so you will know your RV's status anywhere :cool:
 

travelin2

Pennsylvania Chapter Leaders-retired
Jim,
Does that mean you will have three batteries on board with the residential fridge? Can you tell me why and how going up to a 80amp breaker helps in this application? You mentioned auto reset, how will you know it tripped? Bare in mind I'm electrically challenged

Ira

Sent from my SM-G930V using Tapatalk

Ira, to eliminate power interruption to the hydraulic pump I did 3 things...
1-removed the hydraulic pump power lead from the buss bar 50A breaker.
2-replaced that 6 ga power lead with a 4 ga starter cable. Ran another 4 ga starter cable directly from batteries to a breaker to the hydraulic pump
3-installed an in-line 60A marine breaker
In short, my hydraulic pump is powered direct from battery bank. Marine breaker can also act as a cutoff switch to pump
No problems since


Sent from my iPhone using Tapatalk
 

jbeletti

Well-known member
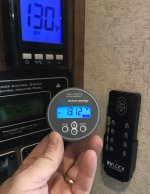
Got the Victron BMV-712 battery monitor installed this afternoon.

I need to read the docs to get it programmed. For now, I put in 105 AH and skipped everything else.

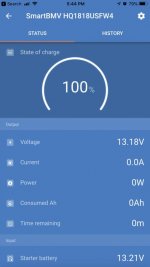
To my project post, I just added a picture of the monitor and a screen shot of the main page of the app.

AND - I took that screen shot from inside the house! So about 20 feet away and through 2 walls. This thing just may be readable from the truck cab. I’ll test tomorrow.
 
Last edited:

jbeletti

Well-known member
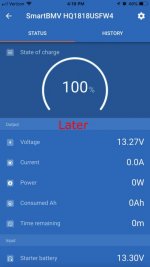
I did some testing with the Victron BMV-712 Battery Monitor.

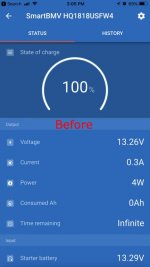
First, I checked the battery voltage prior to connecting the truck to the RV. Then I checked again after I connected them. No difference at all - solid at 13.26 volts.

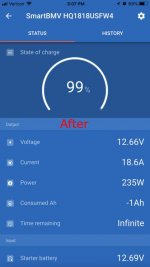
Then I took a screenshot of the battery state prior to retracting all 6 jacks using the Auto-Retract feature of LevelUp. Then I retracted all 6 jacks and took another screenshot. FInally, I looked at the app, maybe 15 minutes later and the battery voltage had recovered. I got a phone call before I could get a screenshot of the quick recovery, but took one an hour later. Here's the 3 images.

Before.jpg After.jpg Later.jpg

So, while I have yet to read the docs on this device and get it setup properly, I'm really digging it. And I LOVE being able to check the battery level from the house! Still hopeful to get a good Bluetooth signal from the device, in the truck cab while traveling down the road. Not optimistic - but hopeful :)

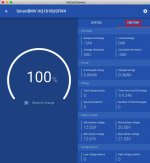
Edit: They have Windows and Mac apps! I downloaded the app for my Mac Powerbook. Below are some screenshots.

Mac Bluetooth Devices Screen.jpg
VictronConnect - Mac - Status Screen.jpg VictronConnect - Mac - History Screen.jpg
 
Last edited:

porthole

Retired
First, I checked the battery voltage prior to connecting the truck to the RV. Then I checked again after I connected them. No difference at all - solid at 13.26 volts.

View attachment 59647


Was the truck running? The Super Duty doesn't power the trailer connector if not running, unless the PCM programming has changed.

What is the "starter battery" on the bottom of the screen?
 
Top