jbeletti's 2015 Landmark 365 Ashland

jbeletti

Well-known member
My Mods: Laptop Power Supply Holder

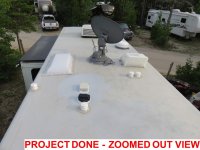
With the assistance of a friend (cookie), I installed two antennas on the roof of the RV. One is for 4G Cellular. The other is for WiFi. The Cellular antenna is from Panorama Antennas, supplied by WPS Antennas. The WiFi Antenna is actually a WiFi Repeater and is from WiFi Ranger, supplied by MITO Corporation.

The cellular antenna connects to my Verizon Jetpack and improves my received Cellular signal strength. This improved my cellular Internet speed and can make a marginal connection quite tolerable.

The WiFi Ranger is used mostly in campgrounds to receive their WiFi signal for Internet. It then creates it's own hotspot that all my Internet-capable devices can connect to. WiFi antennas built into laptops, cell phones and tablets are not always great when used indoors where the cellular service in the area is marginal. By increasing the received WiFi signal strength, you can improve your Internet connection / speed. In addition to the WiFi Ranger Sky on the roof, I also have a WiFi Ranger Go Repeater/Router indoors. The Go allows me to tether my Verizon Jetpack to it via USB. The Go also has Ethernet ports on it and I run a Network Switch on one port and a host of wired networked items connected to it.

Here's two completed project pictures:
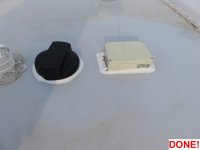
Cellular Antenna and WiFi Ranger Installations - 12.jpg Cellular Antenna and WiFi Ranger Installations - 13.jpg

Here's a LINK to more project pictures.
 

jbeletti

Well-known member
Re: My Mods: Added Entertainment System Equipment

Sometime back, I added an LED light strip (link to initial project) to my Switch Panel area so we could see the switches when we needed to activate something. At that time, I used an "on-hand" LED strip. Later, I upgraded that strip to one from Lowes - (I used 1 strip from this kit).

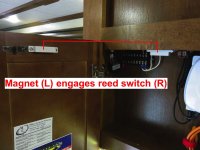
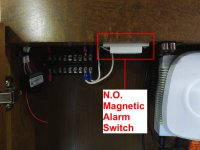
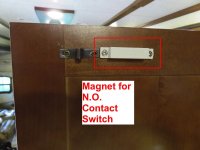
Today, I added a Normally Open Magnetic Reed Switch. The switch mounts to the upper cabinet stile and the magnet mounts to the inside of the cabinet door. Like any switch, you interupt power to the light with a switch. I used the DC positive lead.

I sourced this switch from MCM Electronics - $3.49 - LINK.

Here's the project pics:
Magnetic Switch to control Switch Panel LED Lights - 01.jpg Magnetic Switch to control Switch Panel LED Lights - 02.jpg Magnetic Switch to control Switch Panel LED Lights - 03.jpg

Click the image below for a video showing the light switch operation:
switch_video_icon.jpg
 

Jesstruckn/Jesstalkn

Well-known member
Nice job Jim
Let me know how good the WiFi antenna booster works for you...
Whats on the inside of the coach ?
Did you have to drill down through the rubber roof.

Sent from my XT1254 using Tapatalk
 

jbeletti

Well-known member
Nice job Jim
Let me know how good the WiFi antenna booster works for you...
Whats on the inside of the coach ?
Did you have to drill down through the rubber roof.

Sent from my XT1254 using Tapatalk

Jerrod - I've used this same WiFi Ranger before - it's works well at picking up a stronger WiFi signal from those available.

Yes - I did drill through the roof. Don't drill through the rubber though - always cut it out, then drill through the decking. Otherwise, the drill bit will catch the rubber and it will be a bad day. Once I had a hole the size I needed through the roof deck, I used a long 1/2" bit to go through the rest of the roof and the interior roof decor board. I plugged the hole at the top with a paper towel and filled it with Dicor.

What's on the inside of the coach? That's a loaded question :) I'll try to summarize...

In a space above the switch panel:
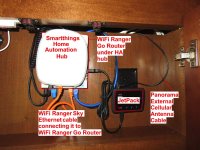
- Verizon Jetpack
- WiFi Ranger Go Router (tethered via USB to the Jetpack and via Ethernet to the WiFi Ranger Sky on the roof)
- Smartthings Home Automation Hub (Ethernet to Router)

In the center cabinet above the Livingroom TV:
- Netgear network switch (connected via Ethernet to the WiFi Ranger Go Router)
- DirecTV DVR (Ethernet to switch)
- Apple Time Capsule (Ethernet to switch)
- Roku 3 (Ethernet to switch)
- Mac Mini for storage of my own digital media (Ethernet to switch)

On the shelves behind the Livingroom TV:
- HP Printer (teeny OfficeJet 100) (USB to Time Capsule - making printer wireless)
- Samsung BlueRay Player (relocated from upper cabinet)
- 4x1 HDMI Switcher

Under Rear Cap Cabinet:
- Small Dome IP Camera (Ethernet to switch)*

*Camera has not been reinstalled in this coach but wiring is run
 

porthole

Retired
Yes - I did drill through the roof. Don't drill through the rubber though - always cut it out, then drill through the decking. Otherwise, the drill bit will catch the rubber and it will be a bad day. Once I had a hole the size I needed through the roof deck, I used a long 1/2" bit to go through the rest of the roof and the interior roof decor board. I plugged the hole at the top with a paper towel and filled it with Dicor.

And on a Cyclone - the drill bit will catch the BAT insulation. Cyclones do not have the styrofoam insulations like the non toy haulers.
 

jbeletti

Well-known member
Would a 1/2" (or any size needed) hole punch work to cut through all of that before you drill ??

Sent from my XT1254 using Tapatalk

I needed 3/4" on top, but I suppose a sharp punch used in a cutting way could get through the membrane. But a utility knife is much easier.

If you're actually asking about using a punch through the entire thickness of the roof - I wouldn't try that approach.


Sent from my iPhone using Tapatalk
 

jbeletti

Well-known member
Re: My Mods: Laptop Power Supply Holder

Below is an annotated and edited image of the gear that the antennas connect to.

Telecom Gear.jpg
 

Jesstruckn/Jesstalkn

Well-known member
Thanks that helps
Now where is that cabinet ? I don't think I have that space.
fc4e9a2eea3fe7f41fb9610e69f98ec7.jpg


Sent from my XT1254 using Tapatalk
 

jbeletti

Well-known member
Re: My Mods: Permanent Gate Valve added at Sewer Outlet

Jerrod - in the space just above the switches, during my build, I had Heartland push that space back into the chase behind it. This gave me about 3" of depth to mount stuff.

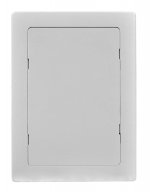
If you wanted to do the same, I suggest you use a utility knife and carefully cut that some portion of that luan out and make a boxed space for mounting of stuff. As you've already learned, that chase back there is really handy for accessing wiring and adding more. Once you open it up near the top, you can access the interior portion of the roof to pull antenna wires down through :) Another idea is to add an Oatey Access Panel to the space.

34053.jpg
 

jbeletti

Well-known member
My Mods: Wireless Backup Camera - mainly for bikes

UPDATE: 26-SEP
-----------------------------------------
Today I installed the Voyager Wireless Receiver and attendant cables (power, audio and video). It's ALIVE!

I shorted the DC+ pin of the 7-wire harness on the RV to the running lights pin to power the running lights and by extension, the Voyager Wireless Backup Camera.

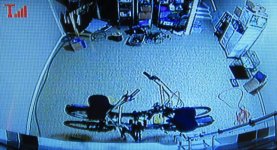
Back in the cab of the truck, I powered up the Voyager Wireless Receiver and the GERMID Rearview Mirror / Monitor. I immediately saw the output screen of the receiver stating to hit the PAIR button. Before I could do that, I was seeing the back of the RV! I guess they pair the camera (TX) with the receiver prior to shipment.

I'll need to read through the Mirror / Monitor docs again to get the hang how best to power the mirror, when to press what button etc.

The mirror / monitor and the Voyager Wireless Receiver are both being powered from a power distribution block I sent to my upfitter to install when he built the truck. I have it programmed to keep anything connected to it - for 60 minutes.

Below are a few pictures:
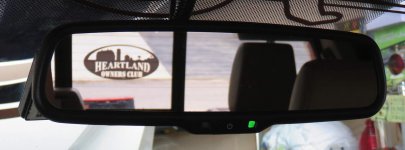
Backup Camera - Wireless Receiver - 01.jpg Backup Camera - Image on Monitor.jpg Backup Camera - Monitor - Monitor Mode.jpg Backup Camera - Monitor - Mirror Mode.jpg

Still to do:
1. Test system while driving at highway speeds
2. Get audio from receiver, connected to Ford head-unit Aux-In
3. Install a hitch camera on the headache rack and route to second video input on mirror / monitor


UPDATE: 23-SEP
-----------------------------------------
I received and installed the GERMID 4.3 inch Car Rear View Mirror Monitor. Wow - this is a great mirror. Unsure how good a monitor it is. Maybe tomorrow.

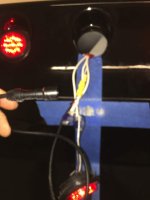
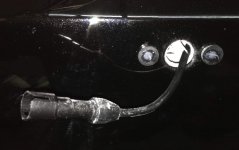
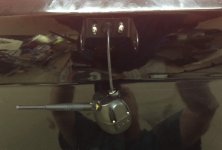
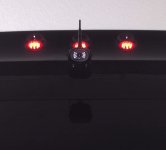
I received Voyager Digital Wireless Camera and Receiver System and installed the camera. Tomorrow, I hope to install the wireless receiver and test the system. As the camera is wireless (audio and video), I only needed to wire it into 12 volt DC power. I decided to keep this simple and tap into the clearance light circuit. It's my plan to move this camera to the next couple of demp coaches.

Below are a few pictures of the camera install and here's a link to all the project pictures.
Backup Camera - Spliced Camera Power Harness to Center Clearance Light.jpg Backup Camera - Well Nuts Installed and Camera Power Harness Routed.jpg Backup Camera - Camera Power Harness Grommet and Camera Bracket Installed.jpg Backup Camera - Camera Installation Complete 02.jpg


UPDATE: 19-SEP
-----------------------------------------
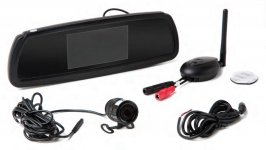
Okay, so the item I ordered below from Rearview Safety did not work out for my use case. I could not maintain connectivity and when I had it, the image quality was not what I was looking for.

I have since ordered:
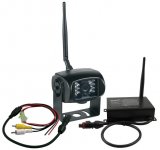
  • Voyager Digital Wireless Camera and Receiver System (WVRXCAM1) link
    Note: this product was supplied to me by the manufacturer for demo purposes
WVRXCAM1.jpg


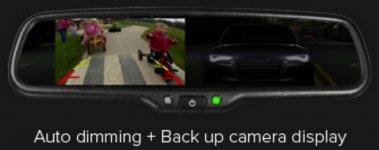
  • GERMID 4.3 inch Car Rear View Mirror Monitor with Auto-Dimming and No. 1 Mounting Bracket (AK-043LAD1) link
    Ordered direct from Chinese manufacturer
AK-043LAD1.jpg

The Voyager wireless system is 1 of 4 wireless systems I've used in the past and it was the best of the bunch. Hoping to get it installed in the next few weeks, if the the monitor arrives from China before I leave home on the next trip.

I'll document the project here.


7-SEP
-----------------------------------------
We've ordered two "Day 6" crank-forward, semi-recumbent bicycles and I'm planning to have a hitch made for the Landmark that bolts-on and can be moved from coach to coach. I'll be using Jeff Damude's design as inspiration.

I sort of want to "keep an eye" on the bikes while we are on the move and when backing. I want to add a backup camera system that I could also move from coach to coach.

I do not want to add another monitor to the cab of my truck and actually considered using an IP camera that would have allowed me to see the camera from my dash mounted iPad.

In the end, I ordered a cheap camera and replacement rearview mirror with built-in receiver and monitor. I generally do more research than this but I'm sort of under-the-gun timewise on all of this, so what I ordered may be the test system that gets sold and upgraded :)


ITEM RETURNED >
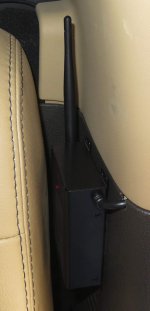
I ordered this system from Rearview Safety. Their external transmitter, like most, is not weatherproof. As such, my plan is to mount it in the center cabinet above the rear window in the rear cap. I plan to power it from the running lights circuit. They are including some sort of antenna extender that will allow me to mount the antenna externally. This will give me a fighting chance at receiving a signal to the receiver built into the rearview mirror.

We shall see how this goes :) I'll document it in this post after I receive the equipment and do the install.

rearview_camera_system.jpg< ITEM RETURNED!
 
Last edited:

Jesstruckn/Jesstalkn

Well-known member
Re: My Mods: Permanent Gate Valve added at Sewer Outlet

Jerrod - in the space just above the switches, during my build, I had Heartland push that space back into the chase behind it. This gave me about 3" of depth to mount stuff.

If you wanted to do the same, I suggest you use a utility knife and carefully cut that some portion of that luan out and make a boxed space for mounting of stuff. As you've already learned, that chase back there is really handy for accessing wiring and adding more. Once you open it up near the top, you can access the interior portion of the roof to pull antenna wires down through :) Another idea is to add an Oatey Access Panel to the space.

View attachment 39736
That's what I was thinking.
How tall are your cupboard doors ? Are they special order ?
Do you have a pic of them ?

Sent from my XT1254 using Tapatalk
 

Jesstruckn/Jesstalkn

Well-known member
Re: My Mods: Wireless Backup Camera - mainly for bikes

THIS POST IS A PLACEHOLDER

We've ordered two "Day 6" crank-forward, semi-recumbent bicycles and I'm planning to have a hitch made for the Landmark that bolts-on and can be moved from coach to coach. I'll be using Jeff Damude's design as inspiration.

I sort of want to "keep an eye" on the bikes while we are on the move and when backing. I want to add a backup camera system that I could also move from coach to coach.

I do not want to add another monitor to the cab of my truck and actually considered using an IP camera that would have allowed me to see the camera from my dash mounted iPad.

In the end, I ordered a cheap camera and replacement rearview mirror with built-in receiver and monitor. I generally do more research than this but I'm sort of under-the-gun timewise on all of this, so what I ordered may be the test system that gets sold and upgraded :)

I ordered this system from Rearview Safety. Their external transmitter, like most, is not weatherproof. As such, my plan is to mount it in the center cabinet above the rear window in the rear cap. I plan to power it from the running lights circuit. They are including some sort of antenna extender that will allow me to mount the antenna externally. This will give me a fighting chance at receiving a signal to the receiver built into the rearview mirror.

We shall see how this goes :) I'll document it in this post after I receive the equipment and do the install.

View attachment 39800
Nice
I'm afraid I wouldn't be able to see that though. I can't read my gauges without my glasses and can't see the road with them. LOL
So I need big screen
And I do want to do something soon to watch the bikes also.
I bought the XC hitch or bumper mount bike rack from Camping World. I found it on sale a few months back.
It is so much easier to use then anything I've use in the past and you can lock the latches with a small padlock.
It is adjustable but your new bikes look long. If you need and measurements on it let me know.
edfafd729b9e2cdc60e09bc6a9a3a5e9.jpg

819e99b262e5b3f7cee17338ec4293a3.jpg

As you can see I had to make a new tube 30" long and welded the threads inside to be able to use the mounting bolt that secures the tube into the hitch and keep it from bouncing around.
c4011c6e14e5d5017336cfa4205f2b1c.jpg
1345bea5e1881a40dcb839bdf937b035.jpg
79f49835ba4eb54e0eb6c2a87b279a0f.jpg


Sent from my XT1254 using Tapatalk
 

Jesstruckn/Jesstalkn

Well-known member
Re: My Mods: Wireless Backup Camera - mainly for bikes

I will have to try my Gopro in the back window hooked to the Ipad. I wonder how far it will reach ?
 

Bones

Well-known member
Re: My Mods: Wireless Backup Camera - mainly for bikes

I will have to try my Gopro in the back window hooked to the Ipad. I wonder how far it will reach ?
I think the best way to know if you lost something is to watch all the cars swerve behind you then start swinging and flailing arms at you as they drive by.
 

jbeletti

Well-known member
Re: My Mods: Permanent Gate Valve added at Sewer Outlet

Jerrod - I will get back to you with a picture of my cabinet and length of the doors.

In terms of the bike rack, I'm leaning towards the Swagman SEMI 4.0.

You're right - our bikes are long - 52" wheelbase. The wheel holders area adjustable - same as on your rack. One difference on the SEMI 4.0 is that the rachet arms clamp down on the tire/wheel and not the frame.

Day 6 has found that arms clamping down on the frame, eventually wear the paint. They are a Swagman dealer and have a SEMI 4.0 on order and will get back to me with their feedback in a week or so on it's suitability for their bikes.

One of my neighbors is quite the fabricator and I met with him today to discuss making me a hitch. He's in. He'll be taking measurements today and will make it in a couple weeks for me. I may have to have him make me an extension bar so I can work around the ladder - though with my Swagman XTC many years ago, I was able to slide the inside bike to the left and clear the ladder. I won't have much wiggle room with these long bikes though.

Thanks for your pics and thoughts. Discussions like this really make this forum a relevant resource for RVers as we share experiences and help each other out :)
 

Jesstruckn/Jesstalkn

Well-known member
Jim... You have a nice rack. LOL
I also have a skinz bike cover to go over both bikes and it fits between the tail lights without blocking them. Moving things to the left would be nice to not clime over to get up the ladder but make sure you don't block the tail light.
I can't find any pictures of mine with the bikes and cover on it.
I'll take some next week when I get it back from the detail shop. Doing the Cilajet on it Wednesday
f38df73e87a896aca4d9b1d3b0603cbd.jpg


Sent from my XT1254 using Tapatalk
 
Last edited:

Bones

Well-known member
Jim... You have a nice rack. LOL
I also have a skinz bike cover to go over both bikes and it fits between the tail lights without blocking them. Moving things to the left would be nice to not clime over to get up the ladder but make sure you don't block the tail light.
I can't find any pictures of mine with the bikes and cover on it.
I take some next week when it gets back from the detail shop. Doing the Cilajet on it Wednesday

I'd post a nice rack but I might get in trouble
 
Last edited by a moderator:
Top