jbeletti's 2015 Landmark 365 Ashland

Jesstruckn/Jesstalkn

Well-known member
Re: Mod: Relocated 2 Ceiling Lighting Switches

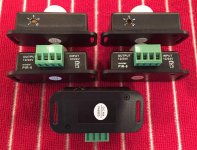
They look nice. I killed my battery one under the sink So I may follow your lead here and add one with motion. I have 12 volt access right on the other side of my sink cabinet. What was the wire Jim B suggested using for running most 12 volt projects? Oh by the way I just picked up new gas struts to get rid of my 2 stage struts on my basement door.
Dave the wire we're using is roll's of 18-4 and 18-2 speaker wire and I also have been using a lot of 16-2 wire
e66ad404a2dbdcc9cd7651d29149ceea.jpg

1dfa5c93e81d3f7a89da2e3176c0b6ff.jpg


Sent from my XT1254 using Tapatalk
 

Gtoli

Well-known member
Yes Jim that is the one's I'm using. They are awesome, easy to install and fairly sensitive. So any human motion sets the off. "Or ON for that matter".
I'm going to do my control panel next. And get rid of the battery operated one. It's getting dim and temperamental.
The good thing with the motion lights is your moving around working in there the light will stay on until you close the cabinet or leave the area. You could leave the doors open and leave the area, the light will time out.
Highly recommended by me.

Sent from my XT1254 using Tapatalk

I'm thinking one of these would be good for the lights in the garage of my Cyclone.
 

Jesstruckn/Jesstalkn

Well-known member
Absolutely ... Install them anywhere that when your in that area you would want the lights on. And actually I've been doing all of mine to a switch so you could override it if you want them off

Sent from my XT1254 using Tapatalk
 

JBoyerinAbq

Active Member
Jerrod,

I decided your accent light concept was the best so I purchased a matching light and wall switch from Heartland. I plan to mount the light a foot or so about the switches - I think it will work perfectly. I have a follow-on question for you. I bought a wall switch just in case I needed it. Ideally, I'd like to just wire it to the outside steps switch as I always turn that on at night. I know I could tap there but where best to ground the light? Would it be ok to just use the ground on the water heater switch or somewhere else?

Also - thanks for the pic of your dining table mount. My new one arrived. Mine was actually screwed in with 8 screws - a mother to get the back two off. The new one didn't have predrilled holes but there is no option for placement so mounting will be no issue.

jeff

- - - Updated - - -
 
Last edited by a moderator:

jbeletti

Well-known member
Re: MOD: Water Filtration and Reverse Osmosis System

They're heeeeerrrrr....

FullSizeRender 177.jpg

$25.45 for all 5 - delivered. Thanks for the heads-up Jerrod. Going on vacation on Friday for a couple weeks. Will come up with some mods to use these on this summer.
 

jbeletti

Well-known member
MOD: Pepwave Max BR1 Router w/ Embedded 3G/4G Modem - Installation

Plan
Replace WiFi Ranger (WFR) Sky (outdoor radio) and Go (indoor radio and router) products as well as Verizon JetPack with a Pepwave Max BR1 Router with Embedded 3G/4G Cellular Modem

Reason for doing Mod
While I've used the WiFi Ranger product for several years, my level of success and satisfaction with it have not met my satisfaction. My equipment was older and began to operate a bit wonky after recent firmware updates. This affected connectivity and reliability and became very frustrating. Additionally, with the latest firmware and with the current Verizon JetPack, I lost my ability to USB tether the JetPack to the WiFi Ranger "and" keep the JetPack charged. I could charge only or tether only. This was a no-go for me. And finally, it was time to open my mind to other brands and products.

Goals
Consolidate the number of items from 3 (external WFR, internal WFR router and Verizon JetPack cellular modem) to 1 (an all-in-one solution). Regain a high level of WAN uptime.

Equipment
  • Pepwave Max BR1 Router with Embedded Cellular Modem (includes GPS antenna, AC-DC power supply and short indoor cellular and WiFi antennas)
  • DC-DC power supply
  • Adapter so I can use an existing external cellular antenna
  • SIM adapter to adapt my existing Verizon "nano" SIM to a "full-size" SIM
  • Panorama Low Profile MIMO external cellular antenna (existing)
Sponsors
3GStore.com: Pepwave Max BR1 Router (and accessories)
WPSAntennas.com: Panorama Antenna (and coax extension)

Installation
  1. I first needed to remove the WFR Go Router. Simple process of unplugging DC power, Ethernet cables and lifting it off mounting screws, removing the mounting screws. I am deferring the removal of the external WFR radio unit to a later date
  2. To Pepwave Max BR1, add small indoor WiFi antenna, add one small indoor Cellular antenna to Cellular Aux port, add adapter to Cellular antenna Main port
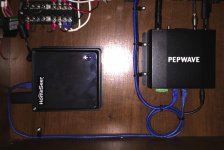
  3. Install Pepwave Max BR1 to inside of cabinet using 4 small wood screws
  4. Connect previously installed external (roof) Panorama MIMO low-profile Cellular antenna to adapter on Cellular antenna Main port
  5. Connect Ethernet cables into Pepwave Max BR1 LAN ports: One from Homeseer Home Automation Controller and one from NetGear 8-port Network Switch
  6. Connect DC-DC (cigarette lighter style plug to coaxial power plug - from 3GStore) power supply to Pepwave Max BR1
Pictures
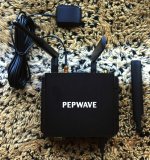
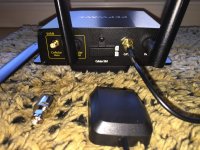
Pepwave BR1 Max - Top.jpg Pepwave BR1 Max - Back 2.jpg Pepwave BR1 Max - Back 1.jpg Pepwave BR1 Max - Front.jpg Pepwave BR1 Max - Installed.jpg

Max BR1 Screen Shots
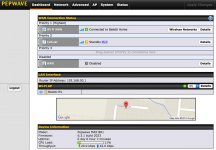
Pepwave BR1 Max - SOTG - Dashboard.jpg

Usage Experience
As of 11-Jun-2016, my only experience is installing the Verizon SIM, installing the Max BR1 in the RV, configuring Dynamic DNS, configuring DHCP range and starting to explore with all the screens to get comfortable with the unit.

The Dynamic DNS is reporting my WAN IP to my DDNS host (dyndns.org). This allows me to remotely access the Max BR1 and by extension, clients connected to it, such has my Home Automation system, IP Cameras etc.

The DHCP range is working by automatically assigning local IP addresses to my local client devices, within the range I chose. This allows me to manually assign permanent IP addresses to certain client devices outside of the DHCP range.

The GPS feature is pretty cool but with one temporary drawback in my installation. The feature allows me to remotely track the vehicle the Max BR1 is installed in. As the Max BR1 is installed in the center of the RV, the supplied GPS antenna cannot see the GPS satellites. As such, it cannot get a position fix. My solution will be to replace the Panorama MIMO antenna with one that has a GPS antenna built into it in addition to dual cellular and WiFi antennas. I will likely wait to do this on the next coach on May 2017.

WiFi for WAN feature: I've set this as my 1st WAN priority. By doing so, I am favoring WiFi networks as my top method for connecting to the Internet. There's a handy Scan button where I can scan for available WiFi networks. My initial scan (at home) revealed many neighborhood WiFi networks. I easily connected to my own home WiFi network and was presented with a password input box. Password was accepted and the Max BR1 immediately connected to my home WiFi network. Initial speed testing from a WiFi connected laptop show significant speed reduction through the Max BR1. I tested about 60 MBPS download speed on my laptop directly connected to my home WiFi network. This was reduced to about 15 MBPS when my laptop was connected to the Max BR1 WiFi network that was connected to my home WiFi network. So initially, this is disappointing. I will work with the 3GStore support team to see if this can be improved upon through router settings.

Cellular for WAN feature: I've set this as my 2nd WAN priority. By doing so, my hope is that when I lose my first priority connection (WiFi) to the Internet, that the Max BR1 will automatically fail-over to the Cellular connection. I have not yet tested this feature but I have used the Max BR1 Cellular Internet connection and it worked well. I have not performed speed tests on the cellular connection but it is on my work list to do.

Recap
So far, I am pleased:
To have reduced my equipment count from 3 to 1
To have eliminated the USB tethering issue by use of the embedded cellular modem
To have successfully configured and tested DDNS service
To have successfully connected client devices to the Max BR1 via Ethernet and WiFi

I'll be heading out on a 2-week trip starting 12-Jun-2016 and hope to learn more about this product. As I do, I will add to this post.
 

danemayer

Well-known member
Re: My Mods: Water Pump Switch and Status LED Project

Jim,

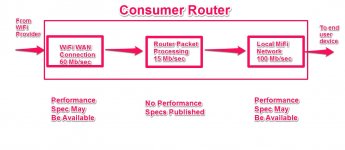
I'll be interested in whether the 3GStore has any ways to improve performance throughput. My guess is that there's probably delay staging the packets as they go through the router and are re-transmitted on the local MiFi. I've never seen consumer router manufacturers publish any specs on packet handling speeds. They typically talk about the speed of the connection between the MiFi output and the end user device.
Router Performance.jpg
 

Jesstruckn/Jesstalkn

Well-known member
You guy's are getting way too technical for me.
I want it !!! Do they have a plug and play version, for us technology challenged folks out here ?

Sent from my XT1254 using Tapatalk
 

jbeletti

Well-known member
You guy's are getting way too technical for me.
I want it !!! Do they have a plug and play version, for us technology challenged folks out here ?

Sent from my XT1254 using Tapatalk

Jerrod - other than not having a 5 GHz WiFi band, so far this Pepwave Router is pretty cool.

As for plug and play, it nearly is my friend. You do not need to define the DHCP range. You do not need to configure DDNS.

All you need to do is screw on the antennas, pop in your SIM and plug it into power.

Then a couple of quick settings and done.
 

Bones

Well-known member
Re: Mod: Relocated 2 Ceiling Lighting Switches

Jim,

As usual awesome. Sometimes routers slow down because they can't switch an older device to another channel as easily and they can only go as fast as the slowest device. I know. This happens when you have newer equipment and older equipment mixed in. Just a thought

Dave
 
Re: MOD: Pepwave Max BR1 Router w/ Embedded 3G/4G Modem - Installation

WiFi for WAN feature: I've set this as my 1st WAN priority. By doing so, I am favoring WiFi networks as my top method for connecting to the Internet. There's a handy Scan button where I can scan for available WiFi networks. My initial scan (at home) revealed many neighborhood WiFi networks. I easily connected to my own home WiFi network and was presented with a password input box. Password was accepted and the Max BR1 immediately connected to my home WiFi network. Initial speed testing from a WiFi connected laptop show significant speed reduction through the Max BR1. I tested about 60 MBPS download speed on my laptop directly connected to my home WiFi network. This was reduced to about 15 MBPS when my laptop was connected to the Max BR1 WiFi network that was connected to my home WiFi network. So initially, this is disappointing. I will work with the 3GStore support team to see if this can be improved upon through router settings.

With WiFi WAN you'll always see some form of speed loss. The loss can be minimal or fairly significant. The first reason for the speed loss is physical distance. The farther you are away from the source access point, the greater the speed loss. Second is the fact that the BR1 has a single WiFi radio. The one radio is doing the job of a client on the source network, and also rebroadcasting your new network. Because of the distance and the extra wireless hops, you'll get that loss. 3Gstore wrote an article which I'll link below that covers WiFi WAN pros and cons, and some tricks to help you get the most out of the connection.

http://www.evdoinfo.com/content/view/4480/64/

Feel free to contact our support fore more info.
 
Top